Table of Contents >> Show >> Hide
- Why Paper Butterflies Never Go Out of Style
- Supplies You’ll Need (and What You Can Sub in a Pinch)
- Pick Your Butterfly Style
- Option 1: The Classic One-Sheet Origami Butterfly (Beginner-Friendly)
- Option 2: The Accordion-Fold Paper Butterfly (Perfect for Kids + Party Decor)
- Option 3: The Layered 3D Paper Butterfly (Fancy-Looking, Still Easy)
- Paper Choices That Actually Matter (Yes, Even “Just Paper”)
- Pro Tips for Crisp Folds and Symmetry
- Common Problems and Quick Fixes
- Fun Variations (Because Butterflies Don’t Do ‘Boring’)
- Conclusion
- Real-World Crafting Experiences: What Making Paper Butterflies Feels Like (and Why You’ll Keep Making “Just One More”)
- SEO Tags
If you’ve ever looked at a plain sheet of paper and thought, “You could be a butterfly, you just don’t know it yet,”
you’re in the right place. Paper butterflies are one of those magical crafts that are cheap, fast, and wildly
satisfyinglike making a snack, but less likely to disappear immediately.
In this guide, you’ll learn three reliable ways to make a paper butterfly:
a classic one-sheet origami butterfly, a kid-friendly accordion-fold butterfly, and a
layered 3D butterfly that looks like it belongs in a fancy craft store display (but it’s secretly still paper).
Along the way, I’ll share tips on paper choices, crisp folds, and how to fix the most common “why does mine look like a crumpled tortilla” problems.
Why Paper Butterflies Never Go Out of Style
A paper butterfly is basically craft-world confetti: it shows up everywhere and instantly makes things feel more cheerful.
You can use paper butterflies for party décor, wall art, gift wrapping, garlands, mobiles, scrapbook accents, classroom activities,
or just as tiny reminders that you can make something pretty out of almost nothing.
Supplies You’ll Need (and What You Can Sub in a Pinch)
Your supplies depend on which butterfly style you choose, but here’s the greatest-hits list.
I’ll include “nice-to-have” tools and “no judgment” substitutes.
Core supplies
- Paper (origami paper, scrapbook paper, printer paper, construction paper, tissue papereach has its moment)
- Scissors (for template and accordion styles)
- Glue (glue stick for light paper, craft glue or hot glue for décor projects)
- Optional: pipe cleaners or thin craft wire (for bodies and antennae)
Nice-to-have tools (but not required)
- Ruler + pencil (for measuring strips or making templates)
- Bone folder or the edge of a credit card (for crisp folds)
- Scoring tool (helps accordion folds look clean and consistent)
- Beads (for a cute “body” and extra sparkle)
Pick Your Butterfly Style
Different paper butterflies shine in different situations. If you want “no cutting, just folding,” go origami.
If you’re crafting with kids or decorating a wall, accordion is your best friend.
If you want a more “art piece” look, layered 3D is the move.
Option 1: The Classic One-Sheet Origami Butterfly (Beginner-Friendly)
This is the go-to answer for how to make a paper butterfly with minimal supplies:
one square sheet of paper and a few minutes. Origami paper is great, but don’t let that stop youthin wrapping paper,
old book pages, music sheets, and even newspaper can work for practice.
Best paper for this method
- Recommended: a square sheet around 6×6 inches (great for beginners)
- Fun upgrade: patterned paper for instant “wow”
- Pro tip: if your paper has a white side and a colored side, start with the white side facing up so the finished butterfly shows color
Step-by-step: easy origami butterfly
- Start with a square sheet. Place it color-side down if you want the butterfly’s “top” to be patterned or colorful.
- Make guiding creases. Fold in half horizontally, unfold. Fold in half vertically, unfold. You’re creating a plus-sign crease map.
- Add diagonal creases. Fold corner-to-corner one way, unfold. Repeat the other diagonal, unfold. Now you have an “asterisk” of creases.
-
Bring corners toward the center (lightly at first). Fold each corner inward toward the center point to form small triangular flaps,
then unfold if your model calls for itthese creases help later shaping. -
Collapse into a base shape. Using your existing creases, gently press the paper into a flat triangle/diamond-like base.
Don’t force itorigami is more “persuasion” than “wrestling.” -
Create the wing structure. Fold side edges toward the center line to create neat flaps, then open and flatten sections as directed.
This is where your butterfly starts to look less like geometry homework. - Form the body. Fold the model in half and adjust the narrow center area so the body is defined.
- Shape the wings. Gently spread the wings and add a slight bend along the body so the butterfly looks lifted, not flat.
- Final tweak. If it looks lopsided, don’t panicsmall adjustments (and better crease accuracy next time) make a big difference.
Origami success tips
- Crisp folds matter: press firmly enough to set a crease, but not so hard you tear the paper.
- Practice with scrap paper before using your “special” paper.
- Go tiny for fun: once you get the hang of it, try smaller squares for mini butterflies that can perch on plants or gifts.
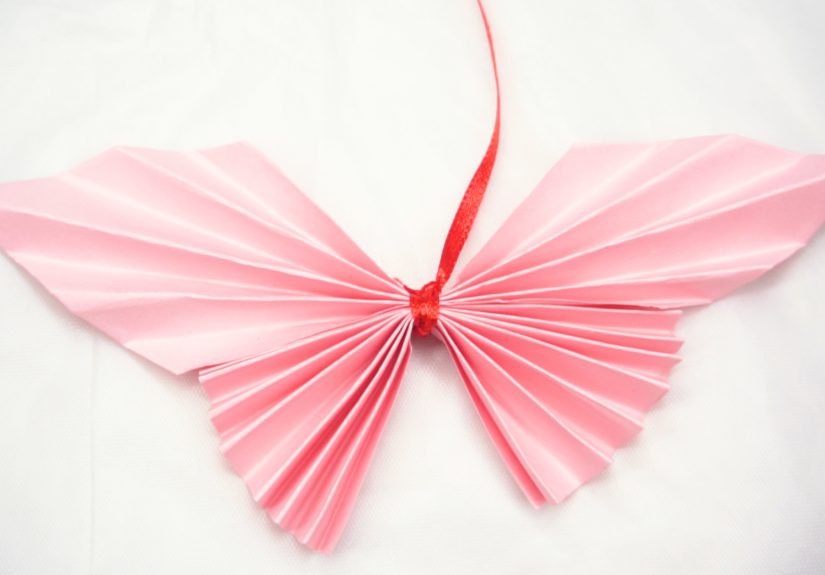
Option 2: The Accordion-Fold Paper Butterfly (Perfect for Kids + Party Decor)
If you want an easy paper butterfly craft that looks great in a group (garlands, mobiles, wall clusters),
accordion folding is the MVP. You can use cardstock for structure or lighter paper for a floaty look.
Paper selection that saves your sanity
- Cardstock: sturdy wings that hold shape well
- Vellum or patterned paper: elegant, delicate wings
- Avoid: glitter paperit often cracks right along the folds (rude, honestly)
Method A: Two-piece accordion butterfly (classic)
- Cut two paper pieces (one for top wings, one for bottom wings). The top piece is usually larger.
- Accordion fold each piece into even pleats. (Scoring first helps, but you can fold carefully by hand.)
- Stack the folded pieces so the larger one sits above the smaller.
- Pinch the center tightly and wrap with a pipe cleaner or thin craft wire to form the body.
- Shape antennae by twisting the ends upward. Add beads if you want a cute “body.”
- Fan out the wings and fluff the folds until it looks symmetrical.
Method B: Tissue paper butterfly (extra floaty)
Tissue paper makes wings look airy and full, especially when you gently separate layers.
This style is excellent for spring décor, classrooms, and mobiles.
- Cut tissue squares (for example, 3×3 inches; adjust bigger for larger butterflies).
- Stack multiple layers of tissue to make fuller wings.
- Accordion fold diagonally from corner to corner.
- Pinch at the center and twist a pipe cleaner around it.
- Separate layers gently to “puff” the wings and add volume.
Example project: a butterfly garland
Want décor that screams “spring party” without screaming at your wallet? Make a garland:
trace butterfly shapes using a template (even a cookie cutter can help keep shapes consistent),
cut them out, fold each one lengthwise, and hot-glue them back-to-back around twine every few inches.
Suddenly you have whimsical butterfly bunting with suspiciously high “I totally bought this” energy.
Option 3: The Layered 3D Paper Butterfly (Fancy-Looking, Still Easy)
If you’ve ever seen a wall decorated with 3D butterflies that look like they’re mid-flight,
this is the style. You can cut multiple layers, stack them, and gently bend the wings upward for dimension.
It’s also a great way to use scrapsbook pages, script paper, patterned leftovers, you name it.
How to make a layered 3D butterfly
- Choose a butterfly template (or draw one). Make 2–3 sizes for a layered look.
- Trace and cut each butterfly shape from coordinating papers.
- Stack the layers from largest on the bottom to smallest on top.
- Attach only the “body” area with glue (leave the wings free so they lift).
- Shape the wings by curling them slightly upward with your fingers or a pencil.
- Mount for display using removable adhesive if you’re doing wall art, or glue onto cards and gift tags.
Elegant display idea: “specimen” style wall art
For a dramatic look, print or trace butterfly shapes, cut them out neatly, and mount them on a dark background.
If you want strong contrast, you can adhere the butterfly print to black paper and cut it out cleanly.
This creates that curated “cabinet of curiosities” vibeminus the museum security guard.
Paper Choices That Actually Matter (Yes, Even “Just Paper”)
Paper isn’t just paper when you’re folding. Thickness, finish, and fiber all change how your butterfly behaves.
Here’s how to choose without turning this into a doctoral thesis in Stationery Science.
Quick paper guide
- Origami paper: thin, crisp folds, perfect for detailed models
- Printer paper: accessible and fine for practice; a bit stiff for tiny folds
- Scrapbook paper: great patterns; thickness variestest fold before committing
- Cardstock: best for accordion wings and garlands; too thick for many origami models
- Tissue paper: soft, airy, great for layered “fluffy” wings
- Glitter paper: pretty but often cracks on tight folds (use for cut-out styles instead)
Pro Tips for Crisp Folds and Symmetry
- Fold, then sharpen: make the fold lightly first, align edges, then press the crease firmly.
- Use a flat edge: a bone folder, ruler edge, or old gift card helps clean up creases.
- Work on a hard surface: couch cushions are great for naps, terrible for precision folding.
- Match both sides: if you fold one wing, repeat immediately on the other side while your hands remember what they did.
- Don’t over-crease delicate paper: too much pressure can tear thin sheets or leave shiny “stress marks.”
Common Problems and Quick Fixes
“My butterfly looks uneven.”
Usually this comes from small alignment errors early on. For origami, redo the base creases carefully.
For accordion butterflies, make pleats the same width and pinch the center exactly in the middle.
“My folds keep popping open.”
Use slightly thicker paper (or reinforce with a tiny dot of glue in hidden spots). For accordion styles,
wrapping the center tightly with pipe cleaner or wire solves most of this instantly.
“The paper is cracking.”
This happens with glitter paper or very stiff coated paper. Switch to scrapbook paper, cardstock, or origami paper,
or use that fancy paper for the layered cut-out method instead of tight folding.
“My tissue paper is tearing.”
Tissue is delicate. Fold gently, avoid aggressive creasing, and separate layers slowly.
If needed, use fewer layers or slightly larger pieces.
Fun Variations (Because Butterflies Don’t Do ‘Boring’)
- Add beads: string beads on the center wire for a polished butterfly “body.”
- Make a mobile: hang butterflies from thread; a simple straw cross-frame works well for lightweight tissue styles.
- Garden picks: attach a toothpick, skewer, or floral wire to the back so butterflies “sit” in a vase or plant pot.
- Gift wrap upgrade: add a small paper butterfly on top of a wrapped present instead of a bow.
- Decoupage accents: apply a flat butterfly cut-out with decoupage medium to boxes, tags, or craft décor.
Conclusion
Making a paper butterfly is one of the quickest ways to turn everyday paper into something that feels alive.
Whether you go origami, accordion, or layered 3D, the secret is simple: pick the right paper for the method,
make clean folds or cuts, and don’t be afraid to try again. (Butterflies don’t hatch perfectly on the first day either.)
If you want a reliable plan: start with the accordion butterfly for immediate success,
graduate to the origami butterfly for that “I can fold magic” feeling, and finish with
layered 3D butterflies when you’re ready to decorate like a crafty genius.
Real-World Crafting Experiences: What Making Paper Butterflies Feels Like (and Why You’ll Keep Making “Just One More”)
Here’s something nobody warns you about: paper butterflies are a gateway craft. You start with onejust to test it.
Then you make a second because the first one “was practice.” Then a third because you want to see what it looks like
in patterned paper. Twenty minutes later, your desk looks like a butterfly convention and you’re emotionally attached
to at least two of them.
The first real experience most people have is the fold-confidence wobble. You’re following steps,
you’re trying to keep corners aligned, and somewhere around “collapse along existing creases,” your brain briefly
leaves your body. That’s normal. The trick is to slow down for the early creasesthose are the “bones” of the butterfly.
When the foundation folds are clean, everything afterward feels like it clicks into place.
Accordion butterflies create a different kind of satisfaction: they’re instantly recognizable. Even if your pleats
aren’t perfectly even, the moment you pinch the center and fan out the wings, you get that “oh! it worked!” payoff.
This is why accordion folding is so great for kids, classrooms, and partiessuccess is fast, and fast success is
basically crafting espresso. If you add a pipe cleaner body, the project becomes sturdier and more forgiving, and the
antennae are an instant personality upgrade. (Yes, antennae have personality. Don’t argue. They just do.)
Tissue paper butterflies bring their own drama. Tissue is light and delicate, and it will absolutely tear if you
rush itlike it’s trying to teach patience through mild inconvenience. But when you separate the layers and the wings
get that fluffy, dimensional look, it feels worth every gentle tug. People often describe this stage as “surprisingly
relaxing,” right up until someone sneezes and the butterflies try to achieve flight for real.
Layered 3D butterflies are the “I made décor” moment. Cutting multiple sizes and stacking them creates depth that looks
intentionaleven if you’re using scraps you found in a drawer. It’s also where people tend to experiment the most:
book pages, music sheets, metallic accents, watercolor washes, or mixing prints that “shouldn’t” work together but somehow
do. And once you see a cluster of 3D butterflies on a wall, you’ll understand why people keep adding “just a few more.”
It’s the crafting equivalent of hanging one photo and then realizing the whole wall wants to become a gallery.
The most common “aha” experience is realizing that paper choice changes everything. A stiffer sheet makes
crisp wings that hold shape; a thinner sheet folds neatly for origami; glitter paper looks gorgeous but may crack; tissue
looks airy but needs a gentle hand. Once you feel those differences, you stop blaming yourself when a butterfly turns out
weirdand start blaming the paper like a seasoned professional. (This is growth.)
Finally, there’s the experience nobody can resist: finding a purpose for them. You’ll stick one on a gift.
You’ll add one to a card. You’ll tape three above a desk “temporarily” and then they live there forever. You’ll consider
making a garland. You’ll consider making a mobile. You’ll consider making a second mobile. At that point, congratulations:
you’ve become the kind of person who owns “butterfly supplies,” and honestly, that sounds like a pretty nice life.


