Table of Contents >> Show >> Hide
- Before You Start: A Quick Safety Reality Check
- What You’ll Need
- How to Let Air Out of a Tire: 11 Steps
- Step 1: Park somewhere flat, safe, and boring
- Step 2: Find the correct target PSI (the car’s, not the tire’s)
- Step 3: Make sure the tires are cold
- Step 4: Remove the valve cap and don’t lose it
- Step 5: Check the current pressure
- Step 6: Decide how much air to release (and go slowly)
- Step 7: Press the valve pin to release air
- Step 8: Release air in short bursts
- Step 9: Recheck the PSIoften
- Step 10: Repeat until you hit the target pressure
- Step 11: Replace the valve cap and do a quick final check
- Extra Tips That Save Time (and Regret)
- Common Reasons People Let Air Out (Without the Drama)
- FAQ: Quick Answers You’ll Actually Use
- Conclusion
- Real-World Experiences and Lessons Drivers Often Share (Extra )
Sometimes your tires don’t need more airthey need less. Maybe a shop topped them off a little too enthusiastically,
you inflated them on a warm afternoon and now the weather’s colder, or you’re dialing in pressure for a smoother ride.
Whatever the reason, letting air out of a tire is one of those basic car skills that’s surprisingly easy… as long as you do it
safely and don’t treat the valve stem like a stress toy.
This guide walks you through how to let air out of a tire in 11 simple steps, with practical tips, common mistakes,
and a few “learn-it-the-hard-way” moments you can skip. (Your knees, back, and driveway gravel will thank you.)
Before You Start: A Quick Safety Reality Check
- Only deflate tires you own or have permission to work on. Letting air out of someone else’s tire isn’t a prankit’s a problem.
- Never drive on a seriously underinflated tire. Low pressure can damage the tire and affect steering, braking, and handling.
- Aim for the vehicle’s recommended pressure (usually listed on a sticker inside the driver’s door jamb), not the maximum PSI on the tire sidewall.
- Check and adjust when tires are “cold.” That generally means the car has been parked for a few hours (or you’ve driven very little).
What You’ll Need
You can do this with very little gear, but the right tools make it cleaner and faster:
- Tire pressure gauge (digital or pencil-style). This is non-negotiable if you want accuracy.
- Valve-stem tool or a small object (like the tip of a key, the end of a tire gauge, or a small flathead screwdriver) to press the valve pin.
- Optional: a valve core tool (mostly for special casesmore on that later).
- Optional: gloves and a flashlight (helpful at night or if the valve stem is hiding behind spokes like it owes you money).
How to Let Air Out of a Tire: 11 Steps
Step 1: Park somewhere flat, safe, and boring
Put the car in Park, set the parking brake, and choose a spot away from traffic. A level surface helps you get consistent pressure readings,
and it keeps the whole operation from feeling like a circus act.
Step 2: Find the correct target PSI (the car’s, not the tire’s)
Look for the recommended “cold tire pressure” on the sticker inside the driver’s door jamb (or check the owner’s manual).
If front and rear pressures are different, write them downfuture-you will appreciate the note.
Step 3: Make sure the tires are cold
If you just drove on the highway and then decided to “fix” your tire pressure, your tires are warm and the readings will be higher than normal.
For best accuracy, do this after the car has been sitting for a while (like first thing in the morning or after a few hours parked).
Step 4: Remove the valve cap and don’t lose it
Unscrew the little cap on the valve stem and put it somewhere safelike a pocket, cup holder, or that one spot in the console where pens disappear.
The valve cap helps protect the valve from dirt and moisture, so it’s not just decorative.
Step 5: Check the current pressure
Press the tire pressure gauge firmly onto the valve stem. You’ll likely hear a tiny hiss as the gauge sealstotally normal.
Read the PSI and compare it to your target.
Step 6: Decide how much air to release (and go slowly)
If you’re only a few PSI over, you’re doing a careful “bleed,” not a dramatic deflation. Releasing air is quick, but putting it back can be a hassle
if you’re not near an air compressor.
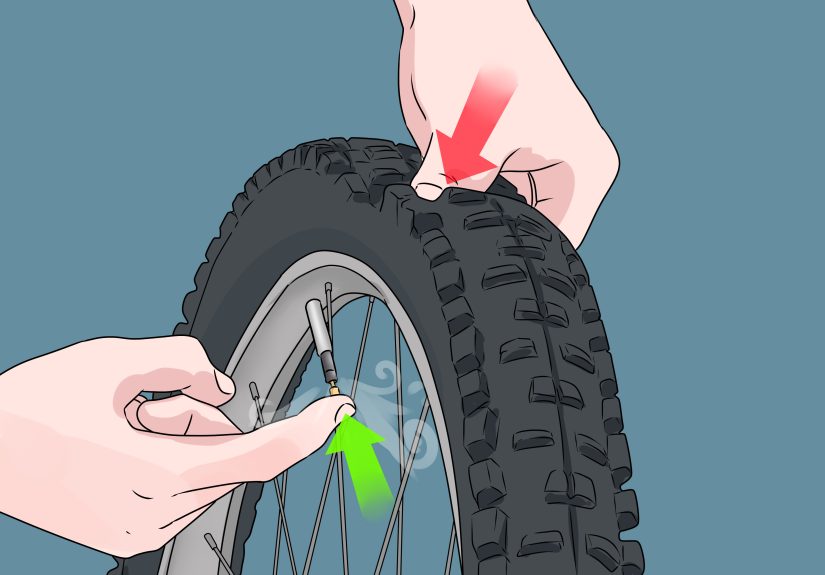
Step 7: Press the valve pin to release air
Inside the valve stem is a small spring-loaded pin. Use a valve tool (or another suitable object) to press it inward.
You’ll hear air escaping immediately. This is the moment to resist the urge to hold it down for a full minute like you’re letting steam out of a teapot.
Step 8: Release air in short bursts
Press for about 1–2 seconds, then stop. Short bursts help you avoid overshooting your target.
Think of it like salting food: you can always add more (or in this case, remove more), but you can’t un-salt the soup without extra effort.
Step 9: Recheck the PSIoften
After each burst (or every couple bursts), recheck with your gauge. This is how you land on the right number instead of playing “guess the pressure”
and losing the game.
Step 10: Repeat until you hit the target pressure
Keep bleeding air in small bursts and checking with the gauge until you reach the recommended PSI.
If your vehicle has different specs for front and rear tires, confirm you’re matching the correct one.
Step 11: Replace the valve cap and do a quick final check
Screw the valve cap back on snugly (no need to Hulk-tighten it). Then check the pressure one more time to confirm nothing changed.
If you adjusted multiple tires, repeat the process for each one.
Extra Tips That Save Time (and Regret)
Don’t confuse “recommended PSI” with “maximum PSI”
The PSI printed on the tire sidewall is typically a maximum inflation rating for the tire itselfnot the right pressure for your specific vehicle.
The vehicle placard/door sticker is the number you want for everyday driving.
If you overshoot and go too low
If you accidentally drop below the recommended PSI, you’ll need to add air back in with a compressor or pump.
Many gas stations have air, and many tire shops will help you top off quickly. If you’re far from air, don’t keep bleedingstop early and recheck.
TPMS light still on after fixing pressure?
Many vehicles need a bit of driving time for the tire pressure monitoring system (TPMS) to update.
Also, TPMS warning lights often don’t come on until pressure is significantly low, so don’t rely on the light as your main “gauge.”
Your gauge is your truth-teller.
When a valve core tool matters
Most drivers will never need to loosen or remove a valve core. That’s typically for special situations (like replacing a faulty core or doing certain
off-road setups with deflators). For normal “I’m 3 PSI high” adjustments, pressing the valve pin is the correct move.
Common Reasons People Let Air Out (Without the Drama)
- Overinflation after adding air: You aimed for 35 PSI and hit 40 PSI because the compressor gauge was… optimistic.
- Seasonal temperature swings: Tire pressure can drop when temperatures fall and rise when they warm up, so you may need small adjustments.
- New car or recent service: Tires are sometimes inflated higher during transport or servicing and should be set back to spec.
- Balancing ride comfort and handling: Within manufacturer specs, small corrections can improve feel and wear patterns.
FAQ: Quick Answers You’ll Actually Use
How long does it take to let air out of a tire?
If you’re only dropping a few PSI, it can take 1–3 minutes per tire. If you’re trying to substantially deflate a tire, it can take longer
and it’s usually not recommended unless you’re performing a repair or following a specific, legitimate use case.
Can I just press the pin with my fingernail?
Technically, maybe. Practically, you’ll regret it. Use a small tool so you can control the release and avoid stabbing your finger on a dirty valve stem.
Should I let air out when tires are warm?
It’s best to adjust tire pressure when tires are cold. If you deflate warm tires to the “cold” number, they may end up underinflated once they cool.
Conclusion
Learning how to let air out of a tire is one of those small skills that pays off for yearsespecially when you’re trying to hit the right PSI,
keep tire wear even, and avoid that squishy “something feels off” driving sensation. Go slow, use a gauge, adjust in short bursts, and always aim for the
pressure your vehicle manufacturer recommends. It’s not glamorous, but neither is buying tires early because you guessed wrong.
Real-World Experiences and Lessons Drivers Often Share (Extra )
If you want to feel like a tire-pressure wizard, you don’t need a magic wandyou need patience and a tire gauge that isn’t living a fantasy life.
One of the most common “experience stories” drivers talk about starts at a gas station air pump. You pull up, the machine beeps, and you try to set
your tires to the number you remember (maybe 35 PSI). But the pump hose hisses, the screen lags, and suddenly you’ve got 41 PSI in the front tire.
The lesson people learn fast: use your own gauge as the final authority. The pump is helpful, but your gauge is the referee.
Another classic scenario happens after a service appointment. A driver notices the car feels slightly “bouncy” on the way homelike the suspension
drank three energy drinks. They check pressures and find the tires are several PSI higher than the door sticker. This isn’t always negligence;
sometimes techs inflate a bit high while checking for slow leaks or setting up vehicles. But the takeaway is consistent: always verify tire pressure after service,
especially if the ride suddenly feels different or the steering feels extra twitchy.
Then there’s the seasonal surprise. A chilly morning arrives, and the TPMS light pops on like an uninvited guest. Drivers often assume the worst
(“I’m doomed, the tire is flat, my day is ruined”). In reality, temperature changes can nudge tire pressure up or down. The “experience-based” lesson
many people share is to check pressures calmly with a gauge first, then adjust to spec. It turns panic into a two-minute fixand it keeps you from
ignoring a genuine leak in the future because you’ve trained yourself to dismiss the light.
A smaller but very real struggle: the valve cap. People drop it, it rolls, it disappears, and somehow it always heads straight under the car like
it’s late for a meeting. Drivers who’ve been through this start doing a simple habit: they put the cap in a pocket before they do anything else.
It sounds silly until you realize the cap helps keep grime and moisture away from the valve core. A missing cap won’t instantly deflate your tire,
but over time it can contribute to valve issuesespecially in places with road salt, rain, or lots of dust.
Finally, there’s the “I let out too much air” moment. It happens when someone holds the valve pin down too long because it feels productive.
The tire drops below spec, and now you need to add air back in. This is where drivers learn the golden rule: short bursts, frequent checks.
Bleeding air is fast; getting it perfect takes small, careful adjustments. In other words, don’t treat the valve like a button you mash in a video game.
Treat it like a volume knobtiny turns until it sounds right.


