Table of Contents >> Show >> Hide
- Before You Buy: Choose Crown Molding That Matches Your Room (and Your Sanity)
- Tools and Materials Checklist (What You’ll Actually Use)
- Know the Geometry: Spring Angle, “Nested” Cuts, and Why Corners Lie
- Measure and Mark Like a Pro (So Your Crown Sits Straight)
- Plan Your Cut Order (This Is Where Most Regret Can Be Prevented)
- Cutting Crown Molding: The Parts People Fear (But You’ve Got This)
- Install Crown Molding Without Wrestling Gravity (Too Much)
- Caulk, Fill, and Finish: Where It Starts Looking Expensive
- Troubleshooting Common Crown Molding Problems
- Real-World Lessons From Hanging Crown Molding (The “I Learned This So You Don’t Have To” Section)
Crown molding is the “nice shoes” of a room: you don’t need it to leave the house, but once it’s on, everything looks more put-together. The catch? Installing crown molding combines the precision of finish carpentry with the chaos of walls that are rarely straight and corners that are rarely 90°kind of like trying to wrap a present while the box slowly changes shape.
The good news: you can absolutely install crown molding yourself with the right plan, a little patience, and a willingness to test-fit pieces like you’re auditioning them for a role. This guide walks you through choosing the right molding, measuring and marking, cutting inside and outside corners, coping for tight joints, fastening, and finishing so the final result looks intentional (not like a trim emergency).
Before You Buy: Choose Crown Molding That Matches Your Room (and Your Sanity)
Pick a profile and size that fits
Crown molding comes in endless profilesfrom simple cove shapes to ornate layered details. Bigger rooms and higher ceilings can handle taller crown molding; smaller rooms usually look best with a modest profile so it doesn’t feel like the ceiling is wearing shoulder pads.
Choose a material that matches the space
- Solid wood (pine, poplar, hardwood): Strong, crisp detail, great for staining or painting. Can move a bit with seasonal humidity.
- MDF: Smooth and stable for painted trim, budget-friendly, but hates wateravoid damp areas unless you seal it very well.
- Polyurethane/PVC/foam options: Lightweight and moisture-resistant (nice for bathrooms), often easier for solo installers to handle.
One-piece crown vs. “built-up” crown
If you want a more dramatic look without wrestling a giant single piece, a built-up crown (multiple layers of trim that stack to look custom) can be more forgiving. It’s also easier to align smaller pieces than one wide board that wants to twist the second you blink.
Tools and Materials Checklist (What You’ll Actually Use)
You don’t need a truck full of tools, but you do need the right ones for clean cuts and solid fastening. Here’s a practical list:
Tools
- Compound miter saw (or miter box for very small/simple projects)
- Coping saw (for inside corners) and/or a small file/rasp
- Stud finder, pencil, tape measure
- Level (2–4 ft) or laser level (nice-to-have)
- Finish nailer (brad nailer) and appropriate finish nails
- Caulk gun
- Safety glasses and hearing protection
- Step ladder (or two ladders if you have a helper)
Materials
- Crown molding (buy extra for waste and test cuts)
- Wood glue (for scarf joints and corner joints)
- Paintable caulk (for small gaps at wall/ceiling)
- Wood filler/spackle (for nail holes and small imperfections)
- Sandpaper (fine grit)
- Primer/paint (or stain + clear coat if you’re finishing wood)
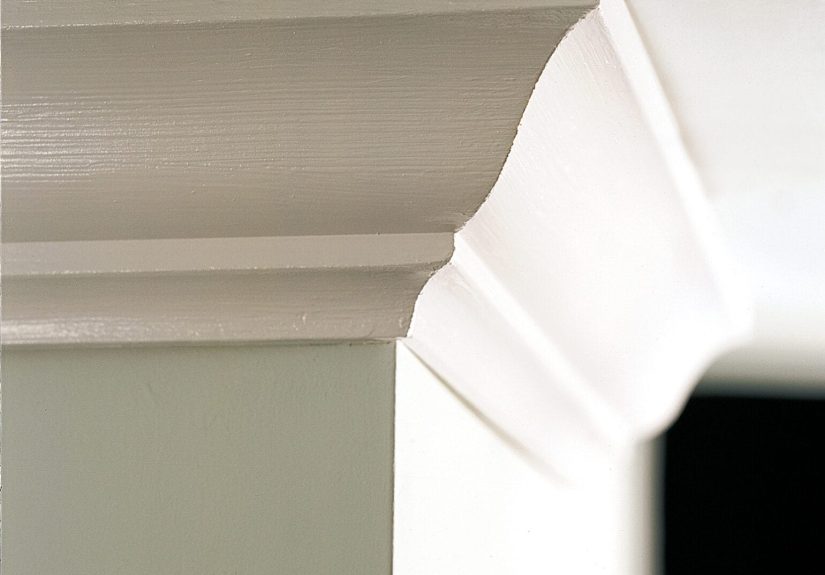
Know the Geometry: Spring Angle, “Nested” Cuts, and Why Corners Lie
Crown molding sits at an angle between the wall and ceiling. That installation angle is the spring angle. Many common crowns are designed for typical wall/ceiling angles, but real houses can be… creatively interpreted versions of “typical.”
You have two main ways to cut crown molding corners:
Method A: “Nested” cuts (most DIY-friendly)
You hold the crown molding upside down on the miter sawexactly the way it will sit on the wall and ceiling. The top edge (ceiling side) rests on the saw table; the bottom edge (wall side) rests against the fence. Then you cut miters like normal. This method reduces math, which is great because crown molding math has ended friendships.
Method B: Compound miter + bevel cuts
This is where you lay the crown flat and adjust both the miter and bevel angles. It can be very accurate, but it’s easier to get wrong if you’re new. If your saw has crown stops and you can reliably “nest” the crown, Method A is usually the faster path to success.
Measure and Mark Like a Pro (So Your Crown Sits Straight)
Step 1: Measure the room perimeter and buy enough molding
Measure each wall length at the wall/ceiling junction and add them up. Then buy extraespecially if this is your first install. Extra material isn’t waste; it’s tuition for learning without panic. It also covers mistakes, scarf joints, and the inevitable “I cut the left corner as a right corner” moment.
Step 2: Locate studs and ceiling nailing points
Crown molding needs to be nailed into solid framing when possible. Use a stud finder to mark wall studs a few inches below the ceiling line. If your crown is tall, you may also catch ceiling joists near the top edge depending on how the molding lands.
Step 3: Mark guide lines for consistent placement
Hold a short scrap of your crown in position, then mark where the bottom edge hits the wall and where the top edge hits the ceiling. Use a level to extend those marks into light guide lines. These lines are your “stay on the runway” indicators while you’re juggling long trim pieces.
Plan Your Cut Order (This Is Where Most Regret Can Be Prevented)
Before you cut a single full-length piece, decide your strategy:
- Start with the longest, straightest wall to build confidence and get your placement dialed in.
- Use scarf joints (angled end-to-end joints) if a wall is longer than your molding length.
- Plan corners intentionally: Inside corners are usually best “coped” for a tighter fit. Outside corners are typically mitered.
Pro tip: Make a couple of short test blocks from scrap crown and label them “CEILING” and “WALL.” Use them to quickly confirm how the crown sits and which direction a cut should go. Your future self will thank you loudly.
Cutting Crown Molding: The Parts People Fear (But You’ve Got This)
Step 1: Cut straight runs and square ends
For a straight run that ends at an inside corner where it will “butt” into another piece, one end can be square (90° cut). For scarf joints and corners, you’ll be making angled cuts.
Step 2: Scarf joints (for long walls)
When one piece isn’t long enough, join two pieces with a scarf jointa diagonal cut that overlaps. Dry-fit the joint, then add wood glue before fastening. Orient the overlap so the “leading” edge faces away from the main viewing direction. That helps the seam disappear once painted.
Step 3: Inside corners cope for the win
Inside corners are where crown molding likes to reveal that your walls are not, in fact, perfectly square. A coped joint is more forgiving than two perfect 45° miters because the coped piece fits over the profile of the other piece, hiding tiny out-of-square issues.
Here’s a reliable coping workflow:
- Install the “square-cut” piece first so it butts into the corner with a clean, straight end.
- On the mating piece, cut a 45° miter (nested on the saw) to expose the molding profile.
- Trace the profile edge lightly with pencil if helpful.
- Cope along the profile with a coping saw, keeping a slight back-cut (tilt the saw so you remove more from the back than the face). The face edge is what matters.
- Fine-tune the fit with a file or sandpaper until the seam closes tightly.
If coping feels intimidating, practice on scraps. After a few tries, you’ll realize coping is less “mystical woodworking art” and more “cutting along a line carefully while pretending you’re calm.”
Step 4: Outside corners test-fit and adjust
Outside corners usually get two miter cuts that meet at the corner. The tricky part is that outside corners are often slightly open or closed (not a true 90°). If you cut both at perfect 45° and the corner isn’t perfect, you’ll get a gap that stares at you every time you walk into the room.
To handle this:
- Test-fit the two pieces before nailing.
- If the joint opens at the front, adjust the miter slightly (for example, 44°/46° style tweaks depending on the corner’s real angle).
- Glue the outside corner joint before fastening to reduce future movement.
Install Crown Molding Without Wrestling Gravity (Too Much)
Step 1: Dry-fit everything you can
Hold pieces in place, confirm they follow your guide lines, and check corner seams. This is also where you label the backs of pieces (“North wall,” “Left inside corner,” etc.). Labels prevent the classic DIY twist: cutting a perfect piece, setting it down, then forgetting which wall it belonged to.
Step 2: Start with a long run and work toward corners
Position the crown so it lines up with your marks. If you have a helper, this is their moment to shine. If you’re solo, use temporary nails or a scrap support block to hold one end while you get the other end aligned.
Step 3: Nail into framing whenever possible
Use your stud marks as a guide. Drive finish nails through the crown into studs and/or into solid ceiling framing where the top edge lands. If you’re struggling to catch framing (or your crown lands in a “no man’s land”), you can install thin nailer strips (wood backing) along the wall near the ceiling to give yourself consistent nailing material.
Step 4: Secure joints as you go
At scarf joints and outside corners, apply wood glue, press the joint tight, then nail. For extra clean joints, you can “pin” the joint with a couple of brads near the seam, then nail into framing.
Caulk, Fill, and Finish: Where It Starts Looking Expensive
Fill nail holes and sand smooth
Use wood filler (or spackle for painted trim) for nail holes. Let it dry, then sand lightly. Don’t sand the profile details into a new shapeunless your dream is to invent “modern minimalist crown molding” by accident.
Caulk small gaps (not structural gaps)
Use paintable caulk where the crown meets the wall and ceiling to hide tiny waviness. Keep the bead small and smooth it with a damp finger or caulk tool. Caulk is not magic putty for huge gaps, but for small imperfections, it’s a finishing superpower.
Paint (or touch up)
Many DIYers prefer to prime/paint crown molding before installing, then do final touch-ups after filling and caulking. Pre-painting can save your neck from painting overhead for hours, which is a form of cardio nobody requested.
Troubleshooting Common Crown Molding Problems
“My inside corner has a gap.”
- If you used miters, consider switching to a coped joint for that corner.
- Check that the crown is seated consistently against the wall and ceiling.
- Small gaps at the top/bottom edges can often be caulked (once the joint itself is tight).
“My outside corner doesn’t close.”
- Your corner likely isn’t a true 90°. Test-fit, then adjust the miter angle slightly.
- Make sure the crown is nested in the saw consistentlysmall changes in how it’s held can change the cut.
“The molding won’t sit flatthere’s a dip in the wall.”
- Use caulk for small gaps.
- For larger dips, consider adding backing strips or shimming behind the crown in low spots.
- Work to your guide lines; let the caulk hide what drywall refused to do.
“My joints look perfect today and weird next month.”
- Wood can expand/contract with humidity. Gluing joints (especially scarf joints and outside corners) helps.
- Using stable materials like MDF (in dry rooms) can reduce seasonal movement.
Real-World Lessons From Hanging Crown Molding (The “I Learned This So You Don’t Have To” Section)
Installing crown molding has a funny way of making you confident and humbled in the same afternoon. The first lesson is that setup is half the job. The room doesn’t care that you watched three videos and feel spiritually readyif your stud marks are off or your guide lines are missing, every piece becomes a guessing game. When I started treating crown like a repeatable system (mark studs, draw guide lines, test-fit corners, label pieces), the whole project stopped feeling like improvisational theater.
The second lesson: scrap pieces are priceless. I keep two short “crown buddies” cut from leftover molding. One is marked “wall edge” and the other “ceiling edge.” Any time I’m unsure how a piece should sit in the saw, I grab a crown buddy and match it. This prevents the classic mistake of cutting a beautiful corner… for the opposite side of the room. That mistake is common enough that it basically deserves its own support group.
Third: coping is worth learning. I used to think coping was only for people who own ten chisels and say things like “mmm, nice grain.” In reality, coping is a practical hack for imperfect corners. The first couple of copes looked like they were cut by a nervous squirrel, but after a few practice runs, the technique clicked: the face edge matters most, and a slight back-cut makes the joint forgive tiny wall angle weirdness. Once you see a coped inside corner snug up tight, you’ll wonder why you ever tried to force two miters to behave.
Fourth: outside corners are a test-fit sport. Even when your saw is dialed in, your house might not be. I learned to dry-fit every outside corner and to expect minor angle tweaks. If the corner opens at the front, the angle likely needs a small adjustment. If the crown seems to twist, it might not be seated consistently against the saw fence and table. Consistency is everythingsame orientation, same pressure, same contact pointsbecause crown molding can punish “close enough” with a gap you’ll notice forever.
Fifth: glue is your quiet hero. Finish nails hold crown to the wall and ceiling, but wood glue helps keep joints tight and reduces seasonal movement. I glue scarf joints and outside corners, then nail. After that, a little filler and caulk turns “carpentry” into “finish work,” which is where the room suddenly looks finished instead of “in progress.”
Finally: don’t let perfection block progress. Crown molding is one of those projects where you can chase microscopic gaps until your ladder becomes your permanent address. Aim for tight joints, use coping where it helps, glue smartly, and finish neatly. Once it’s painted and the room is furnished, most people will say, “Wow, this looks amazing,” not, “Excuse me, is that a 1/32-inch shadow line near the left inside corner?” (And if they do, hand them a coping saw and a ladder. Kindly.)


