Table of Contents >> Show >> Hide
- What You’ll Learn
- Why Pegboard Needs a Gap Behind It
- Tools & Materials Checklist
- Planning Your Pegboard Wall (So It Doesn’t Turn Into “Pegboard Regret”)
- Step-by-Step: How To Install a Pegboard Tool Organizer
- Step 1: Measure, mark, and level your top line
- Step 2: Cut the pegboard and furring strips
- Step 3: Paint or seal (optional, but smart)
- Step 4: Attach furring strips to studs
- Step 5: Position the pegboard and pre-drill through peg holes
- Step 6: Screw the pegboard to the furring strips (use washers)
- Step 7: Add hooks, bins, and holders
- Step 8: Do a gentle load test
- Mounting on drywall without studs (not ideal, sometimes necessary)
- Video Tutorial: A Simple Shot List + Voiceover Script
- Common Mistakes That Make Pegboards Annoying
- Organizing Tips That Actually Stick (Unlike That One Hook)
- Final Thoughts
- Real-World Experiences & Lessons People Learn After Installing Pegboard (Extra)
A pegboard is basically a “choose-your-own-adventure” wall for tools: today it’s wrenches and screwdrivers, tomorrow it’s a paint sprayer, a tape measure, and that mysterious Allen key that only appears when furniture is already half-built.
The trick is installing it correctly so hooks don’t pop out, the board doesn’t bow, and your wall doesn’t look like it lost an argument with a drill.
In this guide, you’ll learn the right way to mount a pegboard tool organizer (with the all-important gap behind it), how to size it for your space, and how to plan a simple “video tutorial” style installation you can followor film for your own project.
Why Pegboard Needs a Gap Behind It
Pegboard hooks and hangers don’t magically float. They need clearance behind the board so the hook’s back “tab” can slide in and lock.
If you mount pegboard flat against drywall, you’ll spend your days re-installing hooks like you’re playing whack-a-mole.
That’s why most reputable DIY guides recommend mounting pegboard on furring strips (thin wood strips) or spacers. The strips create a uniform air gap, add stiffness, and give your screws something solid to bite intoespecially when the pegboard is loaded with heavier tools.
Tools & Materials Checklist
Pegboard + mounting supplies
- Pegboard panel (tempered hardboard, metal, or plastic/polypropylene)
- Furring strips (common sizes: 1×2 or similar thin strips)
- Screws (length depends on wall type; often 2 to 2-1/2 inches for studs with furring strips)
- Washers (help prevent screw heads from pulling through pegboard holes)
- Pegboard hooks/accessories (single hooks, double hooks, bins, small shelves, tool holders)
- Optional: hook locks/clips (help stop hooks from lifting out when you remove tools)
Tools you’ll actually use
- Stud finder (and/or a strong magnet for finding screws in studs)
- Level (2–4 ft level is ideal)
- Tape measure + pencil
- Drill/driver + bits (including a small pilot bit, like 1/8-in)
- Hand saw or circular saw (or have the store cut the board for you)
- Safety glasses (your eyes are not “spare parts”)
- Hearing protection (if cutting/drilling a lot)
Planning Your Pegboard Wall (So It Doesn’t Turn Into “Pegboard Regret”)
1) Pick the best location
The ideal spot is near your workbench where you naturally reach for tools. Avoid areas exposed to frequent water spray or high humidity unless
you choose a material designed for it. Hardboard pegboard is budget-friendly, but metal or plastic pegboards can handle damp conditions better.
2) Decide board size and orientation
A common approach is installing a board that spans multiple studs (for strength) and covers the “tool zone” above a bench. If you’re unsure,
outline the pegboard shape on the wall with painter’s tape. Stand back and do the highly scientific test: “Does this look right?”
3) Locate studs and plan furring strip placement
Most walls have studs spaced 16 inches on center (sometimes 24). Mark stud centers vertically. Your furring strips should land on studs so the
whole system is solid. Typical setups use vertical strips behind the left and right edges of the pegboard plus at least one support in the middle.
For larger boards, add more supports.
4) Pre-plan your tool layout (yes, before drilling)
You don’t need a museum-worthy blueprint. Just group tools by use:
- Daily drivers: tape measure, driver bits, screwdrivers, utility knife
- Fastening: hammers, nail sets, pliers, wrenches
- Cutting: snips, handsaws, saw guides
- Power tools: drill/driver, impact driver, batteries/chargers (often better on a shelf)
Keep frequently used tools at chest height. Put heavier items lower. And leave breathing room around awkward shapesotherwise you’ll discover
the joy of removing three tools to reach one.
Step-by-Step: How To Install a Pegboard Tool Organizer
Step 1: Measure, mark, and level your top line
Use a level to draw a light pencil line where the top edge of the pegboard will sit. Mark the left and right boundaries. Confirm the board won’t
crash into outlets, switches, or shelves. (Tools like being accessible; they don’t like being trapped behind a cabinet.)
Step 2: Cut the pegboard and furring strips
If your pegboard isn’t pre-cut, cut it to size. Many home improvement stores can cut panels for you. Cut furring strips so they match the pegboard
height (for vertical strips) or width (for horizontal strips), depending on your mounting plan.
Tip: Lightly sand rough edges. A splinter from a “simple organization project” is the opposite of personal growth.
Step 3: Paint or seal (optional, but smart)
If you’re using hardboard pegboard, painting or sealing can reduce moisture absorption and make it easier to wipe clean. A light coat of primer plus
paint can also brighten a dim garage. Just let it dry fully so your tools don’t smell like fresh paint for the next three seasons.
Step 4: Attach furring strips to studs
Hold the first strip on your stud marks. Use a level to keep it straight. Pre-drill pilot holes to reduce splitting, then drive screws into studs.
Repeat for the strip on the other side and add at least one center support strip (more for wider boards).
- Goal: a solid frame that sits flat and creates a consistent gap behind the future pegboard.
- Best practice: fasten strips into studs whenever possible.
Step 5: Position the pegboard and pre-drill through peg holes
Lift the pegboard onto the furring strips (a helper is useful unless you enjoy balancing large panels while holding a drillan activity nobody asked for).
Align it to your level line. Then pre-drill pilot holes through peg holes, through the furring strip, and into the stud behind it.
This makes driving screws easier and helps keep the board from cracking or shifting.
Step 6: Screw the pegboard to the furring strips (use washers)
Start with a screw near the center support to “set” the board, then add screws at the corners, then fill in across the supports.
Washers help spread the load so the screw heads don’t chew through the pegboard.
A practical spacing guideline is placing screws every 8–12 inches along supports for a sturdy mountespecially if you’ll hang more than just a
pair of scissors and a dream.
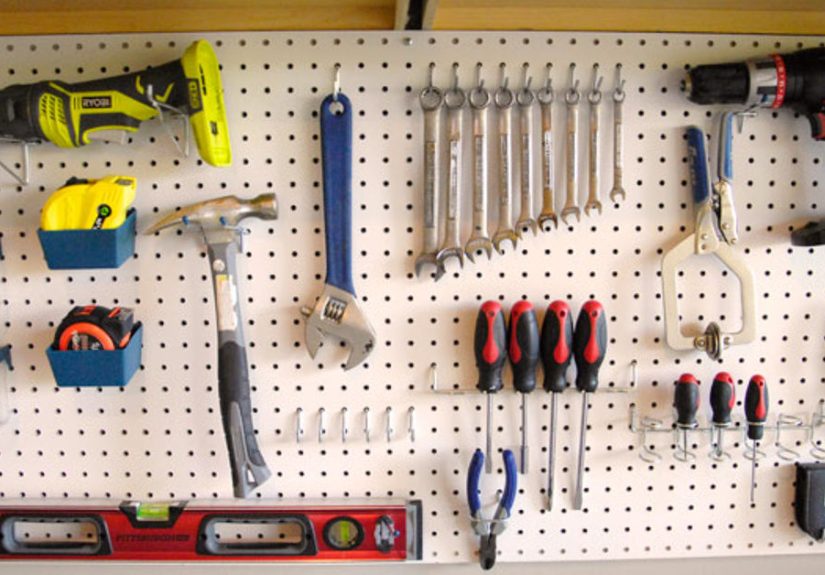
Step 7: Add hooks, bins, and holders
Now the fun part: the “Tetris phase.” Start with the biggest tools first, then fill in smaller items. Use double hooks for heavier hand tools.
Consider hook locks or clips if you regularly yank tools off the wall with enthusiasm.
Step 8: Do a gentle load test
Before you hang everything you own, load the board gradually. Watch for flexing. If the board bows or feels loose, add more screws into supports,
add another furring strip support, or reduce the load in that area.
Video Tutorial: A Simple Shot List + Voiceover Script
Whether you’re filming for your own blog/social post or just want a “follow-along” structure, this mini storyboard keeps the project clear and watchable.
Aim for short clips (10–25 seconds each) with a few longer “how-to” moments for the key steps.
Recommended shots (in order)
- Before scene: messy wall/bench + quick pan (establish the problem)
- Materials laydown: pegboard, furring strips, screws, washers, hooks
- Find studs: stud finder beep + marking studs with pencil
- Level line: show the level and your top guideline
- Cutting: quick clip of cutting board/strips (or “store cut it for me” flex)
- Attach furring strips: pre-drill + drive screws into studs
- Hang the board: lift into place + one screw set
- Fasten with washers: close-up of washer under screw head
- Hook placement: demonstrate how hooks lock in
- Final reveal: organized wall + satisfying tool “hang” montage
Voiceover script (editable)
“Today we’re installing a pegboard tool organizer the right waymeaning we’re not screwing it flat to the wall and hoping for the best.
First I found the studs, marked a level line, and mounted furring strips to create a gap behind the pegboard. That gap is what lets hooks lock in securely.
Next I positioned the pegboard, pre-drilled through peg holes, and fastened it using screws and washers. Then I arranged tools by how often I use them,
keeping heavy items lower and daily tools at chest height. The result: everything visible, easy to grab, and way less time spent searching for the tape measure
that was somehow in my pocket the whole time.”
Common Mistakes That Make Pegboards Annoying
Mounting flat to the wall
No gap = hooks won’t seat well. You’ll lose hooks every time you remove a tool, which turns “organization” into “a recurring event.”
Not hitting studs (when you can)
Stud mounting is the gold standard for strength. Anchors can work for light loads, but a fully loaded tool wall deserves real structure.
Too few support strips on big boards
Large pegboards can bow. Add a middle strip (or more) so the board stays flat and strong across its width.
Overloading one zone
Spread heavy items across multiple supports. If your drill, impact driver, and four-pound sledge all live in one corner, that corner will file a complaint.
Hook chaos
Some hooks lift out easily. Hook locks/clips or more secure accessory systems can dramatically reduce frustration if you’re constantly grabbing tools.
Organizing Tips That Actually Stick (Unlike That One Hook)
Use zones and “workflow” placement
- Assembly zone: drivers, bits, tape measure, square
- Cutting zone: snips, utility knife, hand saw
- Fix-it zone: pliers, wrenches, adjustable wrench
- Fastener zone: small bins for screws/anchors (label the bins, not your entire life)
Consider a shadow outline (optional, very satisfying)
Some DIYers trace tool silhouettes (paint pen, tape outline, or labels) so it’s obvious where each tool goes. It’s also a subtle way to notice what’s missing.
Like your 10mm socket. Which is missing because it’s a law of physics.
Add a small shelf for chargers and batteries
Pegboard hooks are great, but chargers often sit better on a shelf or basket. This also keeps cords from turning into a wall-mounted spaghetti situation.
Upgrade accessories where it matters
Cheap hooks are fine for light tools. For heavier or oddly shaped items, use double hooks, specialty holders, or sturdier accessories.
A small investment in the right hook is cheaper than repeatedly picking up tools off the floor.
Final Thoughts
Installing a pegboard tool organizer isn’t hardit’s just very easy to do “almost right,” which is how you end up with hooks popping out and a board that flexes.
Build in the gap, fasten into studs with proper support, use washers, and plan your layout like you actually want to find your tools later.
And if you’re making a video tutorial, keep it simple: show the studs, show the furring strips, show the washers, and end with the most satisfying part
the clean, organized wall that makes your workspace feel instantly more capable.
Real-World Experiences & Lessons People Learn After Installing Pegboard (Extra)
Most pegboard installs go greatright up until the moment you start using the wall like a real person. That’s when the “tiny realities” show up, and they’re
worth knowing ahead of time.
One common experience: people underestimate how much the gap behind the pegboard affects daily happiness. When the gap is too small or uneven,
hooks don’t seat consistently. You’ll notice it immediately when removing a toolespecially screwdrivers and pliersbecause the hook wants to lift out with
the tool. DIYers often fix this by adding more uniform spacers, switching to straight furring strips, or upgrading to hook locks. The lesson: a clean install
isn’t just “pretty,” it’s functional.
Another frequent surprise is how fast a board fills up once you start organizing “properly.” At first, you hang the big obvious items and think,
“Wow, I’m basically a professional now.” Then you remember clamps, extra driver bits, utility blades, sanding pads, extension cords, and the random
accessories that came with tools. People often end up adding a second panel or a narrow strip of pegboard next to the main one for small items. The lesson:
if you have wall space, plan for expansionor at least leave a margin so you’re not rearranging everything every weekend.
Many installers also discover that tool weight distribution matters more than expected. Pegboard can hold a lot, but “a lot” is different from
“all in one corner.” Real workshops tend to evolve: you move heavy tools lower, place daily tools at chest height, and push rarely used items higher.
People who stick with pegboard long-term usually treat it like a living system, not a one-time art project.
There’s also the “hook personality” problem: not all hooks behave the same. Light-duty single hooks are fine for tape measures and small hand tools,
but heavier tools do better on double hooks or specialty holders. DIYers often report that a few well-chosen specialty holders (for drills, hammers,
levels, and wrenches) reduce frustration dramatically. The lesson: you don’t need the fanciest systemjust the right hook for the job.
Finally, almost everyone has a story about layout confidence. The first layout usually looks amazing… until you do a real project and reach for three tools
in a row. Then you realize your “most-used” driver is across the board from your bits, or your measuring tools are far from your cutting tools. People often
do a “practice week” where they hang tools loosely, use the space normally, then fine-tune placement once they see their real workflow. The lesson:
install the board like it’s permanent, but arrange the tools like it’s flexiblebecause it is.
If you take anything from these experiences, let it be this: the best pegboard isn’t the prettiest one on day one. It’s the one that still feels effortless
after a month of real usewhere tools return to their homes without thinking, and the wall quietly saves you time (and a little bit of sanity) every time you
start a project.