Table of Contents >> Show >> Hide
- Meet Your Ivy: Which “Ivy” Are We Talking About?
- Before You Pot It: Two Quick Reality Checks
- Step 1: Choose the Right Pot (Drainage Is Non-Negotiable)
- Step 2: Use a Potting Mix That Drains Like a Champ
- Step 3: Planting Ivy in a Pot (The Actual Planting Part)
- Step 4: Light, Temperature, and Humidity (Where Ivy Becomes Slightly Opinionated)
- Step 5: Watering Without Drowning (or Dehydrating)
- Step 6: Feeding, Pruning, and Training (How to Keep Ivy Cute)
- Step 7: Repotting and Refreshing Soil
- Step 8: Common Problems (and How to Fix Them Fast)
- Bonus: How to Propagate Ivy From Cuttings (So One Ivy Becomes Many)
- Conclusion
- Extra: of “Been-There” Ivy-in-a-Pot Experiences
- SEO Tags
Ivy is the plant equivalent of that one friend who’s always down to hang out: adaptable, low-fuss, and
somehow capable of growing three feet overnight when you weren’t looking. The good news? Growing ivy in a pot
is absolutely beginner-friendly. The even better news? A container is one of the easiest ways to keep ivy
looking classy instead of turning into a leafy takeover situation.
This guide will walk you through choosing the right pot, planting the right way, dialing in light and water,
and troubleshooting the usual “why are you doing this to me?” moments. Whether you want a trailing houseplant,
a hanging basket masterpiece, or a tiny topiary that makes your guests say, “Wait… you made that?”you’re in the right place.
Meet Your Ivy: Which “Ivy” Are We Talking About?
True ivy (Hedera)
When people say “ivy,” they often mean English ivy (Hedera helix)the classic, lobed-leaf vine used as a houseplant
and (controversially) as outdoor groundcover. Other true ivies include Algerian ivy and Persian ivy. In pots, these plants
can trail, climb, or be trained into shapes with pruning.
Common “ivy” look-alikes (not Hedera)
You might also see “Swedish ivy” in stores. It’s cute and easybut it’s not a true ivy. Same with “Boston ivy,” which is a different vine entirely.
Care can overlap a bit, but if your label says Hedera, this planting guide matches your plant best.
Before You Pot It: Two Quick Reality Checks
1) Outdoor warning: ivy can be invasive in many U.S. regions
English ivy is listed as invasive or problematic in multiple states and regions. A pot helps you keep it contained,
but if you grow it outdoors, be intentional: don’t let vines touch soil where they can root, and never toss trimmings
into the yard or nearby woods. Bag them and dispose of them properly.
2) Safety: ivy can irritate skin and is toxic if pets chew it
Many true ivies can cause skin irritation for sensitive people, and English ivy is considered toxic to dogs and cats if ingested.
Translation: wear gloves if you’re rash-prone, and keep your potted ivy where curious pets can’t snack on it like salad.
Step 1: Choose the Right Pot (Drainage Is Non-Negotiable)
Pick a pot with drainage holes
Ivy hates “wet feet.” If water can’t escape, roots sit in soggy soil and rot follows like an uninvited party guest.
Your pot needs at least one drainage holemore is better.
Choose a sensible size
For a small nursery ivy (typically in a 4-inch pot), go up to a 5- or 6-inch container. If your ivy is rootbound, you can size up,
but don’t jump to a pot that’s dramatically larger. Oversized pots hold extra wet soil longer, and ivy roots prefer a cycle of
thorough watering followed by a slight dry-down.
Material matters (a little)
- Terracotta: Breathable, dries faster, great for beginners who overwater.
- Plastic or glazed ceramic: Holds moisture longer, great if you forget to water (but easier to overdo it).
- Hanging baskets: Perfect for trailing “green waterfall” vibesjust watch them in summer, because baskets dry fast.
Step 2: Use a Potting Mix That Drains Like a Champ
What ivy wants
Ivy does best in a loose, well-draining houseplant potting mix. “Well-draining” doesn’t mean bone-dry; it means water flows through
and air can reach roots. A rich commercial houseplant mix usually works well straight out of the bag.
A simple beginner upgrade
If your mix feels heavy or stays wet for days, lighten it up:
- 2 parts quality potting mix
- 1 part perlite (or pumice)
- Optional: a small handful of fine orchid bark for extra chunkiness
The goal is a mix that holds moisture but still breathes. Think “fluffy cake,” not “mud pie.”
Why “too much pot” backfires
Here’s the sneaky part: when the pot is much larger than the root ball, the extra soil stays wet longer than the roots can use it.
That prolonged dampness is a common path to root rot. If you remember nothing else: slightly snug is safer than wildly spacious.
Step 3: Planting Ivy in a Pot (The Actual Planting Part)
-
Water first (optional but helpful): If your ivy is very dry, water it an hour before repotting.
Moist roots slide out more easily and experience less stress. -
Prep the pot: Make sure drainage holes are open. If you’re worried about soil washing out, use a small piece of mesh or a coffee filter
over the hole (no rocks needed; rocks don’t improve drainage in most pot setups). -
Remove the plant and check roots: Gently slide the ivy out. If roots are circling tightly, tease them loose a bit with your fingers.
You don’t need to perform surgeryjust encourage roots to grow outward. - Set the height: Place ivy so the top of the root ball sits about 1/2 inch below the pot rim. This leaves room for watering.
- Backfill with mix: Add soil around the sides, pressing lightly to remove big air pockets. Don’t compact it like you’re packing a suitcase.
- Water thoroughly: Water until it flows out the bottom. This settles soil and helps roots make contact.
- Dump the saucer: If water collects in the tray, empty it after 10–15 minutes. Ivy should not sit in standing water.
Step 4: Light, Temperature, and Humidity (Where Ivy Becomes Slightly Opinionated)
Light: bright and indirect is the sweet spot
Indoors, ivy generally thrives in bright, indirect light. It can tolerate lower light, but growth slows and vines may get leggy.
Variegated ivy (green + cream/white) typically needs more light to keep its pattern; in dim light it may revert toward solid green.
Good spots: near an east window, a few feet back from a south/west window, or close to a bright north window. Avoid harsh midday sun directly on leaves,
which can scorch.
Temperature: cooler is often better
Ivy tends to prefer cool to moderate indoor temperatures. If your home runs warm, keep ivy away from heating vents and radiators.
Brown, crispy edges can be a sign of hot, dry air or drafts.
Humidity: “nice to have,” not “must live in a rainforest”
Ivy likes moderate humidity and often looks best when the air isn’t desert-dry. If your home is dry (especially in winter),
try one of these:
- A tray of wet pebbles under the pot (pot above the water line, not soaking in it)
- A small humidifier nearby
- Grouping plants together to create a mini humid zone
Step 5: Watering Without Drowning (or Dehydrating)
The finger test that saves lives (plant lives)
Water your potted ivy thoroughly, then wait until the surface dries slightly. A practical rule:
when the top 1/2 inch to 1 inch feels dry to the touch, it’s usually time to water again.
Don’t water on a calendarwater based on the soil.
Seasonal adjustments
- Spring/Summer: More light and growth = more frequent watering.
- Fall/Winter: Less growth = less water. Let the top inch dry before watering, and avoid keeping soil constantly moist.
What overwatering vs. underwatering can look like
- Overwatering: yellowing leaves, droop that doesn’t perk up, musty soil smell, slow decline.
- Underwatering: crispy edges, dry soil pulling from pot sides, leaves dropping after a long dry spell.
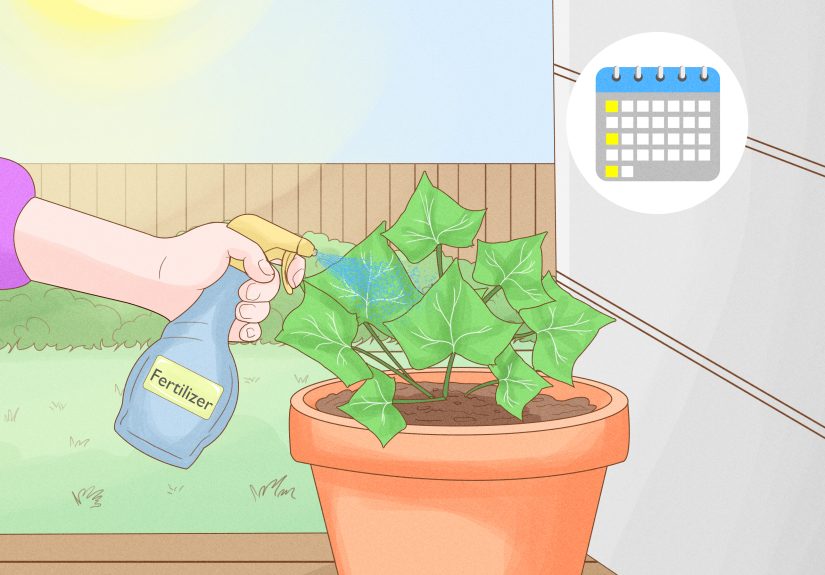
Step 6: Feeding, Pruning, and Training (How to Keep Ivy Cute)
Fertilizer: small meals, not a buffet
During active growth, ivy appreciates light feeding. A beginner-friendly plan:
fertilize about once a month in spring through early fall using a balanced houseplant fertilizer mixed per label directions.
Skip feeding when growth slows (often in winter, or during extreme heat).
Pruning: the secret to “lush” instead of “stringy”
Ivy will happily grow long vines with leaves spaced far apart if light is low or if it’s never trimmed.
Want a fuller plant? Trim vines just above a leaf node to encourage branching.
Think of it as giving your ivy a haircut that says, “Yes, you may growjust not into a dramatic soap-opera ponytail.”
Training options
- Trailing: Let it spill from a shelf or hanging basket.
- Climbing: Add a small trellis or hoop. Tie gently with soft plant ties.
- Topiary: Train ivy around a wire frame. It’s equal parts gardening and arts-and-crafts, which is dangerously fun.
Step 7: Repotting and Refreshing Soil
When to repot
Repot when roots circle the pot, poke out drainage holes, the plant dries out very quickly, or it becomes top-heavy and tips easily.
Many ivies do well with repotting every couple of yearssometimes sooner if growth is fast.
How to repot without drama
- Move up only about 1 inch (or so) in pot diameter at a time.
- Use fresh, well-draining potting mix.
- Water in thoroughly and keep in bright, indirect light while it settles.
If you don’t want a bigger pot
You can refresh the plant by removing some old soil from the edges, trimming a small amount of roots,
and returning it to the same pot with fresh mix. This keeps the ivy compact and manageableideal for indoor spaces.
Step 8: Common Problems (and How to Fix Them Fast)
Spider mites: the tiny villains of dry air
If leaves look stippled, dusty, or slightly bronzedand you notice fine webbingspider mites may be involved.
They thrive in hot, dry conditions.
- Rinse foliage (especially undersides) with water.
- Increase humidity and improve air circulation.
- Use insecticidal soap if needed, following label instructions.
- Isolate the plant while treating so mites don’t spread.
Scale insects and other sap-suckers
Sticky residue, yellowing, and little “bumps” on stems can signal scale. For light infestations, wipe off pests with a cotton swab
and treat with an appropriate houseplant spray or soap product. Consistent inspection is the real cheat code here.
Leaf drop after moving locations
Ivy can be a little dramatic about change. If you move it from low light to bright light (or vice versa), it may drop some leaves.
Stabilize conditions, avoid overwatering, and give it a couple of weeks to adjust.
Variegation fading
If a variegated ivy turns greener, it’s usually begging for more light. Move it closer to a bright window (still avoiding harsh direct sun),
and prune out overly green shoots if you want to preserve the pattern.
Bonus: How to Propagate Ivy From Cuttings (So One Ivy Becomes Many)
Water propagation (beginner favorite)
- Cut a healthy 4–5 inch vine with several leaf nodes.
- Remove the lower leaves so at least one node can sit underwater.
- Place the cutting in clean water in bright, indirect light.
- Change water regularly, and wait for roots to form.
- Once roots are established (around an inch long), pot into well-draining mix.
Pro tip for a bushier pot
If you want a thick, full ivy (instead of a single vine doing interpretive dance off the edge of a shelf), plant multiple rooted cuttings
into the same pot. You’ll get instant fullness and a more balanced look.
Conclusion
If you can keep a mug from overflowing and remember that plants also dislike standing in puddles, you can grow ivy in a pot.
Give it a container with drainage, a light and airy potting mix, bright indirect light, and a watering routine based on soil feelnot vibes.
Trim it to encourage fullness, feed it lightly during growth, and keep an eye out for pests when the air turns warm and dry.
Most importantly: enjoy the process. Ivy is forgiving, fast-growing, and flexible. It’s basically the “practice plant” that still looks elegant enough
to show off on a bookshelf like you’ve had your life together for years.
Extra: of “Been-There” Ivy-in-a-Pot Experiences
Beginner ivy journeys tend to follow a predictable plotline, like a sitcom where the main character swears they’ll be responsible this time.
Episode one usually starts with optimism: you place your new potted ivy somewhere “bright,” which turns out to be a corner that’s bright
only if you squint and believe in miracles. Two weeks later, the vines get long, the leaves get smaller, and the plant develops that
“I’m trying my best, but I can’t see” look. The fix is almost always the same: move it closer to a window with bright, indirect light.
It’s amazing how quickly ivy perks up when it can actually photosynthesize.
Episode two is water-related. New growers often swing between “I love you, have more water” and “Oops, I forgot you existed.”
If your ivy is dropping leaves and the soil is consistently wet, it’s not being moodyit’s probably stressed. Let the top layer dry a bit,
make sure the pot drains, and empty the saucer after watering. On the flip side, if your ivy looks crispy and the soil is pulling away
from the pot edges, it’s time for a deep drink. A good soak until water runs out the bottom can rescue a plant that’s been quietly
dehydrating while you were busy being a functioning adult.
Episode three is the “mystery pest” arc. Someone notices tiny speckles on leaves and assumes dust. Thenplot twistwebbing.
Spider mites love warm, dry indoor air. The simplest first move is a shower: rinse the plant, especially leaf undersides, and boost humidity.
Many people discover that putting ivy in a bright bathroom window (if available) is like sending it to a spa retreat. Just remember:
great humidity doesn’t cancel out the need for good light.
Episode four is haircut day. Ivy can grow long and lanky, especially if you’re being polite and letting it “express itself.”
The moment you start pinching tips and trimming vines above a node, you unlock the secret level: branching. The plant fills in,
looks intentional, and suddenly your hanging basket doesn’t resemble a single green shoelace. Bonus: those trimmings can become
cuttings, which is how many households accidentally end up with “just one more ivy” in every room.
Final episode: you realize potted ivy is best treated like a living decoration with boundaries. You guide it, you shape it, you don’t
let it crawl into other pots like it’s starting a small leafy empire. With a little routinelight check, soil check, occasional prune
ivy becomes one of the most satisfying beginner houseplants: quick results, forgiving nature, and enough personality to keep things interesting.


