Table of Contents >> Show >> Hide
- Why This DIY Works (Even If You’re “Not Crafty”)
- Supplies You’ll Need
- Step-by-Step: Turn Paper Plate Holders into Chic Wall Decor
- Step 1: Choose holders that look intentional (not accidental)
- Step 2: Clean them like you mean it
- Step 3: Scuff-sand glossy plastic (optional, but a game-changer)
- Step 4: Prime for plastic adhesion
- Step 5: Paint in a “designer” palette
- Step 6: Create your inserts (the part that makes people ask “Where’d you buy that?”)
- Step 7: Add texture or trim (optional, but “wow”)
- Step 8: Seal for durability (especially if using paper)
- Step 9: Plan your layout before you commit to the wall
- Step 10: Hang with the right method for your wall and weight
- Step 11: Style the wall so it looks curated
- Five “Chic Wall Decor” Recipes Using Paper Plate Holders
- Layout Tips That Keep It Looking “Designed,” Not “DIY”
- Troubleshooting (Because Crafting Has Plot Twists)
- FAQ
- Experiences to Expect: What You’ll Learn After Making a Few (Extra Length Section)
- Conclusion
You know those paper plate holdersthe reusable plastic rings (or snap-in caddies) that keep flimsy paper plates from folding like a sad taco at a backyard BBQ? Congratulations: you’re holding the most unexpectedly useful “frame” your wall has ever seen.
With a little prep, paint, and styling, paper plate holder wall decor can look like modern sculptural art, a boutique gallery wall moment, or even a designer-inspired “plate wall” cousinwithout the designer price tag. The best part? It’s fast, budget-friendly, and highly customizable, meaning your wall won’t look like it got dressed in the dark.
Why This DIY Works (Even If You’re “Not Crafty”)
Paper plate holders are basically ready-made circular frames. Their built-in lip creates depth and shadow, which is the secret sauce behind high-end wall decor: dimensionality. Add a clean color palette, repeat shapes, and hang them with consistent spacing, and suddenly you’ve got that “I saw this in a magazine” lookexcept you made it between laundry loads.
- Shape repetition makes a wall look intentional (circles are your friend).
- Depth reads “custom” instead of “craft bin.”
- Low weight means easier hanging and less wall drama.
- Easy to update: swap the insert art seasonally without repainting everything.
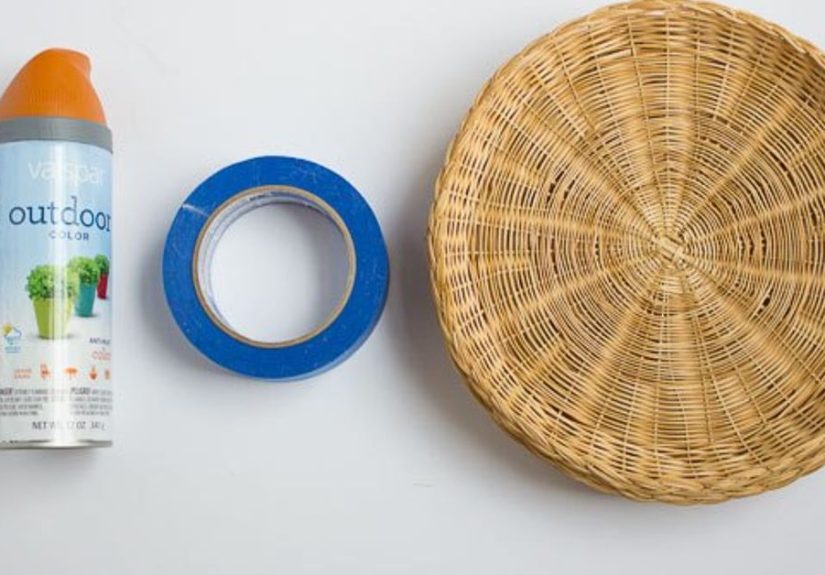
Supplies You’ll Need
Pick your adventure: ultra-simple (paint + hang) or extra-fancy (insert art + texture + topcoat). Either way, keep it light and cohesive.
Core materials
- Reusable plastic paper plate holders (matching sets look sleek; mixed sets look eclectic)
- Dish soap, water, microfiber cloth
- Fine sandpaper or sanding sponge (optional but helpful)
- Plastic-bonding primer or paint formulated for plastic (spray is easiest)
- Spray paint or acrylic craft paint (plus a brush/foam brush)
- Backing for “inserts”: cardstock, scrapbook paper, fabric, thin craft foam, or lightweight cardboard
- Adhesive: double-sided tape, hot glue, or strong craft glue (choose based on inserts)
- Hanging method: picture hanging strips, small hooks, or a lightweight sawtooth hanger
Optional “make it look expensive” extras
- Rub-on metallic wax, gold leaf accents, or faux aged patina paint
- Textured inserts: cane webbing, linen, burlap, wallpaper samples
- Trim: half-round wood trim, beaded garland, braided rope, ribbon
- Clear topcoat (matte is chic; gloss is glam)
Step-by-Step: Turn Paper Plate Holders into Chic Wall Decor
This method creates a “floating art medallion” effect: the holder becomes the frame, and your insert becomes the art. Make one as a statement piece, or create a whole DIY wall decor cluster.
Step 1: Choose holders that look intentional (not accidental)
Look for holders with clean curves and minimal logos or heavy texture. If the set is mismatched, that’s finejust commit to a shared paint color so they feel like a collection. Pro tip: buy a few extra for testing paint and hanging methods.
Step 2: Clean them like you mean it
Plastic holds onto invisible oils (factory residue, fingerprints, kitchen life). Wash with warm water + dish soap, rinse well, and dry completely. If you skip this step, paint may peel laterlike a sunburn, but for your decor.
Step 3: Scuff-sand glossy plastic (optional, but a game-changer)
If the surface is shiny, lightly scuff with fine sandpaper. You’re not sanding a deck; you’re just giving primer something to grip. Wipe away dust with a clean cloth.
Step 4: Prime for plastic adhesion
For the most durable finish, use a plastic primer or a paint designed for plastic. Apply light, even coats. Thin coats beat thick coats every timethick coats are how you get drips that look like the holder is crying.
Step 5: Paint in a “designer” palette
Want instant chic? Choose one of these palettes:
- Modern: matte black + warm white inserts
- Coastal: soft white + sand/tan textures + pale blue accents
- Glam: champagne gold + black-and-white prints
- Vintage: muted sage + floral/vintage book page inserts
- Minimal: all one tone (yes, even all-beigecalm can be a vibe)
Spray paint gives the smoothest look. If brushing acrylic paint, use a foam brush and apply multiple thin layers.
Step 6: Create your inserts (the part that makes people ask “Where’d you buy that?”)
Place the holder on your chosen paper/fabric and trace a circle. Cut slightly smaller than the inner lip so it sits neatly. Here are insert ideas that read high-end:
- Wallpaper sample circles (instant boutique energy)
- Black-and-white family photos or travel photos
- Line art prints (downloaded and printed at home)
- Linen or canvas fabric for texture
- Botanical pages (or botanical-style prints)
Step 7: Add texture or trim (optional, but “wow”)
If your holders are very plain, add a detail:
- Rope edge: wrap thin rope around the outer rim and glue in place for coastal texture
- Beaded trim: glue beaded garland around the rim for a soft, curated look
- Metallic highlight: rub a tiny bit of metallic wax on raised edges for depth
Step 8: Seal for durability (especially if using paper)
If you used paper inserts and want longevity, a light clear coat can help protect against scuffs. Choose matte if you want it to look expensive (matte hides imperfections and avoids glare).
Step 9: Plan your layout before you commit to the wall
Layout is where DIY becomes design. Arrange your pieces on the floor first. Keep spacing consistent (think “gallery wall,” not “panic collage”). For a clean look, aim for similar gaps between pieces and keep the overall center at eye level.
Step 10: Hang with the right method for your wall and weight
Because paper plate holders are lightweight, you have options:
- Damage-minimizing strips: Great for rentals and easy rearranging (follow the package rules and weight limits).
- Small nails + a simple hanger: Best if you want extra security or a more permanent look.
- Mini hooks: Works well if the holder has a notch or you add a small loop on the back.
If using adhesive strips, make sure the back surface is clean and reasonably flat where the strip will stick.
Step 11: Style the wall so it looks curated
The easiest trick: mix your new pieces with one or two different shapeslike a small rectangular frame, a tiny mirror, or a woven mini basket so the arrangement feels collected, not copy-pasted.
Five “Chic Wall Decor” Recipes Using Paper Plate Holders
1) The Modern Monochrome Set
Paint holders matte black. Use white inserts with minimal line art. Hang in a neat grid (2×3 or 3×3). This looks especially good in an entryway or hallway.
2) The Soft Neutral Texture Wall
Paint holders warm white or greige. Inserts: linen, cane webbing, or textured paper. Add thin rope trim for dimension. Perfect for bedrooms and calm living rooms.
3) The “Tiny Gallery” Family Photo Cluster
Use black-and-white family photos as inserts, all the same size. Keep the holders one color so the photos are the star. This gives you the emotional warmth of family photos without the chaotic frame mismatch.
4) The Cottagecore Botanical Wall
Use botanical prints or pressed-flower style images. Paint holders muted sage, dusty rose, or creamy ivory. Bonus: lightly distress edges with a dry brush for a vintage look.
5) The Glam Moment (Small Space Friendly)
Paint holders champagne gold. Inserts: black cardstock with a simple white quote, or high-contrast abstract prints. Hang three in a vertical line for a sleek “designer column.”
Layout Tips That Keep It Looking “Designed,” Not “DIY”
- Pick a color story: one main color + one accent + one neutral is plenty.
- Keep spacing consistent: even if the arrangement is organic, repeated gaps make it feel polished.
- Create a focal point: one slightly larger piece or a center “hero” holder anchors the wall.
- Don’t hang too high: keep the visual center around typical eye level for a natural look.
- Mix is okayintentional mix is better: mismatched can look collected and charming when the palette is cohesive.
Troubleshooting (Because Crafting Has Plot Twists)
Paint is peeling
Usually caused by skipped cleaning/priming. Fix by stripping loose paint, cleaning again, scuff-sanding, and priming with plastic-bonding primer.
Spray paint looks bumpy
You’re likely spraying too close or too heavy. Light coats, a steady hand, and proper drying time help. Also: humidity can turn spray paint into a texture experiment you did not consent to.
Adhesive won’t stick
Clean the wall surface and the item’s back, and confirm the surface is compatible with your adhesive. If the back is curved, add a small flat backing plate (thin plastic or wood) where the strip attaches.
The arrangement feels “off”
Step back 6–8 feet and take a photo. The camera is brutally honest. Adjust by moving one piece closer, swapping two positions, or adding one small non-circle item to break the rhythm.
FAQ
Are paper plate holders really sturdy enough for wall decor?
Yeswhen used as lightweight decorative frames, they’re ideal. Keep inserts light, don’t overload with heavy add-ons, and use the right hanging method.
Can I do this without spray paint?
Absolutely. Acrylic craft paint works; just use thin coats and consider a primer for better adhesion. A matte sealer helps protect the finish.
Where should I hang these?
Great spots: kitchen nooks, breakfast corners, hallways, powder rooms, laundry rooms, and above a console table. Basically anywhere you want personality without clutter.
Experiences to Expect: What You’ll Learn After Making a Few (Extra Length Section)
The first paper plate holder you transform will probably take the longestand not because it’s hard, but because you’ll spend time deciding what “chic” means for your space. That’s normal. Most people start with a vague goal (“cute wall decor”) and end up realizing they actually want a specific vibe (“modern minimal,” “coastal calm,” or “grandma-but-make-it-trendy”). Once you choose a palette and a repeatable insert style, the process speeds up dramatically.
You’ll also notice that surface prep is the difference between “this looks store-bought” and “this looks like it survived a toddler’s science fair.” Plastic is picky: if it’s even slightly oily, paint may fisheye or scratch off later. People who skip cleaning often end up doing the project twiceonce for fun and once out of regret. If you do it right, you’ll be surprised how durable the finish feels, especially with thin coats and adequate dry time.
Another common experience: your brain will insist the layout is perfect… until you hang the first piece. That’s why planning on the floor (or using paper templates on the wall) feels “extra” but saves you from a wall full of unnecessary holes or wasted adhesive strips. Most DIYers find that once one piece is up, the rest should orbit it. Pick a “hero” holdermaybe the one with the boldest insert or the richest textureand build around it. When the arrangement feels awkward, the fix is usually simple: tighten the spacing, level the center line, or rotate a piece so patterns balance left to right.
Expect a learning curve with spray paint, too. The first coat often looks disappointing because it’s intentionally light. Coat two is where it starts looking smooth, and coat three is where you start whispering, “Okay… I get it now.” If you’re painting indoors, you’ll quickly learn that ventilation is not a suggestion. If you’re painting outdoors, you’ll learn the wind has opinions about your life choices. A calm day, light passes, and patience produce the cleanest finish.
When it comes to inserts, you’ll probably experiment more than you think. Many people start with scrapbook paper and then realize texture looks even more elevated: linen scraps, wallpaper samples, or even a single-color cardstock with a tiny centered motif can look surprisingly high-end. You may also discover that less detail reads more expensive. A simple abstract shape, a monochrome photo, or a restrained botanical print often looks more “designer” than a busy patternespecially when you’re repeating multiple pieces on one wall.
Finally, you’ll gain confidence to mix these pieces with other decor. Once you see how good repeated circles look, you’ll start noticing them everywhere: small mirrors, woven baskets, thrifted plates, embroidery hoops, and round frames all play nicely together. Many people end up expanding the project into a bigger gallery wall because it’s fun, flexible, and easy to refresh. Swap inserts for the holidays, switch from neutrals to bold colors in summer, or add one new piece each month until the wall feels like a personal collection. That’s the real “chic” secret: it looks curated over timeeven if you made it in one weekend.
Conclusion
Turning paper plate holders into chic wall decor is one of those rare DIYs that checks every box: affordable, fast, customizable, and genuinely stylish. Start with a simple set (one color, one insert style), hang it with consistent spacing, and let the wall do what good decor always doestell your story without shouting. And if anyone asks where you bought it, you can smile and say, “Oh, this old thing?” like you didn’t make it from BBQ accessories.


