Table of Contents >> Show >> Hide
- Why an Upside-Down Christmas Tree Works (Yes, It’s More Than a Trend)
- Choose Your Upside-Down Tree Style
- Safety First: Set Up Like You Enjoy Having a Ceiling
- The Upside-Down Decorating Strategy: Think “Holiday Chandelier”
- Style Themes That Look Amazing on an Upside-Down Tree
- Where to Place an Upside-Down Tree (So It Looks Expensive, Not Confusing)
- Troubleshooting: Fix the Common Upside-Down Tree Problems
- Real-Life Decorating Experiences ( of What People Learn the Fun Way)
- SEO Tags
If you’ve ever looked at your living room and thought, “This space needs more drama,” congratulations: you’re spiritually ready
for an upside-down Christmas tree. Also called an inverted Christmas tree or hanging Christmas tree, this
style flips the usual look so the tip points down and the fuller branches live closer to the ceiling. The result feels a little
like holiday décor met a chandelier and said, “Let’s make it art.”
The best part? An upside-down Christmas tree isn’t just a gimmick for people who own velvet blazers and use the word “curate”
in everyday conversation. Done well, it can save floor space, keep ornaments safer from curious pets and tiny hands,
and create a fresh focal point that makes even your most basic apartment feel like a fancy hotel lobby (minus the mysterious “resort fee”).
Why an Upside-Down Christmas Tree Works (Yes, It’s More Than a Trend)
Design-wise, inverted trees do three smart things at once: they pull the eye upward (great for rooms with tall ceilings),
they put your prettiest ornaments closer to eye level, and they free up the area underneath for gifts, a cozy reading nook,
or a “Santa staged this perfectly” vignette.
Historically, hanging greenery isn’t new. Versions of ceiling-hung seasonal décor show up in European traditions and folklore,
and modern upside-down trees have popped up in everything from retail displays to headline-making installations at museums.
The origin stories vary (and some are more legend than documented fact), but the takeaway is simple: people have been hanging
festive evergreens for a long timetoday we just do it with nicer lights and fewer open flames.
Choose Your Upside-Down Tree Style
Before you touch a single ornament, decide what kind of upside-down tree you’re doing. Your decorating plan depends on it.
Option 1: A Purpose-Built Upside-Down Artificial Tree
These are made to be inverted, usually with a stable stand or mounting system. They’re the “buy once, use for years” solution.
If you want the look without the engineering project, this is your easiest pathespecially if you’re aiming for a clean, symmetrical silhouette.
Option 2: A Ceiling-Hung Tree (DIY or Pro Install)
This is the classic “tree on the ceiling” look. It can be stunninglike your holiday décor decided to floatbut it requires
the most attention to safety, weight, and secure mounting.
Option 3: A Wall-Mounted “Inverted” Tree Illusion
If your ceiling is not interested in supporting your festive dreams, try a wall approach: a half-tree, a garland “tree” outline,
or a minimalist branch arrangement angled downward. You still get the upside-down vibe, with less risk and easier setup.
Safety First: Set Up Like You Enjoy Having a Ceiling
An upside-down Christmas tree is not the time to “eyeball it.” You’re combining height, weight, wiring, and holiday excitement.
That’s a fun partyuntil it isn’t.
1) Pick the Right Spot
- Clearance: Make sure nobody will walk face-first into branches. Aim for generous headroom in walkways.
- Heat sources: Keep the tree away from fireplaces, heaters, candles, and vents.
- Outlet access: Plan a clean, safe route for cords so you’re not creating a holiday obstacle course.
2) Respect the Weight (Tree + Decor + Lights)
The tree itself is only the beginning. Add ornaments, ribbon, lights, and maybe a topper, and suddenly you’ve created a
festive physics exam. Use hardware rated for more than the full decorated weight, and whenever possible, secure to a ceiling
joistnot just drywall. If you’re unsure, a handyman or contractor can help you mount safely.
3) Follow Basic Fire & Electrical Safety
- Use lights listed by a qualified testing lab and replace damaged strands.
- Turn off tree lights when you leave home or go to sleep (timers are your friend).
- If using a real tree (rare for upside-down installs), keep it hydrated and remove it when it dries out.
- Never use lit candles on or near the tree. Ever. Not even “for the vibes.”
The Upside-Down Decorating Strategy: Think “Holiday Chandelier”
A traditional tree is decorated from the top down because the top is the focal point. An upside-down tree flips your focal point:
the tip is now closer to eye level. That means your decorating should be intentional about where people actually look.
Step 1: LightsStart Where the Power Is, Finish Where the Magic Is
For a hanging tree, many decorators prefer adding lightweight elements (like lights and ribbon) before the tree is fully mounted,
simply because it’s easier than decorating on a ladder. If your tree is already installed, start near the top (the ceiling side)
and wrap downward so the lights flow naturally toward the tip. Aim for even coverage and tuck cords deep into branches so they
don’t dangle like they’re trying to escape.
Pro move: Use a timer plug so your tree turns on automatically in the evening and shuts off before you’re asleep.
You get the sparkle without the “Did I leave the lights on?” panic spiral.
Step 2: Ribbon and GarlandLet Gravity Work for You
Ribbon looks especially good on an inverted tree because it can cascade downward in a way that feels naturally elegant. Wide wired
ribbon gives structure; softer ribbon gives a “waterfall” drape.
- Waterfall method: Anchor ribbon near the ceiling side, then let it spill toward the tip in gentle waves.
- Spiral method: Wrap ribbon in a loose spiral, keeping spacing consistent so the tree feels balanced.
- Cluster method: Tie ribbon bows or “loops” in groups near the lower half (closer to eye level) for maximum impact.
For garland, go lighter than you thinkespecially on a ceiling-hung tree. The goal is polish, not a tug-of-war between décor and gravity.
Step 3: OrnamentsBalance, Scale, and Shatter-Proof Sanity
Here’s the upside-down truth: if you decorate exactly the way you decorate a normal tree, the bottom (the tip area) can look
overcrowded because it’s visually dominant. Instead, design in layers:
- Start with larger ornaments closer to the trunk and higher up (near the ceiling side) to build structure.
- Use medium ornaments around the midsection to create rhythm.
- Save your most detailed “wow” ornaments for the lower third, where people will naturally stare.
If you have pets or kids: put shatterproof ornaments on the lower area. Even if the point is “out of reach,”
life finds a way. (And by “life,” I mean cats.)
Step 4: The “Tree Topper” Becomes the “Tree Bottomer”
On an inverted tree, the tip is downso your topper needs a new plan. You have three great options:
- Tip topper: Attach a star, finial, or bow to the downward-pointing tip for a bold statement.
- Ceiling crown: Create a decorative collar at the ceiling mount (think: greenery ring, ribbon rosette, or metallic canopy).
- Double focal points: Use a subtle finial at the tip and a dramatic ceiling collar to make the whole setup feel intentional.
Step 5: Hide the Hardware Like a Decorating Wizard
The number-one giveaway of a “first attempt” upside-down tree is visible mounting hardware. Camouflage it with:
- A wide ribbon wrap around the ceiling plate
- A wreath or greenery ring at the attachment point
- A decorative ceiling medallion look (painted foam options exist)
- Coordinated ornaments clustered near the top to draw attention away from the mechanics
Style Themes That Look Amazing on an Upside-Down Tree
Modern Glam (AKA “Holiday Jewelry”)
Stick to metallicsgold, silver, champagnewith warm white lights. Choose ornaments with shine and structure: glass-look baubles,
mirrored accents, and a sleek finial on the tip. Keep ribbon minimal and let the sparkle carry the room.
Cozy Cottage (AKA “Cookies Would Approve”)
Use classic red-and-white, candy-cane stripes, gingerbread ornaments, and soft ribbon bows. Add small ornaments in clusters near
the lower third so the “cute” details live where people can actually see them.
Scandi Minimal (AKA “Calm, But Make It Christmas”)
Neutral palette, warm lights, wood or straw ornaments, and lots of negative space. An upside-down tree can look surprisingly
serene when you don’t pack every branch with sparkle.
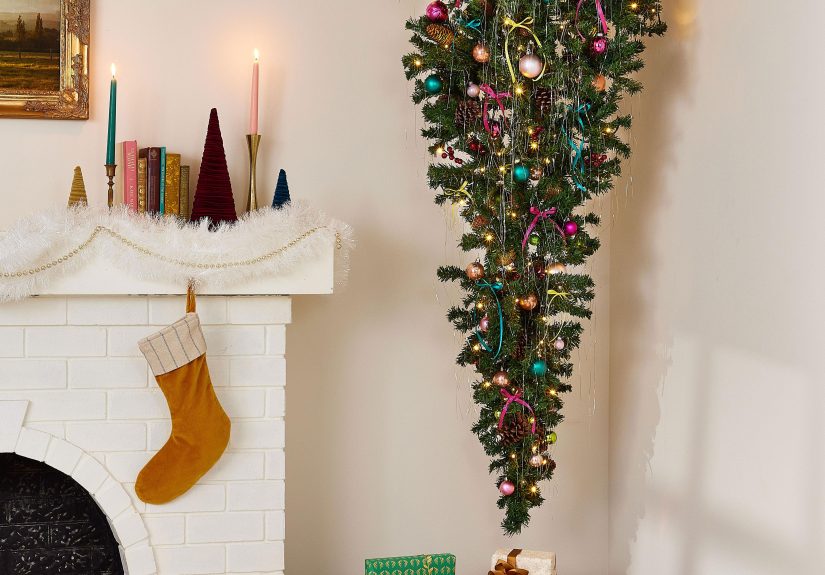
Maximalist Color Party (AKA “Yes, And…”)
Pick a tight palette (like jewel tones or pink-and-red) and go all in: oversized ornaments, layered ribbon, playful garlands,
and unexpected elements (tiny disco balls, anyone?). The inverted shape keeps it looking intentional instead of chaotic.
Where to Place an Upside-Down Tree (So It Looks Expensive, Not Confusing)
Placement is half the magic. The goal is to make it feel like the tree belongs therelike your ceiling always dreamed of being festive.
Over a Dining Table
This is the “holiday chandelier” effect at its best. Keep the tree high enough for comfortable sightlines and movement, and decorate
with lighter ornaments so nothing feels visually heavy above your dinner guests. Bonus: it makes even takeout pizza feel like a formal event.
In an Entryway or Foyer
Want instant wow? Put it where people walk in. Use a refined palette and a clean ribbon design so the tree reads as stylish, not
like a decoration accident. Entryways love vertical drama.
In a Small Living Room
If you’re short on floor space, the upside-down tree helps. You can still place gifts or a small seating moment underneath, which
is especially handy in apartments where every square foot is basically a celebrity.
Troubleshooting: Fix the Common Upside-Down Tree Problems
“It Looks Lopsided”
Step back and check the silhouette. On an inverted tree, uneven spacing shows up fast. Reposition ornaments in a triangle flow:
wider visual weight near the top, lighter near the tip. Also: fluff branches. Always fluff branches. It’s the unsung hero of fake trees.
“The Tip Area Looks Too Busy”
Swap tiny ornaments for fewer statement pieces near the tip. Add ribbon there instead of more ornaments. You want the eye to land,
not get trapped in a glitter traffic jam.
“You Can See the Cords”
Use light clips or twist ties and tuck cords deeper into the greenery. Consider running the main cord along the ceiling line and down
a corner seam so it blends into the architecture.
Real-Life Decorating Experiences ( of What People Learn the Fun Way)
Most people’s first experience decorating an upside-down Christmas tree starts with a very confident sentence like, “This will be easy.”
Then reality politely clears its throat. The biggest “aha” moment tends to be scale: ornaments you’ve used for years suddenly look different
when the tree’s most visible area is the lower third. A classic pack of small baubles that looked perfectly balanced on a traditional tree can
look like confetti on an inverted onecute, but busy. Many decorators end up editing their ornament mix: fewer pieces near the tip, larger
focal ornaments closer to eye level, and more breathing room overall.
Another common experience is discovering that ribbon becomes the MVP. On a standard tree, ribbon is optional flair. On an upside-down tree,
ribbon can be the difference between “Wow, that’s gorgeous” and “Did the Grinch install this while running away?” Gravity helps ribbon drape
naturally, so even beginners can get a designer-like cascade effect. People who normally skip ribbon often become instant converts once they
see how it visually smooths the inverted shape and hides minor imperfections.
Lighting also feels different in practice. If you’ve ever wrapped lights on a normal tree while standing comfortably on the floor, decorating
a ceiling-hung tree can feel like doing holiday décor on “hard mode.” Many households learn to plan lighting earlier: test strands first,
decide where cords will run, and (if possible) add lights before the final hang. The first year is usually the “learning tree,” and the second
year is the “why didn’t we do it this way from the beginning?” tree.
Families with pets often report the funniest (and most practical) win: ornaments survive longer. Cats still investigate, but the tree’s most
tempting shiny objects aren’t sitting at paw height. That said, people also learn that pets are excellent problem-solvers. If a dangling cord
is visible, it becomes a toy. If an ornament swings freely, it becomes a personal challenge. The usual fix is simple: tuck cords deeper,
choose shatterproof ornaments for the lower area, and avoid anything that jingles like it’s auditioning for a musical.
The final real-life lesson is emotional, not technical: an upside-down tree becomes a conversation piece. Guests ask about it. Kids remember
it. Even skeptics tend to smile once they see the room. People who try it often say the best part isn’t just the lookit’s the way it makes
decorating feel new again. Holiday traditions can get repetitive, and flipping the tree (literally) brings back that playful, “we’re making
a moment” energy. The tree becomes less of a checklist item and more of a story you get to tell all season long.


