Table of Contents >> Show >> Hide
- What Is a CAT5 Network Patch Cable?
- CAT5 vs. CAT5e: Which Cable Should You Crimp?
- Tools and Materials You Need
- Understand the Two Wiring Standards: T568A and T568B
- Step-by-Step: How to Crimp a CAT5 Network Patch Cable
- Step 1: Measure and Cut the Cable
- Step 2: Slide on the Boot First
- Step 3: Strip the Outer Jacket
- Step 4: Untwist and Straighten the Pairs
- Step 5: Arrange the Wires in the Correct Order
- Step 6: Trim the Conductors Evenly
- Step 7: Insert the Wires Into the RJ45 Plug
- Step 8: Crimp the Connector
- Step 9: Repeat on the Other End
- Step 10: Test the Cable
- Common Mistakes When Crimping CAT5 Patch Cables
- How to Troubleshoot a Failed CAT5 Cable
- Best Practices for Better CAT5 Patch Cables
- When Should You Make Your Own CAT5 Patch Cable?
- Safety Notes Before You Start
- Real-World Experiences: Lessons Learned From Crimping CAT5 Patch Cables
- Conclusion
- SEO Tags
Crimping a CAT5 network patch cable sounds like something a mysterious IT wizard does in a server room while muttering about packets, pins, and “who touched the switch?” In reality, it is a practical skill anyone can learn with a little patience, the right tools, and a healthy respect for tiny colored wires that love to rearrange themselves at the worst possible moment.
This user-friendly guide explains how to crimp CAT5 network patch cables from start to finish. You will learn what tools you need, which wiring standard to choose, how to arrange the wires, how to crimp an RJ45 connector, and how to test your finished cable. Whether you are making a short cable for a router, replacing a broken Ethernet patch cord, wiring a home office, or simply tired of buying 25-foot cables when you only need 6 feet, this guide has you covered.
Before we begin, a quick modern reality check: original CAT5 cable is considered older network cabling. CAT5e is now far more common and is usually the better choice for new patch cables because it offers improved performance and supports Gigabit Ethernet more reliably. Still, the crimping process for CAT5 and CAT5e patch cables is essentially the same, so the steps below apply to both.
What Is a CAT5 Network Patch Cable?
A CAT5 network patch cable is a short Ethernet cable used to connect network devices such as computers, routers, switches, modems, printers, game consoles, smart TVs, and network storage devices. It has an RJ45-style modular plug on each end and contains four twisted pairs of copper conductors inside the outer jacket.
The word “patch” simply means the cable is used to patch one device into another part of the network. Think of it as the friendly handshake between your computer and the internet. Without it, your device may be left staring into the digital void, wondering why the Wi-Fi is “being dramatic” again.
CAT5 vs. CAT5e: Which Cable Should You Crimp?
If you already have CAT5 cable on hand, you can use it for many basic Ethernet connections, especially 10/100 Mbps networks. However, if you are buying cable today, CAT5e is the smarter pick for most home and small-office projects. CAT5e is designed with better crosstalk control and is commonly used for 1 Gbps Ethernet connections when installed and terminated properly.
For patch cables, choose stranded copper cable when possible. Stranded Ethernet cable is more flexible, which makes it ideal for short cables that get moved, bent, unplugged, and reconnected. Solid copper cable is better suited for fixed in-wall or structured cabling runs, where the cable sits still and behaves itself like a respectable adult.
Tools and Materials You Need
Before crimping your CAT5 network patch cable, gather everything in one place. This prevents the classic DIY networking problem: holding a half-prepped cable while searching for a missing connector under the desk.
Required Items
- CAT5 or CAT5e Ethernet cable, preferably stranded for patch cables
- RJ45 modular plugs rated for CAT5 or CAT5e
- RJ45 crimping tool
- Cable stripper or sharp jacket stripper
- Flush cutter or electrician’s scissors
- Network cable tester
- Measuring tape
- Optional boot covers or snagless strain-relief boots
One important detail: match your RJ45 connectors to your cable type. Solid and stranded cable use slightly different plug contact designs. If you use the wrong connector, the metal contacts may not bite into the conductor properly. The cable might work for five minutes, fail later, or behave like a haunted printer: technically connected, spiritually unavailable.
Understand the Two Wiring Standards: T568A and T568B
Ethernet patch cables are usually wired using one of two standards: T568A or T568B. Both use the same eight wires, but the orange and green pairs are arranged differently. For a normal straight-through Ethernet patch cable, use the same standard on both ends.
T568B Color Order
T568B is very common in U.S. Ethernet patch cables. With the connector clip facing away from you and the gold contacts facing up, the pin order from left to right is:
- White/Orange
- Orange
- White/Green
- Blue
- White/Blue
- Green
- White/Brown
- Brown
T568A Color Order
T568A is also valid and is often preferred in some residential, government, or structured cabling contexts. Its pin order is:
- White/Green
- Green
- White/Orange
- Blue
- White/Blue
- Orange
- White/Brown
- Brown
The golden rule is consistency. T568B on both ends makes a straight-through cable. T568A on both ends also makes a straight-through cable. T568A on one end and T568B on the other creates a crossover cable, which is rarely needed for modern home networking because most newer network equipment can automatically detect and adjust the connection.
Step-by-Step: How to Crimp a CAT5 Network Patch Cable
Step 1: Measure and Cut the Cable
Measure the length you need, then add a little extra. A cable that is one foot too long is mildly annoying. A cable that is two inches too short is a personal betrayal. Cut the cable cleanly using a cable cutter or the cutter built into your crimping tool.
Avoid making patch cables excessively long. Ethernet channels are generally designed around a maximum total length of 100 meters, or 328 feet, but patch cables should usually be much shorter for everyday device connections. For a desk, entertainment center, router shelf, or small network rack, custom lengths between 1 and 25 feet are usually practical.
Step 2: Slide on the Boot First
If you are using strain-relief boots, slide one onto the cable before attaching the RJ45 connector. Everyone forgets this at least once. It is practically a networking rite of passage. The boot cannot magically pass through a crimped connector later, no matter how persuasive you are.
Step 3: Strip the Outer Jacket
Strip about 1 to 1.5 inches of the outer jacket from the cable end. Be gentle. You want to remove the jacket without nicking the inner wire insulation. If you cut too deeply and damage a conductor, snip off the end and start again. A clean start beats troubleshooting a mystery failure after the connector is already crimped.
Inside the cable, you should see four twisted pairs: orange, green, blue, and brown. Some cable may include a ripcord, separator, or filler. Trim these close to the jacket if present.
Step 4: Untwist and Straighten the Pairs
Untwist the four pairs just enough to arrange them into the chosen color order. Keep the untwisted section as short as possible. The twists are not decorative; they help reduce crosstalk and interference. Treat them like tiny engineering spirals doing important work.
Straighten the wires with your fingers. You can gently pinch and pull each conductor until it lies flat. Do not yank the wires or scrape the insulation harshly. Your goal is neat alignment, not an arm-wrestling match with copper.
Step 5: Arrange the Wires in the Correct Order
Choose T568B unless you have a specific reason to use T568A or you are matching an existing installation. Lay the wires side by side in the correct order. For T568B, remember this sequence: white/orange, orange, white/green, blue, white/blue, green, white/brown, brown.
Flatten the wires between your thumb and index finger. Check the order twice. Then check it again. Many bad cables are born from one tiny color swap. White/green and white/blue are especially good at sneaking into the wrong seat like mischievous passengers on a very small bus.
Step 6: Trim the Conductors Evenly
Once the wires are in order, trim them evenly so about half an inch remains beyond the jacket. The exact length depends on your connector, but the key idea is simple: the wires must reach the front of the plug, and the outer jacket must enter the connector far enough for the strain relief tab to grip it.
If the wires are too long, the jacket will not seat inside the connector. If they are too short, one or more conductors may not reach the contact pins. Aim for a clean, square cut.
Step 7: Insert the Wires Into the RJ45 Plug
Hold the RJ45 plug with the clip facing down and the gold contacts facing up. Carefully slide the wires into the connector, keeping them flat and in order. Each wire should enter its own channel. Push firmly until the conductors reach the front of the plug.
Look through the clear connector body. You should see all eight wire tips at the front. Also confirm that the cable jacket is inside the connector. If only the individual wires are inside and the jacket is hanging outside, the crimp will be weak and the cable may fail when pulled or bent.
Step 8: Crimp the Connector
Insert the loaded RJ45 plug into the crimping tool. Make sure it is fully seated, then squeeze the handle firmly until the tool completes the crimp. The metal contacts should pierce the wire insulation and touch the copper conductors. The strain-relief tab should clamp down on the cable jacket.
Do not half-crimp. A timid squeeze is how cables learn to disappoint you. Use steady pressure and complete the motion according to your tool’s design.
Step 9: Repeat on the Other End
Repeat the same process on the second end of the cable. For a standard patch cable, use the same wiring pattern on both ends. If you used T568B on the first end, use T568B on the second end. If you used T568A on the first end, use T568A on the second end.
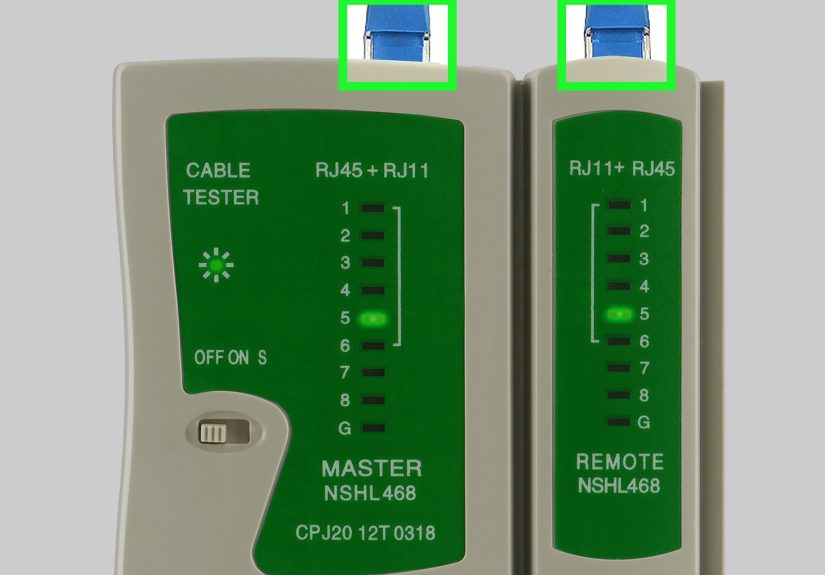
Step 10: Test the Cable
Plug both ends into a network cable tester. A basic tester checks whether pins 1 through 8 are connected in the correct order. Better testers can identify opens, shorts, reversed pairs, split pairs, and miswires.
If the tester lights up 1 through 8 in order on both units, congratulations. You have made a working CAT5 network patch cable. You may now enjoy the quiet satisfaction of creating infrastructure with your bare hands and a mildly intimidating crimp tool.
Common Mistakes When Crimping CAT5 Patch Cables
Mixing T568A and T568B by Accident
This creates a crossover cable. It may still work with modern devices, but it is not the standard patch cable you intended to make. Always compare both ends before testing.
Leaving Too Much Untwisted Wire
Untwisting too much wire can increase crosstalk and reduce performance. Keep the pairs twisted as close to the connector as possible.
Using the Wrong RJ45 Connector
Use connectors made for the category and conductor type of your cable. CAT5e stranded cable should use CAT5e connectors designed for stranded conductors.
Failing to Seat the Jacket Inside the Plug
The connector should grip the cable jacket, not just the tiny wires. If the jacket does not enter the plug, the cable will be physically weak.
Skipping the Cable Tester
Never assume a cable works because it looks nice. Ethernet cables can look perfect and still fail. Test every cable before putting it into service.
How to Troubleshoot a Failed CAT5 Cable
If your cable tester shows a fault, do not panic. Most crimping mistakes are easy to fix by cutting off the bad connector and trying again.
- Open circuit: One wire did not make contact. Check that each conductor reached the front of the plug before crimping.
- Short: Two wires may be touching or improperly seated. Cut and reterminate the end.
- Miswire: The colors are not in the correct order. Recheck the T568A or T568B sequence.
- Split pair: The pin order may look visually close but the twisted pairs are not correctly maintained. This can cause performance issues even if continuity seems fine.
- Intermittent connection: The plug may not match the cable type, the crimp may be weak, or the cable jacket may not be secured.
Best Practices for Better CAT5 Patch Cables
Good patch cables are not just about pin order. Physical handling matters too. Avoid sharp bends, tight knots, and crushing the cable with furniture. A common rule of thumb for unshielded twisted-pair Ethernet cable is to avoid bends tighter than about four times the cable diameter. In normal human language: do not fold it like a taco.
Use reasonable cable lengths, label cables in network closets, and color-code patch cables when helpful. For example, blue cables for computers, yellow for printers, red for uplinks, and purple for “nobody knows what this does, but we are afraid to unplug it.”
Also avoid running Ethernet cables parallel to power cords for long distances. Crossing a power cable at a right angle is usually less problematic than bundling network cable tightly alongside electrical wiring. Good cable routing reduces interference and keeps your installation easier to maintain.
When Should You Make Your Own CAT5 Patch Cable?
Making your own patch cables is useful when you need custom lengths, unusual routing, fast repairs, or bulk cable management. It is especially handy in small offices, home labs, security camera setups, network racks, and classrooms.
However, for everyday use, factory-made patch cables are often inexpensive and very reliable. If you only need one cable, buying one may be faster. If you need ten cables of exact lengths, crimping your own starts to make sense. If you need a cable at midnight and the store is closed, congratulations: your crimping tool just became the hero of the evening.
Safety Notes Before You Start
Network patch cables are low-voltage, but the tools are sharp. Use cutters carefully, keep fingers away from blades, and do not crimp connectors on cables that are plugged into active equipment. If your cable will be installed inside walls, ceilings, air-handling spaces, or commercial buildings, check local code requirements and use the correct jacket rating, such as riser or plenum-rated cable where required.
For simple desk-to-router patch cables, the process is straightforward. For permanent building cabling, structured wiring, or business-critical networks, consider using proper jacks, patch panels, certification testing, and professional installation practices.
Real-World Experiences: Lessons Learned From Crimping CAT5 Patch Cables
The first thing most people learn when crimping CAT5 network patch cables is that confidence arrives one connector after competence. The first cable may feel awkward. The wires refuse to stay flat, the jacket seems too thick, and the RJ45 plug looks impossibly small. Then, after a few tries, your hands begin to understand the rhythm: strip, untwist, arrange, flatten, trim, insert, inspect, crimp, test.
One practical experience is that lighting matters more than expected. Trying to distinguish white/orange from white/brown under a dim desk lamp is a recipe for comedy and failure. A bright workspace makes the color sequence much easier to verify. If your eyes are tired, pause before crimping. A five-second inspection can save five minutes of rework.
Another lesson is that cheap tools can make the job harder. You do not need the most expensive professional crimper for occasional home use, but a flimsy tool may produce inconsistent crimps. A decent ratcheting crimper, sharp cutter, and reliable tester can turn a frustrating project into a smooth one. The cable tester is especially valuable because it tells the truth without judging you. It does not care how proud you are of that connector; if pin 6 is wrong, pin 6 is wrong.
Beginners also tend to untwist too much cable. It feels easier to work with long straight conductors, but too much untwisting can hurt signal quality. The trick is to expose enough wire to arrange the colors comfortably, then trim the conductors so the twist remains close to the plug. With practice, you will use less exposed length and produce cleaner ends.
Pass-through RJ45 connectors can be very beginner-friendly because the wires slide through the front of the plug before crimping. This lets you verify the color order more easily. Traditional closed-end plugs are perfectly fine, but they demand a more precise trim length. If you are learning, pass-through connectors may reduce frustration. Just make sure your crimper is designed to trim pass-through wire ends cleanly.
Another real-world tip: always make one test cable before making twenty. If you are using a new batch of plugs, a new crimper, or a different cable brand, build one short cable and test it. This confirms that the plug fits the cable and that your tool crimps correctly. Nothing ruins a productive afternoon like discovering that the first nineteen cables were made with incompatible connectors.
Labeling is also worth the extra minute. In a small setup, cable labels may seem unnecessary. But six months later, when the router, switch, printer, access point, and gaming PC all have blue cables, labels become little paper superheroes. Even simple labels like “Router to Switch” or “Desk PC” can prevent accidental unplugging and reduce troubleshooting time.
Finally, remember that not every network problem is caused by the cable, but a bad cable can imitate almost every network problem. Slow speeds, dropped connections, PoE camera resets, printer failures, and random disconnects can all come from poor termination. A properly crimped and tested CAT5 or CAT5e patch cable removes one big question mark from the troubleshooting list. That alone makes the skill worth learning.
Conclusion
Learning how to crimp CAT5 network patch cables is a practical, money-saving, and surprisingly satisfying networking skill. Once you understand T568A and T568B wiring, use the right RJ45 connectors, keep the wire order consistent, and test every finished cable, the process becomes simple. The details matter: match the connector to the cable, keep the twists close, seat the jacket inside the plug, and do not skip testing.
For new projects, CAT5e is usually the better choice over old CAT5, especially when Gigabit Ethernet performance is expected. But whether you are repairing an existing cable, building a custom patch cord, or organizing a small network rack, the same careful crimping technique will help you create reliable Ethernet connections. In other words, you do not need to be a network wizard. You just need the right color order, a steady hand, and the courage to crimp with purpose.


