Table of Contents >> Show >> Hide
- Why Dog Ear Cleaning Matters
- How Often Should You Clean Your Dog’s Ears?
- What You Need Before Cleaning Your Dog’s Ears
- How to Clean Your Dog’s Ears: 6 Easy Steps
- Signs Your Dog May Have an Ear Infection
- Common Dog Ear Cleaning Mistakes
- How to Make Ear Cleaning Easier for Your Dog
- Special Tips for Puppies, Senior Dogs, and Floppy-Eared Breeds
- When to Ask a Veterinarian for Help
- Real-Life Experience: What Ear Cleaning Actually Feels Like at Home
- Conclusion
Cleaning your dog’s ears may not be the glamorous side of pet parenting, but it is definitely one of those small habits that can save your furry roommate from discomfort, odor, wax buildup, and the dramatic head-shaking performance that usually ends with ear cleaner on your shirt. The good news? Learning how to clean your dog’s ears is easier than convincing a Labrador that the sandwich was not meant for him.
Dog ear cleaning is not something you should do randomly, aggressively, or with whatever bottle is currently sitting in your bathroom cabinet. A dog’s ear canal is sensitive, curved, and very different from a human ear. Cleaning too deeply, using the wrong product, or ignoring signs of infection can make things worse instead of better. Done correctly, however, routine ear care can help remove wax and debris, reduce odor, and make it easier to notice early warning signs of trouble.
This guide explains how to clean your dog’s ears in six easy steps, what supplies to use, what not to use, when to call your veterinarian, and how to make the whole experience less like a wrestling match with a furry octopus.
Why Dog Ear Cleaning Matters
Dogs explore the world with enthusiasm, and their ears often collect evidence of that lifestyle. Dirt, wax, moisture, grass particles, pollen, and general “I rolled in something mysterious” debris can build up over time. Some dogs rarely need ear cleaning, while others require more regular attention because of their breed, coat type, allergies, swimming habits, or history of ear infections.
Floppy-eared breeds such as Cocker Spaniels, Basset Hounds, Beagles, and some retrievers may be more prone to trapped moisture because their ear flaps limit airflow. Dogs that swim often can also develop damp ears, which may create a cozy environment for yeast or bacteria. Dogs with allergies may scratch their ears or develop recurring inflammation. In other words, your dog’s ears may be low-maintenance, high-maintenance, or somewhere in the “please check me after every muddy adventure” category.
The goal of cleaning is not to scrub the ear until it shines like a kitchen sink. Healthy dog ears do not need constant deep cleaning. In fact, over-cleaning can irritate the ear canal and disturb the normal balance inside the ear. The smart approach is simple: inspect regularly, clean only when needed, and ask your veterinarian for guidance if your dog has recurring ear problems.
How Often Should You Clean Your Dog’s Ears?
There is no one-size-fits-all schedule. Some dogs may need ear cleaning only occasionally, especially if their ears are clean, dry, and odor-free. Other dogs may need cleaning weekly or after swimming, depending on their ear shape and medical history. Dogs being treated for ear infections may need a specific cleaning schedule recommended by a veterinarian.
A practical rule is to check your dog’s ears once a week. Look for redness, swelling, discharge, bad odor, excess wax, or signs of discomfort. If the ears look clean and your dog is not scratching, rubbing, or shaking their head, you may not need to clean them at all. If you see mild wax or dirt, a gentle cleaning may be helpful. If you see heavy discharge, pain, bleeding, strong odor, or your dog pulls away when you touch the ear, stop and call your veterinarian.
What You Need Before Cleaning Your Dog’s Ears
Gathering supplies before you start is important because once ear cleaner enters the chat, your dog may decide the living room is suddenly a racetrack. Having everything nearby keeps the process calm and controlled.
Basic Supplies
- Veterinarian-approved dog ear cleaning solution
- Cotton balls, cotton pads, or gauze
- A clean towel
- High-value treats
- Optional: disposable gloves
- Optional: dog-safe ear wipes for the outer ear only
Use a cleaner made specifically for dogs and recommended by your veterinarian whenever possible. Different ear cleaners are designed for different needs. Some help dry the ear after swimming, some help break down wax, and some are used as part of a treatment plan for dogs prone to infections. If your dog has a history of ear disease, ask your vet which product is safest.
What Not to Use
Avoid hydrogen peroxide, rubbing alcohol, vinegar mixes, essential oils, and random home remedies unless your veterinarian specifically instructs you to use them. These products can irritate sensitive ear tissue, especially if the ear is already inflamed. Also avoid pushing cotton swabs into the ear canal. Cotton swabs can push debris deeper, irritate the canal, or cause injury if your dog suddenly moves.
How to Clean Your Dog’s Ears: 6 Easy Steps
Step 1: Choose a Calm Location
Pick a quiet, easy-to-clean area such as a bathroom, laundry room, porch, or kitchen. Ear cleaning can get splashy. Your dog will probably shake their head, and that shake may launch tiny droplets of cleaner and wax in directions no scientist has fully mapped.
Place a towel nearby and keep treats within reach. If your dog is nervous, let them sniff the bottle and cotton pads before you begin. Praise them calmly. The goal is to make ear cleaning feel routine, not like a surprise spa appointment arranged by a villain.
Step 2: Inspect the Ear First
Before adding any cleaner, lift your dog’s ear flap and look inside. A healthy ear is usually light pink, not swollen, and free from heavy discharge or strong odor. A small amount of wax may be normal. However, dark crumbly debris, pus-like discharge, redness, swelling, bleeding, or a sour smell may signal an infection or another problem.
Also watch your dog’s reaction. If they cry, flinch, snap, pull away, or seem painful, do not continue. Cleaning an infected or painful ear can hurt and may worsen irritation. In that case, your best step is a veterinary exam.
Step 3: Apply Dog Ear Cleaning Solution
Hold the ear flap gently upward to help open the ear canal. Place the tip of the ear cleaner bottle near the opening of the canal, but avoid touching the bottle tip directly to the ear. This helps keep the bottle clean and reduces the chance of spreading yeast or bacteria.
Squeeze enough solution into the ear canal as directed by the product label or your veterinarian. Do not panic if it sounds squishy. That sound means the solution is moving around and helping loosen wax and debris. Your dog may look at you as if you have betrayed the entire friendship, but stay calm and reassuring.
Step 4: Massage the Base of the Ear
With the ear flap still lifted, gently massage the base of the ear for about 20 to 30 seconds. You should hear a soft squishing sound as the solution moves through the canal. This step helps the cleaner break up wax and debris so it can come out more easily.
Use gentle pressure only. You are not kneading bread dough. If your dog seems uncomfortable, stop. A calm dog with mild wax may tolerate this step well, especially if you pair it with praise and treats. A painful dog may resist, which is another sign that a vet visit is the safer choice.
Step 5: Let Your Dog Shake
Now comes the dramatic part. Let your dog shake their head. This is normal and helpful because the shaking action brings loosened debris and extra cleaner toward the outer ear. Stand back, protect your outfit, and accept that this is why the towel was invited to the party.
Some dogs shake once and look proud. Others shake like they are auditioning for a wind machine commercial. Either way, let them do it. Do not hold the head tightly or force them to stay still during this part.
Step 6: Wipe the Outer Ear
Use a cotton ball, cotton pad, or gauze to wipe the visible part of the ear and the entrance of the ear canal. Clean only what you can easily see and reach. Do not push anything deep into the canal. If you are using your finger wrapped in gauze, be gentle and stay near the outer ear.
Repeat with a fresh cotton pad until the visible debris is removed. Then praise your dog and offer a treat. Even if the cleaning was not perfect, ending on a positive note helps your dog cooperate next time. Remember: progress beats perfection, especially when your client has paws.
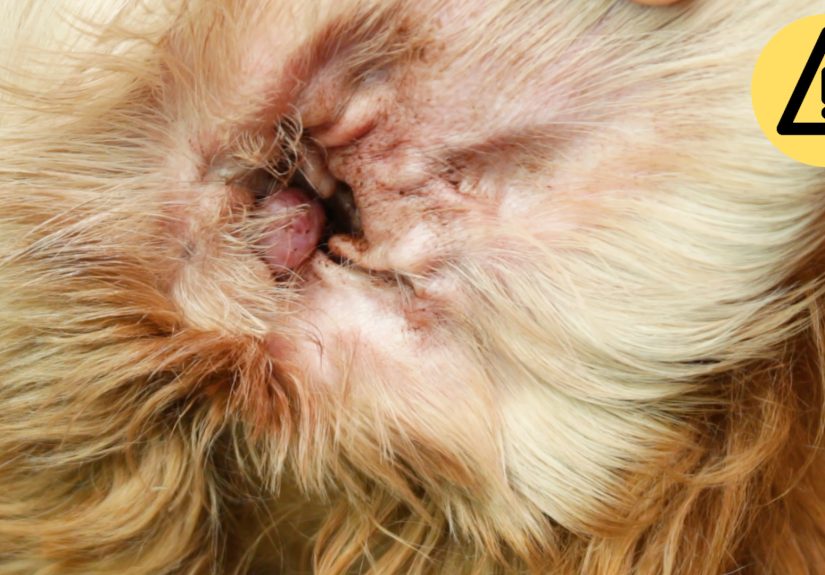
Signs Your Dog May Have an Ear Infection
Cleaning is useful for mild wax and routine care, but it is not a cure for ear infections. Dogs with infections often need veterinary diagnosis and treatment. Ear infections can involve bacteria, yeast, parasites, foreign objects, allergies, moisture, or underlying medical conditions.
Call your veterinarian if you notice any of these signs:
- Strong or unpleasant ear odor
- Redness or swelling inside the ear
- Brown, yellow, black, or pus-like discharge
- Frequent head shaking
- Scratching at the ears
- Rubbing the head on furniture or carpet
- Pain when the ear is touched
- Loss of balance or head tilt
- Recurring ear problems
If your dog has a suspected infection, do not keep cleaning repeatedly in hopes that it will “flush out.” That can delay treatment and make the ear more irritated. A veterinarian may need to examine the ear canal, check the eardrum, identify the cause, and prescribe medication.
Common Dog Ear Cleaning Mistakes
Using Human Products
Human ear drops, alcohol, peroxide, and homemade mixtures are not automatically safe for dogs. A dog’s ear canal can become irritated quickly, especially if there is inflammation or a damaged eardrum. Always use dog-safe products.
Cleaning Too Often
More cleaning is not always better. Over-cleaning can dry out or irritate the ear canal, which may increase discomfort. Clean when there is visible wax, after swimming if your vet recommends it, or on the schedule your veterinarian gives you.
Going Too Deep
Never push cotton swabs or tools deep into the canal. You may push wax further down or injure sensitive tissue. Wipe only the visible area and let the cleaning solution do the deeper work.
Ignoring Pain
If your dog acts painful, stop. Pain is not stubbornness. It is information. A dog who suddenly hates ear cleaning may have an infection, inflammation, a foreign object, or another issue that needs professional care.
How to Make Ear Cleaning Easier for Your Dog
The secret to successful dog ear cleaning is not just technique; it is trust. Start slow, especially with puppies or dogs who dislike handling. Touch the ears gently during calm moments, reward with treats, and stop before your dog gets overwhelmed. Over time, your dog can learn that ear handling predicts snacks, praise, and absolutely no betrayal.
Use high-value treats such as small pieces of chicken, cheese, or a favorite training reward. Keep sessions short. For nervous dogs, break the process into smaller steps over several days: one day touching the ear, another day lifting the flap, another day showing the bottle, and finally cleaning. This is not being dramatic. This is training. Dogs appreciate a clear agenda.
If your dog is large, wiggly, or deeply opposed to ear cleaning, ask another person to help calmly hold and reward them. Avoid yelling, forcing, or pinning your dog down unless there is an urgent medical reason and a professional is guiding you. Fear makes future cleanings harder.
Special Tips for Puppies, Senior Dogs, and Floppy-Eared Breeds
Puppies
Puppies benefit from gentle ear handling early in life. You may not need to clean their ears often, but practicing inspection helps them accept grooming later. Keep sessions playful and short. Reward calm behavior generously.
Senior Dogs
Older dogs may have sensitive skin, chronic allergies, or recurring infections. Be extra gentle, and ask your veterinarian if your senior dog needs a specific cleaner or schedule. Sudden ear odor or discharge in an older dog deserves attention.
Floppy-Eared Dogs
Dogs with long or heavy ear flaps may trap moisture more easily. Check their ears after baths, swimming, rainy walks, and humid outdoor adventures. Your vet may recommend a drying ear cleaner for dogs who swim often.
When to Ask a Veterinarian for Help
Professional help is the right choice when your dog’s ears are painful, swollen, smelly, heavily coated with debris, or repeatedly infected. Your veterinarian can examine the canal, check for mites or foreign material, evaluate the eardrum, and recommend the right treatment. Some dogs need medicated cleaners, prescription drops, allergy management, or follow-up exams.
You should also ask your vet to demonstrate ear cleaning if you are unsure. A quick demonstration can prevent mistakes and make you much more confident at home. Think of it as a tutorial, except the instructor has a stethoscope and your dog is still hoping everyone forgets this ever happened.
Real-Life Experience: What Ear Cleaning Actually Feels Like at Home
In real life, cleaning a dog’s ears rarely looks as graceful as it sounds in a checklist. The first time many owners try it, they prepare the cotton pads, hold the bottle carefully, lift the ear flap, and immediately discover that their sweet dog has transformed into a slippery noodle with opinions. That is normal. Ear cleaning involves an unusual sensation, and most dogs need time to understand that nothing terrible is happening.
One helpful experience is to build a routine before there is a problem. For example, after a weekend bath or a muddy walk, you might check your dog’s ears while they are relaxed. You do not always need to clean them. Sometimes you simply lift the ear, look inside, say “good dog,” offer a treat, and move on. This teaches your dog that ear inspection is not always followed by liquid, wiping, or suspicious human activity.
Another practical lesson is that location matters. Cleaning ears on a couch sounds cozy until your dog shakes ear cleaner across the cushions. A bathroom, laundry room, or outdoor space is usually smarter. Wear clothes you do not love deeply. Keep a towel ready. If your dog is small, placing them on a stable surface with a non-slip mat may help, but never leave them unattended. If your dog is large, standing beside them calmly may work better than trying to face them head-on.
Treat timing also makes a big difference. Many owners save the treat for the end, but nervous dogs often do better with tiny rewards throughout the process. Treat when they let you touch the ear. Treat when they stay still for one second. Treat after the cleaner goes in. Treat after the shake. This turns the whole routine into a snack-powered training session. In dog logic, this is a very persuasive business model.
It also helps to accept that some cleanings will be partial successes. Maybe you only clean one ear today. Maybe your dog lets you inspect but not apply cleaner. Maybe you wipe the outer ear and stop because your dog is getting stressed. That is still progress. Forcing the full process can create fear, while patient repetition builds cooperation.
Owners of floppy-eared dogs often learn to check ears more frequently, especially after swimming. Moisture can linger under heavy ear flaps, so a quick post-swim inspection becomes part of the routine, like drying paws or checking for burrs. Dogs with allergies may need closer attention because ear irritation can flare with seasonal pollen, food sensitivities, or skin inflammation. In these cases, ear cleaning alone may not solve the bigger issue, but it can help you spot changes earlier.
The biggest experience-based tip is this: know what normal looks and smells like for your own dog. Some dogs naturally have a small amount of light wax. Others usually have very clean ears. Once you know your dog’s normal, it is much easier to notice when something changes. A new odor, sudden scratching, darker discharge, or resistance to touch may be your clue to stop cleaning and call the vet.
Cleaning your dog’s ears is not about being perfect. It is about being gentle, observant, and consistent. With the right cleaner, a calm routine, and a generous snack budget, ear care can become a simple part of keeping your dog comfortable and healthy.
Conclusion
Knowing how to clean your dog’s ears is a valuable skill for any pet owner. The process is simple when you use the right supplies: inspect first, apply a vet-approved cleaner, massage gently, let your dog shake, wipe only the visible area, and reward generously. The most important rule is to stay gentle and stop if your dog seems painful or distressed.
Dog ear cleaning should support ear health, not replace veterinary care. If you notice odor, redness, swelling, discharge, pain, or repeated infections, schedule a veterinary visit. Clean ears are wonderful, but healthy ears are the real goal. And if your dog forgives you afterward for the strange ear-squishing ceremony, consider that a beautiful bonus.


