Table of Contents >> Show >> Hide
- Before You Start: Is Your Shower Faucet a Washer Type or a Cartridge Type?
- What You’ll Need
- How to Change the Washer in a Shower Faucet: 7 Easy Steps
- Step 1: Shut Off the Water and Open the Faucet
- Step 2: Remove the Handle and Trim
- Step 3: Loosen and Remove the Valve Stem
- Step 4: Remove the Old Washer and Inspect the Other Parts
- Step 5: Install the New Washer the Right Way
- Step 6: Reassemble the Faucet
- Step 7: Turn the Water Back On and Test Like a Pro
- Common Mistakes That Make a Simple Repair Take Forever
- When a New Washer Won’t Fix the Leak
- A Specific Example: When This Repair Makes the Most Sense
- How Much Time and Money Does This Repair Usually Take?
- Final Thoughts
- DIY Experience: What This Repair Is Really Like in Real Life
An annoying drip from your shower faucet has a special talent: it can sound like a metronome for your frustration, especially at 2 a.m. The good news is that in many older two-handle shower faucets, the fix is surprisingly simple. A worn washer at the end of the valve stem often causes the leak, and replacing it can restore a tight seal without turning your bathroom into a full-blown renovation zone.
That said, not every shower faucet uses a washer as the main wear part. Many newer single-handle models rely on a cartridge instead. So before you charge into battle with a screwdriver and heroic confidence, it helps to know what kind of faucet you’re working with. In this guide, you’ll learn exactly how to change the washer in a shower faucet in seven easy steps, how to avoid the most common DIY mistakes, and how to tell when the real culprit is a stem, seat, or cartridge instead.
Before You Start: Is Your Shower Faucet a Washer Type or a Cartridge Type?
This is the step that separates a satisfying DIY win from an irritated trip to the hardware store.
If you have an older two-handle shower faucet, there’s a good chance it uses a compression stem with a rubber washer. In that setup, each handle turns a stem that presses a washer down against a valve seat to stop water flow. Over time, that washer hardens, cracks, or flattens out, and the faucet begins to drip.
If you have a single-handle shower faucet, the faucet usually relies on a cartridge, not a simple washer. You may still find seals, springs, or O-rings involved, but the repair is often a cartridge replacement rather than a washer swap.
Quick rule of thumb: if your shower has separate hot and cold handles, a washer replacement is much more likely to solve the problem. If it has one main control handle, expect to inspect the cartridge first.
What You’ll Need
- Flathead screwdriver
- Phillips screwdriver
- Allen wrench set
- Adjustable wrench or deep socket wrench
- Needle-nose pliers
- Replacement washer that matches the old one exactly
- Silicone plumber’s grease
- Small towel or rag
- Flashlight
- Optional: seat wrench, emery cloth, replacement stem screw, replacement O-ring
Pro tip: put a towel over the drain before removing anything tiny. Shower drains love to eat screws, caps, and washers like they’re at an all-you-can-lose buffet.
How to Change the Washer in a Shower Faucet: 7 Easy Steps
Step 1: Shut Off the Water and Open the Faucet
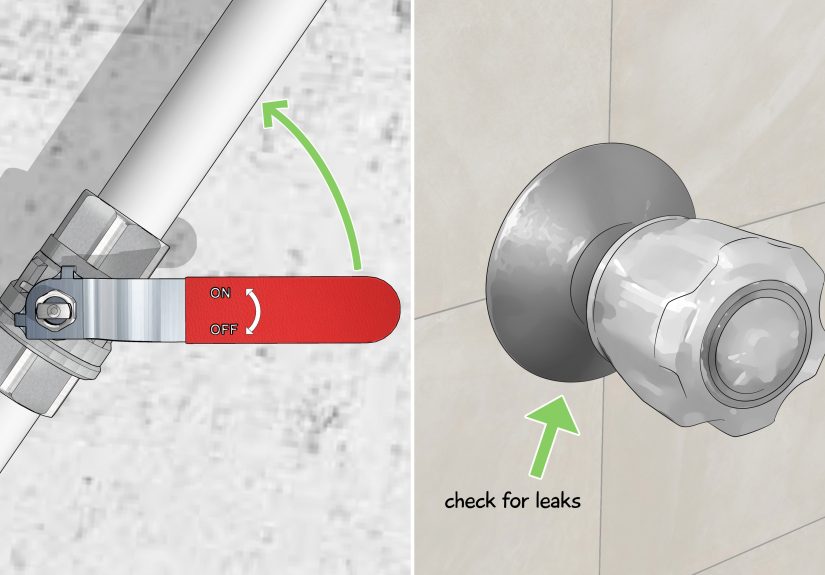
Start by shutting off the water supply to the shower. If your bathroom has local shutoff valves, use those. If not, shut off the main water supply to the house. Then open the shower faucet to release any remaining water and pressure in the line.
This step matters more than people think. Skipping it can turn a simple repair into a wet performance art piece. It also reduces pressure inside the valve so parts come out more safely and predictably.
Step 2: Remove the Handle and Trim
Pry off the decorative cap from the leaking handle if there is one. Underneath, you’ll usually find a Phillips screw or an Allen set screw. Remove it, then pull the handle off. If mineral buildup has basically glued the handle in place, wiggle gently rather than yanking like you’re starting a lawn mower.
Next, remove the escutcheon plate or trim sleeve behind the handle. Some plates are held with screws, while others twist off. Once the trim is out of the way, you should be able to see the valve stem assembly.
Step 3: Loosen and Remove the Valve Stem
Use an adjustable wrench or deep socket wrench to loosen the packing nut or valve nut at the base of the exposed stem. Once the nut is free, carefully pull the stem straight out.
This is the moment when you find out whether the job is still “easy” or slightly dramatic. If the stem resists, avoid forcing it with wild enthusiasm. Gentle pressure, a steady grip, and a little patience usually work better than brute force.
Lay the removed stem on a towel so you can inspect it clearly. You’ll typically find the washer attached to the bottom of the stem with a small screw.
Step 4: Remove the Old Washer and Inspect the Other Parts
Unscrew the small screw holding the washer in place. Then remove the old washer. In some cases, it will peel right off. In others, you may need needle-nose pliers to coax it loose. If the retaining screw is corroded, replace it too.
Now inspect the surrounding parts before you rush to install the new washer. Check for:
- A worn or pitted valve seat: if the metal seat the washer presses against is rough, the new washer may not seal properly.
- A damaged stem: if the stem is bent, cracked, or heavily corroded, replacing only the washer may not stop the leak.
- A worn O-ring or packing: if water leaks around the handle rather than dripping from the showerhead or spout, the O-ring may be the issue.
If the valve seat looks slightly rough, you may be able to smooth it with emery cloth or a seat-dressing tool. If it looks badly worn, replace the seat instead of pretending the new washer will perform miracles.
Step 5: Install the New Washer the Right Way
Take the old washer with you when buying the replacement. This is not the time for guesswork, optimism, or “eh, that looks close enough.” The new washer should match the old one in size, shape, and thickness.
Install the new washer in the same orientation as the original. Secure it with the screw, but do not overtighten it. Then apply a small amount of silicone plumber’s grease to the washer, O-ring, or moving rubber parts as needed.
Why silicone grease? Because it helps parts move smoothly, supports a better seal, and is safe for many rubber and plastic plumbing components. A tiny amount goes a long way. This is plumbing, not buttering toast.
Step 6: Reassemble the Faucet
Slide the stem back into the valve body and tighten the valve nut securely. Reinstall the trim plate or sleeve, then put the handle back on and tighten its screw. Snap the decorative cap back into place if your handle has one.
As you reassemble, make sure everything seats evenly. A crooked stem or misaligned handle can cause stiffness, poor shutoff, or another leak. If something feels off, pause and check alignment before moving on.
Step 7: Turn the Water Back On and Test Like a Pro
Turn the water supply back on slowly. Then open and close the repaired faucet several times. Watch for drips from the showerhead, tub spout, or around the handle. Use a flashlight if needed.
If the drip is gone, congratulations: you fixed the leak without donating your weekend to a plumber’s schedule. If the faucet still drips, the issue may be a worn valve seat, damaged stem, or cartridge problem rather than just the washer.
Common Mistakes That Make a Simple Repair Take Forever
- Buying the wrong washer size: even a slightly wrong fit can keep the faucet dripping.
- Ignoring the valve seat: a new washer won’t seal well against a damaged metal seat.
- Using the wrong grease: petroleum-based products can damage some rubber and plastic parts.
- Overtightening screws: this can distort the washer or strip the retaining screw.
- Forgetting the stem orientation: take a quick photo before disassembly so reassembly is easier.
- Assuming every faucet uses a washer: many newer shower valves need a cartridge replacement instead.
When a New Washer Won’t Fix the Leak
Sometimes a worn washer is the star of the problem. Sometimes it’s just the opening act.
If your faucet continues to drip after the repair, consider these possibilities:
- The valve seat is pitted and needs resurfacing or replacement.
- The stem assembly is worn and should be replaced as a unit.
- The cartridge is faulty, especially on a single-handle shower faucet.
- The leak is actually coming from behind the wall, not the handle assembly.
- There is heavy corrosion or mineral buildup affecting the seal.
If you see water escaping behind the trim plate, notice damage inside the wall, or can’t remove parts without risking breakage, it’s smart to call a licensed plumber. There is DIY pride, and then there is replacing drywall because the “tiny leak” was secretly a wall-soaking menace.
A Specific Example: When This Repair Makes the Most Sense
Let’s say you have an older shower with separate hot and cold acrylic knobs. The faucet drips steadily from the showerhead even when both handles are turned off tightly. The hot handle also feels a little rough when you twist it. In that case, the hot-side stem washer is a prime suspect.
You shut off the water, remove the hot-side handle, pull the stem, and find a flattened rubber washer at the bottom. Once replaced with the correct match and lightly lubricated with silicone grease, the handle turns more smoothly and the drip stops. That’s a classic, satisfying washer-fix scenario.
Now compare that to a sleek single-handle shower valve that drips from the head and has temperature inconsistency. In that case, the culprit is much more likely to be the cartridge or internal seals, not a simple washer at the end of a compression stem.
How Much Time and Money Does This Repair Usually Take?
If the faucet comes apart without drama and you already have the right replacement washer, the repair can take 30 to 60 minutes. If the handle is stuck, the stem is corroded, or the hardware store run becomes a sequel, expect longer.
Cost is usually modest. A washer is inexpensive, and even a small assortment pack can cost far less than replacing the entire shower fixture. If you also need a stem, seat, or cartridge, the price goes up, but it’s still often cheaper than a full faucet replacement.
Final Thoughts
Learning how to change the washer in a shower faucet is one of those home repairs that feels intimidating right up until the moment it clicks. Once you understand how the handle, stem, washer, and seat work together, the repair becomes far less mysterious. For older two-handle shower faucets, replacing the washer is often the fastest and most affordable way to stop a drip, save water, and rescue your sanity.
The secret is accuracy, not force. Match the washer exactly, inspect the seat and stem, use the right lubricant, and test carefully before declaring victory. Do that, and you’ll have a quiet shower faucet, a small DIY win, and one fewer household sound slowly driving you bananas.
DIY Experience: What This Repair Is Really Like in Real Life
For many homeowners, changing a shower faucet washer starts with confidence, takes a brief detour through confusion, and ends with a surprisingly satisfying sense of triumph. The experience is rarely difficult in a technical sense, but it does demand patience, observation, and a willingness to admit that tiny plumbing parts have an oversized sense of drama.
The first surprise is usually how small the actual washer is. People expect a major broken component and instead find a little rubber piece that looks almost too unimpressive to be responsible for such an irritating drip. But that tiny washer is doing the critical job of sealing the water flow every time the faucet is turned off. Once it wears down, even slightly, the faucet can drip for days, weeks, or months.
The second surprise is how much the success of the job depends on preparation. Homeowners who lay out tools, cover the drain, take a photo before disassembly, and bring the old washer to the store usually describe the repair as manageable. The ones who skip those steps often end up making multiple hardware store trips, searching for a dropped screw, or trying to remember which direction a part was facing. In other words, the difference between “easy project” and “why is this my life now?” is often just ten minutes of prep.
Another common experience is discovering that the leak was telling a bigger story. Sometimes the washer is clearly worn and the repair works immediately. Other times, the old washer is damaged, but so is the valve seat, the stem screw, or the O-ring. That’s when homeowners learn an important plumbing lesson: a faucet is a system, not just a handle you turn. One worn part may be obvious, but it can exist alongside other aging components.
There’s also a practical confidence boost that comes from doing this repair yourself. Once people see how the handle comes off, how the stem pulls out, and how the washer sits at the bottom, shower faucets stop feeling mysterious. Even if the first repair takes an hour, the next one usually feels much easier. What once seemed like specialized plumbing work starts to look like a sequence of simple mechanical steps.
And then there’s the best part: the moment you turn the water back on, close the faucet, and hear absolutely nothing. No drip. No taunting plink. Just silence. That’s when the whole experience shifts from minor inconvenience to genuine accomplishment. You didn’t just swap a washer. You diagnosed a problem, handled the repair, and improved something in your home with your own hands. Not bad for one small piece of rubber and a little stubborn determination.


