Table of Contents >> Show >> Hide
- Before You Start: The “Fun Police” Safety Talk (Worth Reading)
- Tools and Materials Checklist (Buy Once, Cry Once)
- Step 1: Choose Your Forge Style and Size
- Step 2: Build (or Prep) the Steel Shell
- Step 3: Cut the Openings and Burner Port
- Step 4: Install the Ceramic Fiber Insulation
- Step 5: Rigidize and Seal the Insulation (Do Not Skip This)
- Step 6: Apply the Refractory Hot Face (And Build a Real Floor)
- Step 7: Add an Optional Reflective Wash for Efficiency
- Step 8: Install the Burner, Regulator, and Gas Plumbing
- Step 9: Cure the Refractory, Fire Up, and Tune the Flame
- Operating Tips: Make It Hot, Not Sketchy
- Common Problems (and How to Fix Them Without Yelling)
- Real-World Experience (About ): Lessons You Only Learn After Lighting It
- Conclusion
So you want to build a propane blacksmith forge. Excellent choicebecause nothing says “I’m an adult” quite like
voluntarily creating a dragon-sized hot box in your garage to make metal obey you.
A good DIY propane forge can heat steel fast, run clean(er) than coal, and fit your shop space and budget.
A bad one can shed itchy ceramic fibers, waste propane, or turn your workspace into a carbon monoxide trivia question.
This guide walks you through nine practical steps to build a safe, efficient propane forge that can handle everyday
forging, heat treating, and (with the right setup) forge welding. We’ll keep it real, keep it readable, and keep your eyebrows
in the “optional” category.
Before You Start: The “Fun Police” Safety Talk (Worth Reading)
Propane forges are simple machines with one complicated side effect: they make invisible danger. Two big ones:
carbon monoxide and airborne ceramic fiber dust. Both can ruin your day without asking permission.
1) Ventilation and carbon monoxide
A propane forge consumes oxygen and can produce carbon monoxide (CO), especially if it’s tuned rich or running in an enclosed space.
Use your forge in a well-ventilated area (open doors, cross-breeze, and ideally a hood or exhaust fan).
Add a CO detector in your shop. If you ever feel “flu-ish” while forgingheadache, dizziness, nauseastop and get fresh air immediately.
2) Ceramic fiber insulation isn’t confetti
Most DIY propane forges use ceramic fiber blanket (often called “Kaowool,” though that’s a brand name) because it insulates incredibly well.
The downside: loose fibers can irritate skin and lungs. The fix: rigidize and seal the insulation, then add a refractory hot face.
Wear gloves, eye protection, and a properly rated respirator when cutting or handling fiber.
3) Propane leaks are not “spicy air”
Leak-test every connection with soapy water before firing. Bubbles = nope. Also: never check leaks with a flame unless you enjoy
expensive haircuts.
Tools and Materials Checklist (Buy Once, Cry Once)
Forge body and structure
- Steel shell: a short section of thick-walled pipe, an air tank, or fabricated sheet steel box (clean, uncoated, and safe)
- Stand: steel legs, an angle-iron frame, or a sturdy welded base
- Doors/openings: front opening (and optional rear pass-through)
Insulation and refractory
- Ceramic fiber blanket: typically 1″ thick; often two layers for ~2″ total insulation
- Rigidizer: commercial rigidizer for ceramic fiber (spray or brush-on)
- Refractory hot face: castable refractory or refractory mortar (e.g., 3000°F-class insulating castable)
- Sacrificial floor: hard firebrick splits or kiln shelf pieces to protect the refractory from flux
- Optional reflective wash: high-temp coating/kiln wash to improve efficiency and protect surfaces
Burner and gas supply
- Burner type: Venturi burner (simple) or blown/ribbon burner (more even heat, more parts)
- Propane regulator: commonly an adjustable high-pressure regulator (often 0–30 PSI range) with gauge
- Hose and fittings: propane-rated hose, flare fittings, shutoff valve(s), pipe dope or gas-rated thread sealant
- Ignition: long lighter or torch (keep your knuckles out of the blast zone)
Basic tools
- Angle grinder with cutting and flap discs
- Drill + hole saw/step bit (burner port and mounting holes)
- Welder (helpful) or bolts/brackets (workable)
- Measuring tape, marker, clamps, PPE (gloves, glasses, respirator)
Step 1: Choose Your Forge Style and Size
Your forge is not a pizza oven. (Okay, it is a pizza oven, but for steel.) Size it for what you actually make:
knives, hooks, tools, small sculpture, or occasional forge-welding.
Simple sizing rules that save propane
- Smaller chamber = faster heat + less fuel. Build the smallest forge that fits your typical work.
- For knife work, an interior around 6–8″ diameter and 10–14″ long is a common sweet spot.
- If you need long stock, add a rear pass-through instead of making the whole forge enormous.
Pick a burner approach
- Venturi burner: uses gas flow to pull in air. Less wiring and fewer moving parts. Great first build.
- Blown/ribbon burner: uses a blower to control air. Often more even heat and better control at low temps, but more build complexity.
Step 2: Build (or Prep) the Steel Shell
The shell is the “skin” of the forge. It holds insulation and takes bumps. Common options: thick pipe, a welded box,
or a repurposed tank. If you repurpose anything, make sure it’s safe, empty, and thoroughly cleanedno mystery residues.
What to aim for
- Sturdy steel at least ~1/8″ thick is a nice target for durability.
- Enough room for 2″ of insulation plus a refractory hot face while still leaving a useful interior chamber.
- A base/stand that won’t wobble when you’re moving hot steel around (because you like your toes).
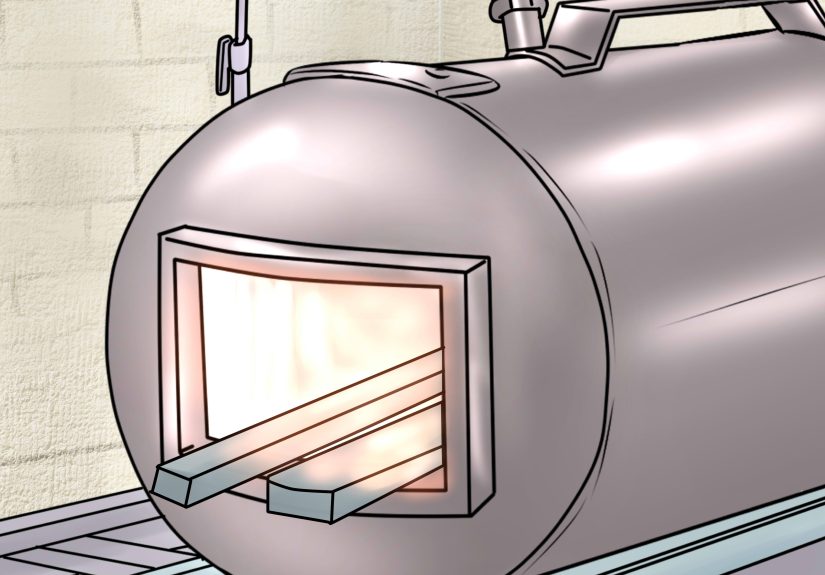
Step 3: Cut the Openings and Burner Port
Plan the front opening first. You want it big enough to work comfortably but not so big that heat dumps out like
your paycheck at a tool store.
Front opening tips
- Oval or rectangular openings are common. Keep the opening as small as your work allows.
- Consider a removable “door brick” (soft insulating firebrick) to reduce the opening when you’re heating small parts.
Burner port placement
- Angle the burner slightly so the flame swirls around the chamber instead of blasting straight at the floor.
- Leave space above insulation for mounting hardware and a burner tube or flange.
- If you’re using a Venturi burner, avoid placing the burner so close to the opening that it sucks in shop air turbulence and backfires.
Step 4: Install the Ceramic Fiber Insulation
This is where your forge becomes efficient. Two layers of 1″ ceramic fiber blanket (for ~2″ total) is a common, proven setup.
Cut the blanket so it fits snugly by compressionsnug insulation stays put and performs better.
How to handle fiber safely
- Wear gloves, long sleeves, eye protection, and a respirator.
- Cut with a sharp utility knife and a straightedge; minimize tearing and dust.
- Fit seams tightly; gaps become hot spots and fuel hogs.
Step 5: Rigidize and Seal the Insulation (Do Not Skip This)
Rigidizer is the “hair gel” for ceramic fiberexcept it’s less sticky and more “keeps your lungs happier.”
Apply rigidizer to the surface facing the forge chamber. Let it dry fully per the product instructions.
Why this matters
- Reduces airborne fibers
- Preps the surface for refractory coatings
- Helps insulation resist flame erosion
After rigidizing, many builders do a gentle first heat to help set it (again: follow the rigidizer’s directions).
You’re not trying to hit welding heat yetyou’re trying to cure, not cook.
Step 6: Apply the Refractory Hot Face (And Build a Real Floor)
Ceramic fiber insulates well but it’s not tough. The refractory hot face protects the insulation from flame wear,
mechanical damage, and flux (if you ever weld). Think of it as armor for your forge’s soft, fluffy insulation core.
Hot face options
- Castable refractory: mix and apply a thin layer to walls/ceiling (common target: around 1/4″–1/2″, depending on product and design).
- Refractory mortar: often used as a thinner “skim coat” over rigidized fiber.
Floor strategy that saves you later
Make your forge floor sacrificial. Put kiln shelf or hard firebrick splits on top of the refractory floor so flux and scale
chew through the replaceable layer first. Future-you will thank present-you with fewer sad noises.
Mixing and thickness notes
Different castables require different water ratios and curing schedules. Some insulating castables list water around the high-teens percent by weight,
but the only correct answer is: follow the manufacturer’s data sheet. Too much water weakens refractory; too little makes it unworkable.
Step 7: Add an Optional Reflective Wash for Efficiency
A high-temp coating (often sold as kiln wash or forge coating) can help protect the hot face and improve perceived efficiency
by helping heat stay where you want itinside the forge, not seasoning your shop walls.
When it’s worth it
- You want faster heat-up and steadier chamber temps
- You do frequent heat treating and want consistent soak temperatures
- You’d like extra protection for the hot face
Apply it thin and even. Thick goopy coats tend to crack like a cookie left in the oven because you “got distracted” by forging.
Step 8: Install the Burner, Regulator, and Gas Plumbing
This step is where your forge becomes a forge instead of a steel burrito shell. A typical DIY setup uses an adjustable regulator,
propane-rated hose, a shutoff valve, and a securely mounted burner. Keep the plumbing simple, accessible, and protected from heat.
Regulator basics (and why BBQ regulators usually disappoint)
- Many dedicated forge burners need more flow control than a low-pressure grill regulator can provide.
- An adjustable regulator with a gauge helps you repeat settings and troubleshoot tuning.
- Add a shutoff valve close to the forge for quick control.
Leak test like you mean it
- Mix dish soap and water (or use a leak-check solution).
- Pressurize the system (open the tank valve slowly).
- Brush or spray every connection: tank valve area, regulator fittings, hose ends, valves, and burner connection.
- If bubbles form, shut it down, fix the connection, and retest.
Burner mounting tips
- Keep the burner stable and alignedvibration and movement can loosen fittings over time.
- Use a flare, flange, or burner tube collar designed for your burner style.
- Maintain clearance so the burner doesn’t overheat the regulator hose or nearby components.
Step 9: Cure the Refractory, Fire Up, and Tune the Flame
The number one way new forges get ruined is impatience. Refractory needs to dry and cure so trapped water doesn’t flash to steam and crack your work.
Your forge is not impressed by your enthusiasm. It wants slow heat ramps and respectful behavior.
A practical curing routine (genericalways follow your refractory’s instructions)
- Air dry: Let refractory dry at room temp for at least a full day (longer if it’s humid or thick).
- Low fire: Run a small flame with the doors open-ish for 20–30 minutes to drive off moisture.
- Step up gradually: Increase heat in stages over an hour or two. If you see lots of steam, back off.
- Cool down: Let it cool naturally. Don’t quench your forge like it’s a hot spoon.
Tuning the flame (the part that feels like wizardry)
You’re aiming for stable combustion and a forge atmosphere that matches your work. Many smiths like a slightly rich (“reducing”) atmosphere to limit oxidation.
Translation: less scale, more happy steel. Too rich, and you waste fuel and may increase CO. Too lean, and your steel scales like a fish with opinions.
Quick tuning cues
- Neutral-to-slightly-rich: steady roar, minimal popping, good heat, less scale
- Too lean: harsh, hissy sound; flame may lift off the burner; steel scales aggressively
- Too rich: lazy flame, smoky exhaust, may “puff” or rumble; wasted propane
Operating Tips: Make It Hot, Not Sketchy
Heat treating in a propane forge
For heat treating, consistency matters more than maximum heat. Use a smaller chamber opening, consider a door brick,
and let the forge soak to stabilize. A simple thermocouple/pyrometer setup can help if you’re doing precise work.
Forge welding considerations
Welding requires higher chamber temps and often fluxflux eats floors. Use a sacrificial floor layer and plan to replace it.
Keep the chamber small, ensure your burner can reach welding heat, and tune slightly rich to reduce oxidation.
Maintenance that keeps performance high
- Inspect the hot face for cracks and patch small damage early.
- Replace sacrificial floor bricks when they get glassy or cratered.
- Recheck fittings periodically for leaks and wear.
- Keep your burner intake clear of grinding dust and shop clutter.
Common Problems (and How to Fix Them Without Yelling)
The forge won’t get hot enough
- Chamber too large for burner output (downsizing or adding insulation helps).
- Big front opening dumping heat (use a door brick).
- Burner not tuned or not getting enough pressure/flow (verify regulator and jet/orifice sizing).
- Flame impinging directly on the floor (adjust burner angle for swirl).
Backfiring or popping
- Burner too close to opening (air turbulence).
- Mixture too lean (increase fuel slightly or adjust air intake if applicable).
- Obstructions or sharp edges inside the burner (inspect and deburr).
Refractory cracking
- Often normal hairline cracks happen with heat cyclingpatch if needed.
- Big cracks usually mean rushed curing, too thick an application, or incorrect water ratio.
Real-World Experience (About ): Lessons You Only Learn After Lighting It
The first time you fire a new propane forge, you’ll feel like a genius… right up until you realize you forgot something obvious,
like “a place to set the tongs down” or “the concept of airflow.” Here are the shop-floor lessons that rarely make the parts list.
First, forge size creep is real. On paper, a bigger chamber sounds great: “I might make swords someday!”
In practice, most beginners forge knives, hooks, bottle openers, and small tools. A compact forge heats faster, uses less propane,
and gives you a more even working zone. If you truly need length, a rear pass-through is the best cheat code. You can heat only the section you need
without paying to warm up a steel cave.
Second, the floor takes all the abuse. Even if you swear you’ll never weld, flux has a way of showing up like a party guest who “just stopped by.”
Scale, borax, and accidental pokes with hot steel will punish your floor. A sacrificial layer of hard firebrick splits or kiln shelf tiles is the difference between
“maintenance” and “rebuilding the forge while muttering.” The sacrificial layer also makes cleanup easier: lift it out, knock the gunk off, replace when needed.
Third, tuning is a skill, not a setting. People love asking, “What PSI should I run?”
The honest answer is: it depends on your burner design, chamber size, and how your forge is breathing that day.
Start low, creep upward, and watch the flame behavior and the steel. Your ears will learn the difference between a clean roar and a cranky sputter.
Your steel will also send feedbackif it’s scaling heavily, you may be running too lean or exposing it too much to open air at the mouth.
Fourth, cure time is not optional. I know, you’re excited. You want to heat steel now.
But rushing refractory curing is the quickest path to cracks, spalling, and regret. If you ever see steam coming off the lining,
that’s water trying to escape without tearing your forge apart. Treat curing like preheating a cast-iron pan: slow, steady, and you’ll be rewarded.
Finally, shop layout matters. A forge that runs perfectly can still be miserable if you place it wrong.
Put your anvil and vise so you can move hot steel without doing an obstacle course. Keep combustibles far away.
Add a simple metal table for hot tools, and you’ll stop doing the “where do I put this?” dance while holding a glowing bar.
The forge is the star, surebut the supporting cast (tongs rack, quench area, clear walkways, ventilation) is what keeps the show running.
Conclusion
Building a propane blacksmith forge is a very achievable DIY project if you prioritize safety, insulation, and a durable hot face.
Keep the chamber reasonably sized, rigidize and seal ceramic fiber, protect your floor with sacrificial brick, and cure refractory slowly.
Once you tune your burner and learn your forge’s “personality,” you’ll have a reliable heat source that makes forging more efficient and a lot more fun.
Just remember: the forge is hot, propane is serious, and your eyebrows deserve a long, happy life.