Table of Contents >> Show >> Hide
- Start With the “Why”: What Will You Actually Do on This Bench?
- Plan the Size Like a Pro (So You Don’t Regret It in Week Two)
- Materials That Make (or Break) a Garage Workbench
- Tools You’ll Need (No, You Don’t Need a Space Program)
- Step-by-Step: Build a Rock-Solid 2×4 Garage Workbench in a Weekend
- Step 1: Decide your exact finished size
- Step 2: Build the top support structure (the “stiffness” part)
- Step 3: Build the legs (and make them behave)
- Step 4: Attach legs to the top assembly
- Step 5: Add lower rails and stretchers (goodbye, wobble)
- Step 6: Install the shelf (instant organization upgrade)
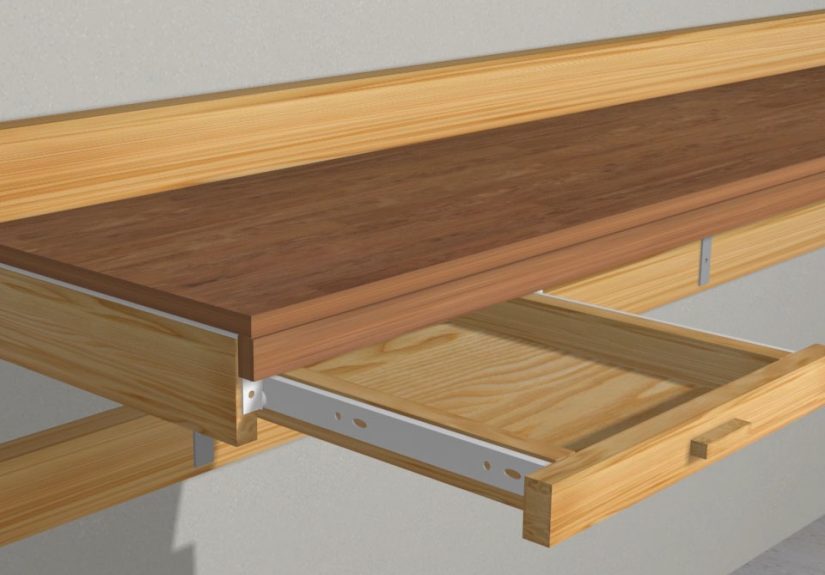
- Step 7: Build and attach the work surface
- Step 8: Flatten and square everything (your future self will thank you)
- Step 9: Add the upgrades that matter
- Common Mistakes (and How to Avoid Them Like a Person With a Plan)
- FAQ
- Conclusion: Build the Bench You’ll Use, Not the Bench You’ll Photograph
- Experience Notes: What I Learned After Building (and Living With) a Garage Workbench
A garage work bench is basically a grown-up version of a kitchen tableexcept you’re allowed to spill glue on it and nobody asks you to use coasters.
Build it right and it becomes the nerve center of your DIY life: cutting, drilling, sanding, wrenching, assembling, and occasionally staring at a project
like it personally insulted you. This guide walks you through planning, materials, and a proven weekend build that’s sturdy, customizable, and
realistically achievable without owning a professional woodshop (or a professional woodshop attitude).
Start With the “Why”: What Will You Actually Do on This Bench?
The best DIY workbench plans aren’t “one size fits all.” Your perfect bench depends on what kind of work you do most. Before you buy a single 2×4,
answer this question: is your bench mainly for assembly, repairs, power tools, hand-tool woodworking,
or everything plus random storage?
Three common garage workbench styles (pick your lane)
-
The Simple 2×4 Workbench: A classic frame with a plywood or MDF top. Great for general DIY, repairs, and power-tool projects.
It’s affordable, fast to build, and tough enough for most homeowners. -
The “Heavy-Duty” Bench: Beefier top (often laminated layers), stronger rails/stretchers, and optional bolted joints.
Choose this if you’ll be pounding, planing, mounting a vise, or using the bench as an outfeed/assembly station. -
The Storage Bench: Adds shelves, cabinets, pegboard, drawers, or even a fold-down design. Perfect for small garages where the bench
has to earn its parking spot.
If you’re unsure, build the simple version firstbut build it with upgrade hooks: a strong base, a replaceable top “skin,” and room underneath
for a shelf. That way, your “basic” bench can evolve into a heavy-duty workhorse later.
Plan the Size Like a Pro (So You Don’t Regret It in Week Two)
Most garage work benches land in a practical range: roughly 28–36 inches deep, 48–96 inches wide, and 28–38 inches tall.
Your garage layout will decide depth and width (you still need to walk past it without turning sideways like a crab).
Depth
Deeper sounds better… until you realize the back half becomes a junk museum. For most people, 24–30 inches is the sweet spot:
enough workspace without turning the far edge into “the land beyond reach.”
Width
If you have the wall space, 60 inches (5 feet) is a very friendly “starter” width: spacious but not massive. If you regularly break down
sheet goods, consider 72–96 inches, or build in sections (a main bench plus a smaller rolling bench).
Height (the comfort cheat code)
Workbench height is personal. A common rule of thumb is to aim near your wrist crease when you stand with arms relaxed at your sidescomfortable for
a lot of general bench work. If you do heavy hand-planing, slightly lower can help you use body weight. If you do detail work or assembly,
slightly higher can save your back. If you can, mock it up: stack scrap boards or boxes until it feels right, then measure.
A proven “starter size”
If you want a solid default, build a bench around 60 inches wide × 30 inches deep × 34 inches tall. It fits many garages, supports a wide
variety of tasks, and still leaves room for tool storage underneath.
Materials That Make (or Break) a Garage Workbench
Lumber for the base
For a DIY garage workbench, construction-grade 2x4s are the go-to: inexpensive, strong, and available everywhere. The key is picking
reasonably straight boards. Sight down the length and avoid obvious twists. A bench built from “pretzel lumber” will always feel like it’s
auditioning for a wobble contest.
Top options (choose based on abuse level)
- Plywood (3/4″): Tough, stable, and widely available. Great all-around top. If it gets trashed, you can replace it.
- MDF: Flat and smoothawesome for assembly and measuring. But it hates moisture, so seal it (paint, shellac, polyurethane, or laminate).
-
Laminated “shop top”: MDF topped with plastic laminate plus hardwood edging gives you a durable, easy-to-clean surface
that resists glue and finish drips. Great for assembly and finishing. - Replaceable skin: A thin sacrificial layer (like 1/4″ hardboard) screwed on top. When it’s wrecked, swap it out and feel reborn.
Fasteners and hardware
- Construction screws (commonly 3″) for framing joints.
- Wood glue where you want stiffness (especially laminated tops).
- Bolts (carriage bolts or lag screws) if you want a semi knock-down bench or extra-rigid leg connections.
- Leveling feet if your garage floor has “personality.”
- Casters if you need the bench to movebut use locking, heavy-duty casters and reinforce the base.
Tools You’ll Need (No, You Don’t Need a Space Program)
You can build a 2×4 workbench with standard DIY tools:
- Measuring tape, pencil/marker, and a straightedge
- Speed square or framing square
- Circular saw (or miter saw if you want faster, cleaner cuts)
- Drill/driver + bits (and a countersink bit if you’re feeling fancy)
- Clamps (at least a coupleclamps are basically extra hands that don’t complain)
- Sander (optional, but your splinters will thank you)
- Safety gear: eye protection and hearing protection
Step-by-Step: Build a Rock-Solid 2×4 Garage Workbench in a Weekend
This build focuses on what makes a bench feel “serious”: a stiff base, strong rails, and a top you can renew instead of mourning forever.
You can scale the dimensions up or down without changing the overall approach.
Step 1: Decide your exact finished size
Lock in width, depth, and height. Then plan your top thickness (for example: one main top layer plus a replaceable skin).
Your leg length is simply: finished bench height − total top thickness. Measure twice, cut once, and avoid the classic
“my bench is now a coffee table” moment.
Step 2: Build the top support structure (the “stiffness” part)
A strong bench starts with a rigid top assembly. One effective approach is a thick substrate under the top surfaceeither a laminated slab made from
boards edge-glued together, or a stout framed grid with cross supports.
- Option A (fast): Build a rectangular 2×4 frame with 2–3 cross supports running front-to-back to prevent sagging.
-
Option B (extra stiff): Create a thick substrate (like a laminated board “butcher-block-ish” core) and then wrap it with rails
to protect edges and add mass.
Tip: If your top assembly includes glue-ups, clamp firmly and let the glue cure. A flat, stiff top is the difference between “workbench”
and “wobbly stage for sad projects.”
Step 3: Build the legs (and make them behave)
For a sturdy DIY workbench, legs should resist racking (side-to-side wobble). A simple method is to build each leg as an L-shape by joining two 2x4s.
This makes the leg much stiffer than a single board.
- Cut 8 leg pieces to your calculated length (two pieces per leg).
- Join each pair into an L-shape using glue and screws.
- Keep the tops flush and squarethis helps the bench assemble flat later.
Step 4: Attach legs to the top assembly
Set the leg assemblies inside the corners of your top structure. You can fasten with screws, but bolts add clamping force and long-term rigidity.
If you bolt, drill clean holes and snug everything tight (don’t crush the wood fiberstight, not tortured).
Step 5: Add lower rails and stretchers (goodbye, wobble)
Lower rails tie the legs together and give you a place for a shelf. A practical setup is to place the lower rails around 10–14 inches above
the floorhigh enough to sweep under, low enough for useful storage.
- Install the long lower rails first (left-to-right).
- Install the short lower rails next (front-to-back).
- Add at least one stretcher or brace in each direction if your bench will see heavy loads.
Step 6: Install the shelf (instant organization upgrade)
Drop in a plywood shelf panel on the lower rails. Suddenly your bench has a “home” for tool cases, clamps, sanders, and that one tape measure
that disappears the moment you need it.
Step 7: Build and attach the work surface
For most garage workbench builds, a layered top is the best balance of durability and cost:
- Main top layer: Use sturdy sheet material (like plywood) or a laminated core for mass.
- Optional replaceable skin: Add a thinner sacrificial sheet on top, screwed down so it’s easy to replace.
If you choose MDF anywhere in the top, seal it to reduce swelling from humidity or spills. If you want a slick, glue-resistant surface,
consider a laminate layer and solid-wood edging for impact resistance.
Step 8: Flatten and square everything (your future self will thank you)
Before you call it “done,” check for twist and wobble:
- Use a long straightedge across the top.
- Check diagonals on the base to confirm it’s square.
- If the floor is uneven, install leveling feet or shim the legs.
Step 9: Add the upgrades that matter
A garage work bench gets exponentially better with a few smart add-ons:
- Power strip mounted to the side (no more crawling behind chargers).
- Pegboard or a tool rail above the bench for hand tools.
- Front edge reinforcement if you’ll clamp often.
- Vise (a game-changer for sanding, sawing, and holding).
- Casters if you must move itjust ensure the base is reinforced and locks are solid.
Common Mistakes (and How to Avoid Them Like a Person With a Plan)
1) Building the bench too deep
If you can’t comfortably reach the back, you’ll stack stuff there. That stack will become permanent. Choose depth you can actually use.
2) Skipping lower rails and bracing
A bench without solid stretchers will rack over time. If you want “rock solid,” tie the legs together near the bottom and consider additional bracing.
3) Using a top you can’t replace
Your work surface will take damage. Plan for it. A replaceable skin is the cheapest “future-proofing” you can build into a DIY workbench.
4) Ignoring floor reality
Many garage floors slope. That’s not a moral failingit’s drainage. Use leveling feet, shims, or an anchoring strategy so your bench doesn’t rock.
FAQ
What should I use for a workbench top?
For most garages: plywood is a great all-around choice. MDF is wonderfully flat for assembly if it’s sealed. For a tougher, easy-clean surface,
consider MDF with laminate and hardwood edging. If you expect heavy abuse, plan a replaceable top layer so you can swap it without rebuilding the bench.
Is it cheaper to build a workbench?
If you already own basic tools, building is often cheaper and gives you a custom fit. If you have to buy major tools just to build the bench,
the “project cost” jumpsbut you’re also investing in tools you’ll use on future projects.
How do you make a workbench with storage?
The simplest storage upgrade is a lower shelf. From there, you can add drawers, cabinets, pegboard, or modular bins. Build the base sturdy first,
then add storage in stages.
Conclusion: Build the Bench You’ll Use, Not the Bench You’ll Photograph
A great garage work bench is sturdy, comfortable, and set up for the work you actually do. Start with smart dimensions, build a rigid base with strong
lower rails, and choose a top that matches your projects (and your tolerance for mess). If you add a replaceable skin and a shelf underneath, you’ll get
a bench that can evolve as your skillsand your tool collectiongrow.
Experience Notes: What I Learned After Building (and Living With) a Garage Workbench
The first thing I learned is that your workbench becomes your garage’s gravity well. The moment it exists, everything wants to land on it: tools,
parts, packages, that “temporary” pile of hardware you swear you’ll sort later. So when people say “plan storage,” they’re not being dramatic.
They’re being prophetic. Even a simple lower shelf changes your daily workflow because you stop treating the bench top like a storage locker.
The second lesson: wobble isn’t a small annoyanceit’s a project killer. On my first bench build, I told myself, “It’s fine. I’ll just be careful.”
That lasted until the first time I tried sanding a board and the bench shimmy-shook like it had stage fright. The fix wasn’t complicated, but it was
humbling: more stretchers, tighter joints, and bracing where it mattered. Once the legs were tied together properly, everything felt easiercutting,
drilling, even measuring. A stable bench makes you feel like a better DIYer overnight.
Third: the top is not a sacred object. It’s a consumable. If you do real workglue-ups, drilling, chiseling, paintingyour top will get scars.
That’s not failure; that’s evidence you actually used it. The best upgrade I ever made was adding a replaceable “skin” layer. When it got trashed,
I unscrewed it, swapped it out, and the bench felt brand-new again. That single decision turned maintenance into a five-minute job instead of a
full weekend of regret.
Fourth: height matters more than you think. A bench that’s too low turns long sessions into back pain. A bench that’s too high makes heavy work feel
awkward. I’ve found that a “general purpose” height is fine for mixed tasks, but if you do a lot of one kind of work, it’s worth tuning the height to
that work. Assembly and detail tasks usually feel better a bit higher. Heavy planing or aggressive sanding can feel better a bit lower. If you’re stuck,
build slightly taller and use a thick anti-fatigue matyour body will notice the difference.
Fifth: don’t underestimate the garage floor. Many garages have a slope for drainage, and that slope will turn a “perfectly square” bench into a rocking
chair if you ignore it. Leveling feet are not fancythey’re sanity. If you’d rather not use feet, shims work too, but feet make adjustments clean and
repeatable when you inevitably move the bench.
Finally: build for your future self. Add a power strip on the side. Leave room for a vise. Make sure there’s a clamping edge somewhere. You don’t need
every upgrade on day one, but you want a bench that welcomes upgrades instead of fighting them. The best workbench isn’t the one with the most features
it’s the one that makes you want to start projects because setup feels easy and the workspace feels dependable.