Table of Contents >> Show >> Hide
- Why Pinewood Derby Cars Go Fast
- Step 1: Start With the Rules, Not the Saw
- Step 2: Choose a Fast, Stable Shape
- Step 3: Put the Weight Where It Works
- Step 4: Prepare the Axles Like They MatterBecause They Do
- Step 5: Prepare the Wheels Carefully
- Step 6: Use Graphite the Right Way
- Step 7: Align the Car for a Smooth Run
- Step 8: Paint Without Hurting Performance
- Step 9: Final Assembly and Race-Day Tuning
- Common Pinewood Derby Speed Myths
- Field-Tested Experiences: What Actually Helps When Building a Faster Pinewood Derby Car
- Conclusion: Build Smart, Tune Carefully, Race Proud
Building a Pinewood Derby car is one of those rare projects where a block of wood, four tiny wheels, a handful of graphite, and a lot of kitchen-table confidence can turn into a family legend. Maybe your goal is to win the pack championship. Maybe your goal is to avoid building a car that wobbles down the track like a shopping cart with one bad wheel. Either way, the secret to speed is not magic. It is physics, patience, and a very healthy respect for friction.
This guide explains how to build a faster Pinewood Derby car using practical, rule-friendly techniques: smart weight placement, careful axle polishing, wheel preparation, smooth alignment, and a design that looks fast without becoming a wooden doorstop. The good news? You do not need a professional workshop. The better news? A young builder can do much of the work with adult supervision, which is the whole point of the Derby in the first place.
Before you start, check your local race rules. Many events follow common Scouting America guidelines: a maximum weight of 5 ounces, a maximum length of 7 inches, a maximum width of 2 3/4 inches, no oil-based lubricants, and no starting devices. Local rules can vary, so do not spend three evenings creating a speed machine only to learn that your ultra-clever wheel modification belongs in the “nice try, engineer” category.
Why Pinewood Derby Cars Go Fast
A Pinewood Derby car is powered by gravity. At the top of the track, the car has potential energy. As it rolls downhill, that energy becomes motion. The faster car is usually the one that wastes the least energy on friction, wobble, air drag, and wheel problems. Think of speed as a bank account. Gravity gives every car a deposit. Friction, bad alignment, rough axles, and bouncing wheels make withdrawals.
The most important performance areas are weight, wheels, axles, alignment, and stability. Paint and decorations matter for style points, and style points are emotionally important, especially if the car has flames. But flames do not reduce axle friction. Unfortunately.
Step 1: Start With the Rules, Not the Saw
The fastest Pinewood Derby car is the fastest legal Pinewood Derby car. Rules usually cover weight, length, width, wheel type, axle type, lubricants, clearance, and whether all four wheels must touch the track. Some packs allow raised wheels or rail-riding setups. Others require four wheels flat on the track. Some allow only dry graphite. Others may allow silicone. Read the rules before cutting, drilling, bending, sanding, or buying aftermarket parts.
Basic rule checklist
- Keep the finished car at or under the maximum weight, commonly 5 ounces.
- Keep the car within the allowed length and width.
- Use approved wheels and axles.
- Use only allowed lubricants, usually powdered graphite or silicone.
- Make sure nothing is loose inside the car.
- Check bottom clearance so the car does not scrape the guide rail.
A car that fails inspection is not a fast car. It is a very shiny paperweight.
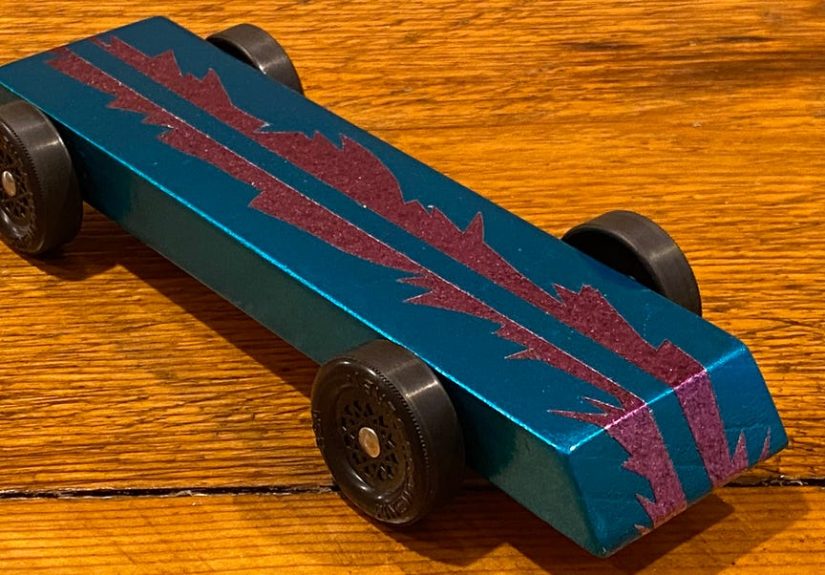
Step 2: Choose a Fast, Stable Shape
A good Pinewood Derby body should be low, smooth, and simple. A wedge shape is popular because it is easy to cut, easy to sand, and naturally keeps extra wood low. A thin rectangle with a sloped front can also work well. More complex designs, such as sports cars or rockets, are fun, but they can add weight in the wrong places and create fragile spots around the axle slots.
Aerodynamics matter a little, but not as much as friction and alignment. Pinewood Derby races are short, and the cars are small. A sleek body can help, but a perfectly polished axle will usually do more for speed than a dramatic spoiler. Spoilers look cool, of course, but the track does not award points for looking like a tiny NASCAR villain.
Best body design tips
- Keep the car low to improve stability.
- Remove unnecessary wood so you can add weight where it helps most.
- Avoid tall decorations that raise the center of gravity.
- Round the front edges slightly to reduce drag and prevent chipping.
- Leave enough wood around the axle slots so the body stays strong.
For a beginner-friendly speed build, draw a low wedge profile on the side of the block, cut along the line, and sand it smooth. Save the masterpiece shaped like a dragon-limo for a design award category.
Step 3: Put the Weight Where It Works
Weight placement is one of the biggest speed factors in building a faster Pinewood Derby car. Most races set a maximum car weight, often 5 ounces. You want to get as close to that limit as possible without going over. A car that weighs 4.4 ounces is leaving useful energy on the table. A car that weighs 5.2 ounces is leaving the race at check-in.
The general goal is to place most of the weight toward the rear of the car, but not so far back that the car becomes unstable. A common target is to balance the finished car about 3/4 inch to 1 inch in front of the rear axle on a smooth track. For rougher tracks, a safer target may be about 1 inch to 1 1/2 inches in front of the rear axle. Rear weighting increases potential energy because the center of mass starts slightly higher on the track. But if the weight is too aggressive, the car can fishtail, wiggle, or lift the front end. That is exciting, but not in a trophy-winning way.
How to test the balance point
- Install the wheels and axles temporarily.
- Add weights without permanently gluing them yet.
- Place a ruler or pencil edge under the car.
- Find the spot where the car balances level.
- Measure how far that spot is in front of the rear axle.
- Move weight forward or backward until the balance point is in your target range.
Tungsten weights are popular because they are dense, which lets you pack more weight into a smaller area near the rear. Zinc and steel weights can also work. Lead should be avoided unless handled with strict adult safety precautions, and many families skip it entirely. Tungsten putty is especially useful at race-day check-in because it allows tiny adjustments when the official scale disagrees with your home scale. And yes, the official scale always wins. It has main-character energy.
Step 4: Prepare the Axles Like They MatterBecause They Do
Stock Pinewood Derby axles often look smooth at first glance, but under magnification they may have burrs, ridges, crimp marks, or rough spots. Every tiny imperfection can rub against the wheel bore and steal speed. Polishing the axles is one of the best legal upgrades you can make.
Start by inspecting each axle. Remove obvious burrs near the nail head with a small file, then polish the shaft with progressively finer sandpaper. Many builders work through grits such as 1000, 1500, 2000, 3000, and even 5000. The goal is not to grind the axle smaller. The goal is to smooth the surface and the underside of the axle head. After sanding, use a metal polish and a soft cloth to create a shiny finish. Clean the axles thoroughly afterward so no grit or polish residue remains.
Axle polishing tips
- Use adult supervision if spinning axles in a drill.
- Keep pressure light so you do not reshape the axle.
- Focus on the underside of the axle head, where the wheel may rub.
- Wash and dry the axle after polishing.
- Handle polished axles carefully to avoid fingerprints and dirt.
Do not skip this step. A car with rough axles is like a runner wearing sandpaper socks. Brave, but not fast.
Step 5: Prepare the Wheels Carefully
Wheel rules vary widely, so check before you modify anything. Some races allow only light sanding to remove mold marks. Others allow polishing the wheel bore. Some prohibit reshaping, narrowing, or lightening wheels. If your rules allow wheel preparation, focus on reducing friction without changing the wheel beyond what is permitted.
Clean the wheels first. Then inspect the tread, inner edge, hub, and bore. If allowed, lightly polish the bore with plastic polish and a soft applicator. A smoother bore reduces friction where the wheel spins on the axle. Some experienced builders also polish the inner hub area where the wheel may touch the car body or axle head. Keep everything clean and dry before adding graphite.
Wheel preparation mistakes to avoid
- Do not sand wheels into a shape your rules prohibit.
- Do not remove too much material from the tread.
- Do not use oil if your race allows only dry lubricant.
- Do not mix polish residue with graphite.
- Do not assume aftermarket wheels are legal.
If your rules require untouched official wheels, do not worry. You can still gain speed through axle polishing, graphite application, alignment, and smart weight placement.
Step 6: Use Graphite the Right Way
Graphite is the classic Pinewood Derby lubricant because it is dry, simple, and commonly allowed. The trick is not just sprinkling it around like fairy dust and hoping the car becomes enchanted. Graphite needs to get inside the wheel bore and onto the axle surface.
Apply graphite before final assembly. Put graphite into the wheel bore, insert the axle, spin the wheel several times, tap gently, and repeat. This builds a thin coating where it actually matters. After the wheels are mounted, add a little more graphite at the axle-wheel contact points and spin the wheels by hand. Avoid dumping huge piles of graphite right before the race without spinning it in. Too much loose graphite can make the first runs slower until the excess clears out.
Simple graphite routine
- Add graphite to the wheel bore.
- Insert the polished axle.
- Spin the wheel by hand.
- Repeat the process several times.
- Install the wheel and axle on the car.
- Spin again to distribute the lubricant.
Graphite is messy. Use newspaper, a tray, or a work mat unless you want your table to look like it lost a fight with a pencil factory.
Step 7: Align the Car for a Smooth Run
Alignment is where many fast-looking cars lose. A car that zigzags down the track travels farther and rubs more. Rubbing means energy loss. Energy loss means slower times. The goal is a car that either rolls very straight or follows a controlled rail-riding path, depending on what your rules allow.
For a basic build, test the car on a smooth board. Draw or tape a straight centerline, raise one end slightly, and let the car roll without pushing. If it drifts sharply left or right, something is misaligned. Try rotating wheels to different axles, checking whether axles are inserted squarely, and making very small adjustments. Do not bend axles while they are installed in the wooden body because you can enlarge the axle slot or crack the wood.
What is rail riding?
Rail riding is an advanced alignment technique where the car is intentionally tuned to touch the center guide rail lightly with one front wheel. That sounds slower, but it can reduce random bouncing and keep the rear wheels from slamming into the rail. If your rules allow it, rail riding can be very effective. If your rules do not allow bent axles or raised wheels, skip it and focus on a straight, smooth roll.
Step 8: Paint Without Hurting Performance
Paint does not make a Pinewood Derby car fast, but bad paint can make it slower. Thick paint near wheel contact areas can rub. Sticky paint can collect graphite. Heavy decorations can move the center of gravity higher or forward. The best plan is to sand the body smooth, apply thin coats, let each coat dry fully, and keep the axle and wheel contact areas clean.
Use lightweight decals, markers, or thin paint for decoration. If you want a glossy finish, apply it before final wheel assembly. Avoid painting inside axle slots unless you are sure it will not affect axle placement. A beautiful car that rubs the wheels is like wearing a tuxedo to a marathon. Fancy, yes. Efficient, no.
Step 9: Final Assembly and Race-Day Tuning
Once the body is painted, the axles are polished, the wheels are prepared, and the weight is placed, it is time for careful assembly. Install the wheels so they spin freely without wobbling. Leave a tiny gap between the wheel and the body. Too tight creates friction. Too loose can allow wobble. A business card thickness is a common starting point, though exact spacing depends on your wheels and rules.
Weigh the finished car on a digital scale. Aim slightly under the limit at home, such as 4.98 or 4.99 ounces, because check-in scales can differ. Bring small removable weight, such as tungsten putty, for final adjustments. Bring graphite if allowed at check-in. Bring patience, because race-day lines can turn even calm adults into nervous pit crews.
Final speed checklist
- Finished weight is at or just below the legal limit.
- Balance point is stable and rear-biased.
- Axles are polished and clean.
- Wheels spin freely.
- Graphite is worked into the bores.
- The car tracks straight or is properly rail-riding.
- Nothing rubs the body, track, or guide rail.
- All weights are secure.
Common Pinewood Derby Speed Myths
Myth 1: The coolest-looking car is the fastest
Not always. Cool matters, but speed comes from physics. A plain wedge with polished axles and great alignment can beat a detailed race car with rubbing wheels.
Myth 2: More graphite always means more speed
Graphite helps when it is inside the wheel bore and properly broken in. Loose piles of graphite can create mess without improving performance.
Myth 3: Put all the weight as far back as possible
Rear weight is good, but too much rear bias can make the car unstable. A slightly safer balance point often beats a wild, fishtailing car.
Myth 4: Aerodynamics are everything
A smooth, low shape helps, but friction and alignment usually matter more in a short Pinewood Derby race.
Field-Tested Experiences: What Actually Helps When Building a Faster Pinewood Derby Car
After watching families build Pinewood Derby cars, one lesson becomes obvious: the fastest car is rarely the one built in a panic the night before the race. Last-minute cars can be charming, but graphite dust, wet paint, and rushed axle work are not a championship strategy. The best builds usually happen in stages. One day for design and cutting. Another day for sanding and painting. Another day for axles, wheels, weight, and testing. That slower schedule gives young builders time to learn instead of simply watching an adult turn the project into a tiny engineering dissertation.
A practical experience-based approach is to build the car around one main goal: reduce wasted motion. When a test car rolls down a board and drifts hard to the left, that is wasted motion. When a wheel vibrates, that is wasted motion. When the body rubs the wheel, that is wasted motion. Instead of chasing every advanced trick online, fix the obvious problems first. A straight-running, properly weighted car with polished axles will usually perform well at a local Derby.
Another helpful lesson is to involve the child in real decisions. Let them choose the color, draw the design, sand the body, weigh parts, and test wheel spin times. Adults should handle dangerous tools, but the builder should understand why the weight goes near the rear and why a polished axle feels smoother than a rough one. That is where the Derby becomes more than a race. It becomes a small physics lab with snacks.
One simple test that families often enjoy is the wheel-spin comparison. Before polishing, place a wheel on an axle and spin it. Time how long it rotates. Then polish the axle, add graphite, and test again. The improvement is usually easy to see, and it gives young builders a satisfying “I did that” moment. Another useful test is the balance test. Move a small weight forward and backward, then show how the balance point changes. Suddenly, center of gravity is not just a science phrase. It is something sitting right there on the kitchen table.
Race-day experience teaches another truth: leave room for adjustment. Do not permanently seal every weight pocket before you know the final weight. Keep a little putty or a small screw-in weight available for check-in. If the car is too heavy, you need a way to remove weight without performing emergency surgery in front of twelve nervous Scouts. If the car is too light, you need a way to add weight quickly and securely.
Finally, remember that the best Pinewood Derby memory is not always the trophy. Sometimes it is the moment the car crosses the finish line without wobbling. Sometimes it is the child explaining graphite to a grandparent. Sometimes it is the ridiculous car name written on the bottom in marker. Build for speed, absolutely. But also build for pride. A fast car is great. A fast car that the young builder helped create is even better.
Conclusion: Build Smart, Tune Carefully, Race Proud
Learning how to build a faster Pinewood Derby car comes down to a few proven principles. Follow the rules, keep the car close to the legal weight limit, place the center of gravity near the rear without sacrificing stability, polish the axles, prepare the wheels if allowed, apply graphite correctly, and tune the alignment. None of these steps require wizard powers. They require care, testing, and a willingness to improve small details.
The winning formula is simple: more useful energy, less wasted energy. When your car rolls straight, spins freely, and carries its weight wisely, it has a much better chance of reaching the finish line first. And if it also has a lightning bolt painted on the side? Well, that cannot hurt morale.
Note: Always check your local Pinewood Derby rules before using advanced techniques such as raised wheels, bent axles, extended wheelbases, aftermarket parts, or rail riding.