Table of Contents >> Show >> Hide
- Why a Box Trap Works
- Tools and Materials
- How to Build a Box Trap in 13 Steps
- Step 1: Confirm the trap is legal where you live
- Step 2: Choose the right size for your target animal
- Step 3: Sketch the design before cutting anything
- Step 4: Cut the frame pieces
- Step 5: Assemble the rectangular frame
- Step 6: Attach the wire mesh to the sides, top, and floor
- Step 7: Build the sliding front door
- Step 8: Add door guides and a stop
- Step 9: Make the trigger plate
- Step 10: Install the latch and test the action
- Step 11: Smooth, reinforce, and weather-check the trap
- Step 12: Place and bait the trap correctly
- Step 13: Monitor, release safely, and fix the real problem
- Best Practices for Humane Use
- Common Mistakes to Avoid
- Is Building Your Own Box Trap Worth It?
- Real-World Lessons and Experience: What People Learn the Hard Way
If you have a rabbit chewing your lettuce like it pays rent, or a squirrel treating your attic like a vacation condo, a humane box trap can be a practical solution. The key word there is humane. A good box trap is designed to catch a small nuisance animal alive without injuring it, while also keeping you safer during handling and release.
This guide explains how to build a simple live-capture box trap in 13 steps using basic materials, modest tools, and a healthy respect for wildlife laws. It is written for small nuisance animals such as rabbits, squirrels, or similar-sized backyard troublemakers. It is not for protected wildlife, pets, large animals, or any species that may carry a serious bite risk. If you suspect you are dealing with a skunk, raccoon, bat, or an animal acting sick, aggressive, or disoriented, call a wildlife professional instead of playing frontier engineer.
Before you build, one important truth: a trap is only half the solution. If you release an animal and leave the food source, nest site, or entry hole untouched, you have not solved the problem. You have just created a short intermission. So while you are building the trap, plan the follow-up too.
Why a Box Trap Works
A box trap, sometimes called a cage trap, is basically a rectangular enclosure with a door held open by a trigger mechanism. When the animal walks inside and steps on the treadle or trip plate to reach bait, the door drops shut behind it. Elegant. Simple. Mildly dramatic.
The best designs do three things well: they fit the target animal, they close reliably, and they reduce stress once the animal is inside. That means no sharp edges, no wobbly frame, no trap that tips over like a bad folding chair, and no bait placement that lets the animal steal dinner without triggering the door.
Tools and Materials
- 1×2 or 1×3 lumber for the frame
- Welded wire mesh or hardware cloth
- Plywood or thin scrap wood for the door and trigger parts
- Screws and washers
- Staples or a staple gun for mesh
- Two thin wooden strips for door guides
- Wire, rod, or sturdy string for the trigger linkage
- Hingeless sliding door or gravity door panel
- Wire cutters
- Saw
- Drill or screwdriver
- Sandpaper or a metal file
- Gloves and eye protection
For most small-to-medium nuisance animals, use strong welded mesh that will not bend easily. If you are building for very small animals, tighten the mesh size. If you are building for larger small mammals, strengthen the frame and door. The trap should fit the species, not just whatever scrap wood is making eye contact with you in the garage.
How to Build a Box Trap in 13 Steps
Step 1: Confirm the trap is legal where you live
Start here, not with the saw. Wildlife rules vary by state and sometimes by city or county. Some places allow live trapping only for certain species. Some require release on the same property. Some restrict relocation. Some species are fully protected. If the law says “do not trap,” then your DIY project just became a shelf.
Step 2: Choose the right size for your target animal
A trap that is too small is inhumane. A trap that is too large may fail to trigger properly or catch the wrong animal. For rabbits and squirrels, a compact trap works well. For opossums or similar animals, build a larger version with a sturdier frame and heavier mesh. A good rule is to give the animal enough room to enter naturally without creating a cavern that invites every non-target visitor in the neighborhood.
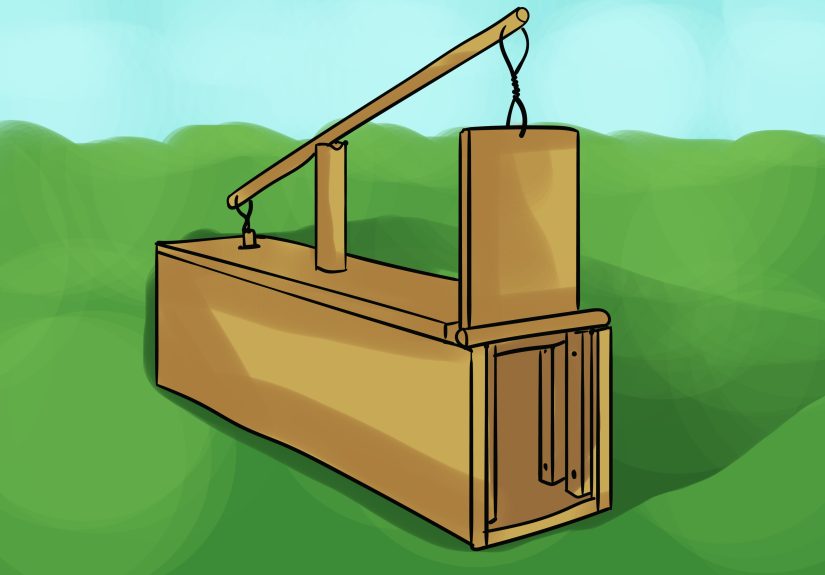
Step 3: Sketch the design before cutting anything
Your basic trap needs six enclosed sides, one working door, one trigger plate, and one linkage that holds the door open until the plate is stepped on. Draw a rectangle for the body, mark the front opening, and plan the trigger plate near the back third of the trap. Put the bait beyond the trigger, not in front of it. Otherwise, congratulations, you have built a snack dispenser.
Step 4: Cut the frame pieces
Cut lumber for the base rectangle, top rectangle, and four corner uprights. Keep angles square. If the frame twists even a little, the door may stick, and a sticky door is the mechanical equivalent of shrugging. Dry-fit the pieces before screwing them together so you catch mistakes while they are still just annoying instead of permanent.
Step 5: Assemble the rectangular frame
Screw the base together first, then attach the uprights, then the top. Add a crossbar at the front top edge to support the door track and a rear crosspiece if the trap feels flimsy. The frame should sit flat on the ground without rocking. A stable trap is safer, more humane, and much less embarrassing.
Step 6: Attach the wire mesh to the sides, top, and floor
Measure carefully and cut mesh panels for the bottom, sides, top, and rear wall. Fasten them with heavy staples or screws with washers. Fold or file any sharp cut ends inward or cover them so the animal cannot scrape itself. The floor matters more than people think. If the mesh feels too slippery or exposed for the target species, you can later add a thin layer of leaves, paper, or natural ground cover when setting the trap.
Step 7: Build the sliding front door
Make a vertical sliding door from plywood, thin wood, or metal that fully covers the opening. It should be heavy enough to drop quickly, but not so heavy that it smashes like a tiny medieval gate. A gravity door is simple and dependable: when released, it falls straight down into place.
Step 8: Add door guides and a stop
Install two narrow wooden guide rails inside the front corners so the door can slide smoothly up and down. Leave just enough clearance so it moves freely without wobbling. Add a bottom stop or lip so the closed door sits securely and cannot be pushed outward by the trapped animal.
Step 9: Make the trigger plate
Create a small treadle from thin wood or rigid plastic and mount it inside the trap floor near the rear half. The plate should tilt or depress when stepped on. Connect it by wire, rod, or string to the latch that holds the door open. Keep the mechanism simple. The more moving parts you add, the more likely your trap will develop a personality disorder.
Step 10: Install the latch and test the action
Raise the door, hook it to the trigger linkage, and press the treadle by hand. The door should release cleanly and drop without dragging. Test it repeatedly. Then test it again on a level surface. A humane trap should trigger fast and predictably. If it takes a firm stomp from a boot to trip it, a squirrel will file a complaint.
Step 11: Smooth, reinforce, and weather-check the trap
Sand rough wood, clip exposed wire ends, tighten fasteners, and make sure the trap is sturdy enough to be carried without flexing. Add a handle only if it keeps your hands safely away from the sides. This is also the moment to think about ventilation and weather. The trap should provide airflow, but once in use it should be easy to cover with breathable cardboard or cloth to reduce stress and shield the animal from heat, sun, wind, or rain.
Step 12: Place and bait the trap correctly
Set the trap on a level, firm surface where you have seen signs of activity: trails, droppings, gnawing, tracks, burrow approaches, or garden damage. Clear sticks and debris from underneath so the trap does not wobble and the door can close all the way. Place a small amount of species-appropriate bait behind the trigger plate. For rabbits, produce and clover-like bait can work. For squirrels, nut-based bait may be effective. Do not overload the trap with bait. You are trying to lure the animal in, not open a buffet.
Step 13: Monitor, release safely, and fix the real problem
Once the trap is set, check it at least daily, and more often during hot or cold weather. If an animal is captured, cover the trap to reduce panic, wear gloves, and keep your face and hands away from the mesh. Release only where lawful and safe, and never assume relocation is allowed. Then immediately address whatever attracted the animal in the first place: seal entry points, protect plants, secure trash, remove food sources, and repair damage. Otherwise, your next article will be titled How to Build a Second Box Trap Because I Ignored Step 13.
Best Practices for Humane Use
Even a well-built trap can become cruel if used carelessly. Never set one and forget one. Never leave a trap exposed in direct summer sun without protection. Never use plastic coverings in warm conditions because they can trap heat. Use breathable materials instead, such as cardboard or cloth, and keep the trap out of extreme weather when possible.
It is also smart to pre-bait shy animals. That means securing the door open for a day or two, placing a little bait near the entrance and farther inside, and letting the animal get comfortable walking in and out. Once feeding activity is obvious, set the trigger normally. This often improves success with species that treat new objects with deep personal suspicion.
Just as important, do not use a generic trap for every situation. Rabbits, squirrels, opossums, and similar animals behave differently. Some move along edges. Some hug cover. Some prefer sweet bait; others prefer nuts or fresh plant material. Trap placement and bait choice matter just as much as construction quality.
Common Mistakes to Avoid
- Building the trap too large or too small for the species
- Placing bait before the trigger instead of beyond it
- Leaving sharp mesh edges inside the trap
- Setting the trap on uneven ground
- Using too much bait
- Forgetting to plan what happens after capture
- Relocating wildlife without checking the law
- Ignoring exclusion and cleanup after release
Is Building Your Own Box Trap Worth It?
Yes, if you need a species-specific trap, enjoy practical projects, and are committed to using it responsibly. A homemade box trap can be effective, affordable, and surprisingly durable. But if you are dealing with protected wildlife, an animal inside a building, repeated infestations, or any species known for biting, spraying, or carrying disease, a licensed wildlife control expert is the wiser move.
Think of a DIY box trap as a tool, not a magic trick. Build it well, use it humanely, check it often, and pair it with prevention. That combination is what actually solves the problem.
Real-World Lessons and Experience: What People Learn the Hard Way
People who build and use box traps for the first time usually imagine the hard part is construction. In reality, the hard part is everything around the trap. The frame goes together in an afternoon. The learning curve shows up later, usually when the builder discovers that wildlife is clever, suspicious, fast, and entirely unimpressed by human optimism.
One of the most common experiences is realizing that placement beats perfection. A beautifully built trap set in the wrong spot can sit empty for days, while a plain trap placed along an active trail can work almost immediately. Many homeowners start by putting the trap where it is convenient for them. Experienced trappers put it where the animal already wants to go. That difference sounds tiny, but it changes everything.
Another lesson is that bait is not about quantity. Beginners tend to overdo it. They pile in food like they are catering a woodland wedding. Then they wonder why the animal nibbled near the entrance, avoided the trigger, or ignored the trap completely because the surroundings already offered easier food. A little bait, positioned correctly, usually works better than a feast. The goal is commitment, not appetizers.
Builders also discover that the trigger system deserves more respect than the rest of the trap combined. If the door sticks, if the treadle is too stiff, or if the latch catches only when the moon is emotionally available, the trap will fail. People who have built successful box traps often say the same thing: test it over and over before it ever goes outside. Then test it again after you move it. A trap that works in the garage can suddenly become stubborn on grass, dirt, or mulch.
There is also the stress factor, which first-time users often underestimate. Once an animal is inside, everything becomes more urgent. The trap needs shade. The animal needs quiet. The person handling it needs gloves, calm nerves, and a plan. This is the point where humane design matters most. A breathable cover, smooth interior surfaces, and a solid carry position make a huge difference. People who skip those details usually wish they had not.
Perhaps the biggest lesson is that trapping without prevention turns into a loop. Someone catches a rabbit, releases it legally, and feels victorious. Two weeks later another animal appears, because the garden is still open, the compost is still tempting, or the entry point under the shed is still wide enough to invite a reunion tour. Experienced homeowners eventually learn that the trap solves the immediate moment, while cleanup, exclusion, and repair solve the recurring problem.
So yes, building a box trap can absolutely work. It can save money, solve a small wildlife conflict, and give you a practical tool you may use again. But the people with the best results are rarely the ones who build the fanciest trap. They are the ones who build a safe one, place it thoughtfully, use it humanely, and treat the capture as step one of a bigger solution. That is the real experience behind a successful box trap project.


