Table of Contents >> Show >> Hide
- What Is a Floor Mounted Tap, Exactly?
- Why People Love Floor Mounted Faucets (and Why Pros Take Them Seriously)
- The Parts You’re Actually Buying (Not Just a Pretty Spout)
- Planning the Location: The “Splash Zone” Is Real
- Subfloor Reality Check: Wood Framing vs. Concrete Slab
- Installation Overview: What Happens Under the Floor
- Codes and Safety: Anti-Scald Is Not Just for Showers
- How to Choose the Right Floor Mounted Tap
- Maintenance and Troubleshooting: Keep It Looking and Working Sharp
- Mistakes to Avoid (So Your Faucet Doesn’t Become a Very Expensive Statue)
- FAQ
- Real-World Experiences: What People Notice After the Instagram Photo
- Wrap-Up: The Best Floor Mounted Tap Is the One You Planned For
- SEO Tags
A floor mounted tap is the bathroom equivalent of wearing a tuxedo to a backyard barbecue: it’s a little extra,
undeniably stylish, and it makes everything around it look more expensive. In American bathrooms, “floor mounted tap”
usually means a freestanding tub fillera faucet that rises up from the floor next to a freestanding
bathtub and pours water into the tub without needing a deck, a wall, or a complicated story about why your plumber
suddenly stopped returning texts.
But here’s the twist: floor mounted faucets aren’t just about looks. They’re also about planning. Unlike a standard
tub spout that lives on a wall (where it can hide its plumbing sins behind tile), a floor mounted tap depends on what’s
underneath your finished floorframing, blocking, concrete, supply lines, and a rough-in valve that must be installed
correctly before the fun part (picking the shiny trim) begins.
What Is a Floor Mounted Tap, Exactly?
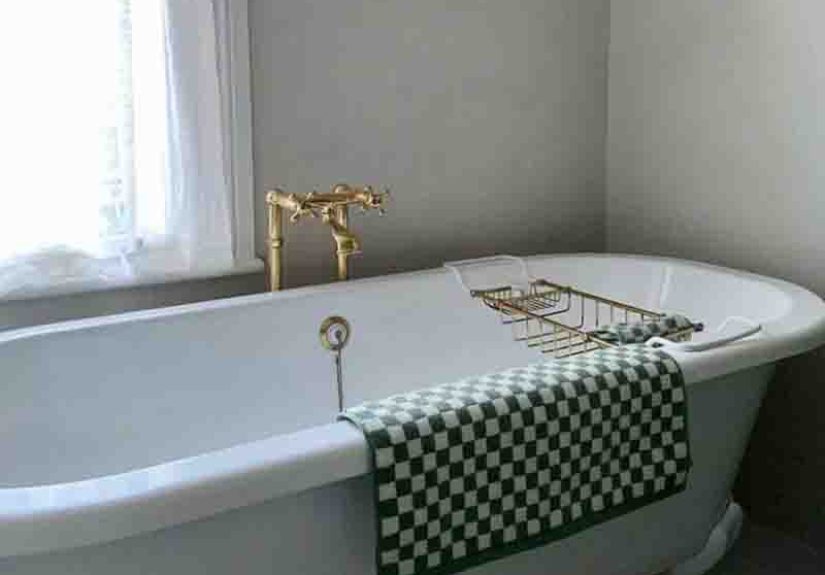
A floor mounted tap is a faucet system anchored to the floor, typically positioned beside a freestanding bathtub.
Water supply lines come up through the floor into a rough-in valve (or a mounting assembly), then continue into a
vertical riser that supports the spout and handle. Many models also include a hand shower (often called a “personal
shower”) with a flexible hose and a diverter.
In plain English: it’s a tall faucet that stands on the floor like it pays rent.
Why People Love Floor Mounted Faucets (and Why Pros Take Them Seriously)
The “yes, please” list
- Design freedom: Perfect for freestanding tubs placed away from wallscenter-of-room, window-side, or “spa fantasy” corner.
- Cleaner tub lines: No deck drilling. No wide tub rim clutter. The tub stays sculptural.
- Flexible pairing: Works with many tub stylesoval soaking tubs, slipper tubs, even some modern clawfoot designs.
- Hand shower convenience: Great for rinsing hair, cleaning the tub, or giving the family dog a very confused bath.
The “hold up” list
- Underfloor access matters: Water lines must run to the faucet location. That’s easy in open framing, harder in finished spaces, and a whole event on a concrete slab.
- Wobble risk: If the base isn’t anchored to solid support, the faucet can moveand a moving faucet is basically a slow-motion plumbing disaster.
- Leak stakes are higher: A small drip under a floor is more annoying than a drip under a sink because you can’t just open a cabinet and glare at it.
- Cost: Between the rough-in, trim, and labor, floor mounted taps can be a bigger bite than wall-mounted options.
The Parts You’re Actually Buying (Not Just a Pretty Spout)
When you shop for a floor mounted tap, you’re usually looking at a system with multiple components. Knowing what they
are helps you compare models without getting hypnotized by the finish name (looking at you, “champagne bronze”).
- Rough-in valve / floor-mount rough: The plumbing core installed beneath the finished floor. This is where hot and cold supplies connect.
- Mounting plate / bracket: A structural base that anchors the faucet to framing or concrete. This is what keeps things stable.
- Riser: The vertical body that carries water upward and supports the spout/handle.
- Trim: The visible partshandle, spout, escutcheon, and sometimes the hand shower cradle.
- Cartridge(s): Internal valve components controlling flow and temperature (commonly ceramic disc style in higher-quality faucets).
- Diverter: If there’s a hand shower, something needs to switch water from tub spout to spray.
A key real-world detail: many manufacturers sell the rough-in separately from the trim.
That’s not a cash grab as much as a scheduling benefitrough-in can be installed during construction, while trim can be
chosen later when you’ve recovered emotionally from picking tile.
Planning the Location: The “Splash Zone” Is Real
The most common mistake with a floor mounted tap is treating placement like a vibe. Placement is not a vibe. Placement is geometry.
If the spout lands too close to the tub wall, water can slap the side and splash. Too far, and it may overshoot or force an awkward
fill angle. Too high, and you’ll create a tiny indoor waterfall. Too low, and it’s a slow pour that tests your patience and your
phone battery.
A practical placement checklist
- Confirm the tub’s final position (including drain orientation and any “wiggle room” for installation).
- Mark the tub rim and centerline on the floor with painter’s tape.
- Match spout reach to the tub’s interior so water enters cleanly without hitting the wall of the tub.
- Leave comfortable handle access so you’re not doing yoga every time you want warmer water.
- Confirm base clearance so the faucet isn’t cramped against a tub skirt or a nearby wall.
Pro tip: many installation manuals include rough-in drawings with minimum clearances and centerline dimensions. Treat those drawings
like flight instructions, not friendly suggestions.
Subfloor Reality Check: Wood Framing vs. Concrete Slab
If you have a wood subfloor
Wood framing is usually the easiest scenario because you can route supplies between joists and add blocking where the faucet needs
to anchor. Many rough-in systems rely on a bracket or mounting plate that must be fastened into solid structuremeaning you may need
additional framing, cross-bracing, or thicker blocking than what’s already there.
Some manufacturers even specify minimum support requirements (for example, thicker wood support or a properly engineered base) because
the faucet acts like a lever: a small bump at the top can translate into big stress at the bottom.
If you’re on a concrete slab
Slab installs are doable, but they’re not “quick Saturday projects.” Getting water lines to the faucet location may require cutting
concrete and creating a channel for piping, then patching. You also need to consider how the rough-in will be secured and how you’ll
service it later if anything ever needs attention.
If you’re remodeling and the bathroom is already finished, slab work can become the main storylinebudget, timeline, dust, and all.
This is one reason many homeowners decide early: either commit to the floor mounted tap during the build, or choose a wall-mounted
alternative during a remodel.
Installation Overview: What Happens Under the Floor
This isn’t a step-by-step substitute for your model’s instructions (and your local code), but it will help you understand the
sequenceand why timing matters.
Typical installation flow
- Rough-in planning: Confirm faucet location relative to the tub. Verify required hole spacing and pipe routing.
- Open the floor (if needed): In new builds, it’s open by default. In remodels, this may require selective demolition.
- Add structural support: Install blocking or a mounting base that meets the rough-in requirements.
- Run hot/cold supply lines: Typically 1/2-inch supply lines, using approved materials and fittings for your jurisdiction.
- Install the rough-in valve / floor rough: Anchor it solidly and set it to the correct height and orientation.
- Pressure test: Verify no leaks before the floor gets closed up.
- Finish the floor: Tile/stone/wood goes in after rough-in positioning is locked.
- Install trim: Add the riser, spout, handle, and hand shower components. Level everything carefully.
- Final test: Check flow, temperature control, diverter action, and stability.
Two themes show up repeatedly in manufacturer instructions: anchor it well and test before you close the floor.
Floors are dramatic to reopen. Your future self will appreciate today’s pressure test.
Codes and Safety: Anti-Scald Is Not Just for Showers
Hot water safety is a real consideration for tubsespecially in homes with kids, older adults, or anyone who enjoys bathing with the
attention span of a golden retriever (meaning: they turn on hot water and immediately walk away).
Many jurisdictions require some form of temperature control or limiting for bathing fixtures. In the U.S., you’ll often hear about
standards for temperature-regulating or temperature-limiting devices. The practical takeaway isn’t memorizing acronymsit’s ensuring
the system includes appropriate scald protection as required by local code and that it’s properly set during installation.
- Pressure-balanced or thermostatic mixing: Helps reduce sudden temperature swings if water pressure changes.
- Temperature limiting devices: Can cap the maximum temperature delivered to a tub filler, depending on the setup.
- Water heater settings matter: Even the best faucet can’t save you from an aggressively hot water heater paired with no limiting strategy.
Bottom line: talk to a licensed plumber (and follow local code) to confirm what’s required for your specific installation. It’s one of the
most important “invisible upgrades” you can make.
How to Choose the Right Floor Mounted Tap
The “right” floor mounted faucet isn’t just the one that matches your towel bars. It’s the one that fits your tub, your bathroom
layout, your plumbing reality, and your expectations of how quickly a tub should fill before you start negotiating with yourself.
1) Flow rate: tub filling is a different sport
Showerheads are commonly designed around lower flow, while tub fillers are often built for faster filling. But “high flow” varies wildly
by model and by your home’s water pressure. Check the spec sheet for gallons per minute (GPM) at a given pressure (often stated at 60 psi).
If the faucet includes a hand shower, that spray component may have a lower maximum flow than the tub spout.
2) Valve design and cartridge quality
Many better faucets use durable cartridge systems (often ceramic disc). That matters for smooth operation and long-term drip resistance.
Also consider serviceability: can the cartridge be accessed from above without ripping up the floor? Some designs make maintenance easier
than others.
3) Materials: your faucet should be more “brass band” than “mystery metal”
Higher-end models tend to use solid brass or stainless components in critical areas. Less expensive faucets may use zinc alloys in parts
where you’d rather not gamble. If you’re buying online, look for clear material descriptions and published specs.
4) Finish durability (because fingerprints have a hobby)
Finishes vary in durability. Some resist spotting and wear better than others. Regardless of finish, gentle cleaning habits matter:
avoid harsh abrasives, and stick to mild soap and water unless your manufacturer specifies otherwise.
5) Hand shower details
If your faucet includes a hand shower, check hose length and how the spray docks. Many models use a hose around five feet long, which is
practical for rinsing the tub without turning your bathroom into a splash-themed escape room.
6) Rough-in compatibility
A common planning pitfall: mixing a rough-in from one system with trim from another. Floor mounted taps are not universal LEGO sets.
Confirm you’re buying a compatible rough-in and trim combination (or a complete kit) before the plumber installs anything.
7) Budget and value reality
Expect a wide range. Entry-level options can cost a few hundred dollars, while premium designer models can climb well into four figures.
The rough-in, trim, and labor should all be part of your budget math. If you’re on a slab, factor in concrete work and patching as well.
Maintenance and Troubleshooting: Keep It Looking and Working Sharp
Floor mounted taps are generally low-drama when installed correctly, but a few issues show up repeatedly in real homes:
- Wobble or movement: Usually structuralinsufficient anchoring or support under the floor.
- Drips from the spout: Often cartridge-related; sometimes debris after construction. A flush and cartridge service can help.
- Low flow: Check shutoffs (if present), debris screens, or partially closed stops. Also confirm your home’s pressure and supply sizing.
- Temperature swings: Can be supply-related, or a sign that you need better temperature control strategy per local requirements.
- Hand shower leaking: Check connections, washers, and diverter performance.
Cleaning tip: wipe down regularly with a soft cloth. If you live in a hard-water area, quick wipe-downs prevent mineral spots from becoming
a permanent bathroom exhibit titled “The Science of Scale.”
Mistakes to Avoid (So Your Faucet Doesn’t Become a Very Expensive Statue)
- Installing without a firm structural base: Stability is everything for a tall, lever-like fixture.
- Skipping a pressure test: Test the rough-in before the floor is sealed. Always.
- Placing the spout without considering splash: Reach and height matter as much as style.
- Ignoring service access: Think about how repairs would happen in five years, not just how it looks on reveal day.
- Assuming “any rough-in fits any trim”: Confirm compatibility and keep documentation.
- Forgetting temperature safety: Plan scald protection and code compliance from the start.
FAQ
Is a floor mounted tap only for freestanding tubs?
Most commonly, yes. Floor mounted tub fillers are designed for freestanding tubs where wall mounting isn’t practical or desired. There are
niche commercial or specialty uses, but residential bathrooms typically use them for freestanding tubs.
Can I add a floor mounted faucet in a finished bathroom?
Sometimes, but it depends on access. If you can reach plumbing from below (unfinished basement/crawlspace), it’s more feasible. On concrete
slabs, it may require cutting concrete. Many remodels choose wall-mounted alternatives if floor access is difficult.
Do I need a rough-in valve?
Many floor mounted taps require a dedicated rough-in valve or floor rough installed beneath the floor, while some systems use adapters
that reduce the need for a separate rough-in. Always follow the specific product requirements.
How do I know if my floor is strong enough?
Follow the manufacturer’s support requirements and consider professional evaluation during construction. Because the faucet is tall and
can be bumped, proper blocking or a structural mounting solution is essential.
Do floor mounted taps fill tubs faster than wall spouts?
Not automatically. Filling speed depends on the faucet’s rated flow and your home’s pressure and supply size. Many tub fillers are designed
for higher flow, but you should check the published specs rather than guessing.
Real-World Experiences: What People Notice After the Instagram Photo
After the remodel glow fades and the bath mat becomes a permanent resident, floor mounted taps tend to get judged on a few very human criteria:
speed, stability, and how annoying they are to live with. Here are common experiences homeowners and plumbers often share when these faucets
move from “dream board” to daily reality.
First: filling speed feels different in real life. Many people expect a freestanding tub filler to blast water like a hotel suite.
Sometimes it does. Sometimes it politely fills like a well-mannered garden hose. The difference often comes down to water pressure, pipe sizing,
and whether your home’s plumbing has long runs to the bathroom. If the faucet is rated at a certain GPM at a certain pressure, but your house
doesn’t deliver that pressure at that location, the tub may take longer than expected. A common “aha” moment is realizing that the tub itself
may be deeper (and hold more water) than the old alcove tubso even a decent flow can feel slower simply because you’re filling more volume.
Second: stability becomes the make-or-break detail. Homeowners who love their floor mounted tap often mention that it feels “rock solid.”
Homeowners who don’t… mention it with the same tone people use when describing a shopping cart with one rebellious wheel. A slight wobble can happen
when the mounting base wasn’t anchored to strong blocking, when the finished floor thickness wasn’t accounted for, or when movement occurred after the
bathroom settled. The lesson pros repeat: the pretty faucet is only as stable as what it’s bolted to.
Third: the hand shower is either a hero or a hassle. In many bathrooms, the hand shower becomes the unsung MVP for rinsing shampoo,
washing the tub, and cleaning around the drain. But people also notice the small practical details: Does the hose tangle? Does the spray dock securely?
Does the diverter switch smoothly? If the hand shower cradle is positioned awkwardly, it can drip onto the floor or splash the side of the tub.
The good setups feel intuitive; the bad setups feel like you need a user manual to rinse a bathtub.
Fourth: cleaning is surprisingly straightforwardif you’re consistent. Floor mounted taps sit out in the open, which means they’re easy
to wipe down (no reaching behind a deck) but also easier to notice when they’re spotted. In hard-water areas, owners often find that a quick wipe
after use prevents mineral buildup that can dull the finish. When people skip that habit, the faucet can develop those chalky “I live here now” spots
that require more effort to remove later.
Finally: planning pays dividends. The happiest installs tend to be the ones planned earlytub location finalized, rough-in aligned with
the tub’s shape, temperature safety considered, and pressure-tested before the floor closed up. The stressful installs are the opposite: the faucet
chosen late, the tub moved “just a few inches,” and everyone hoping the spout reach will magically work out. Spoiler: magic is not a code-approved tool.
If you want the floor mounted tap experience to feel luxurious rather than fussy, treat it like a system: structure + plumbing + placement + safety.
Do that, and you’ll get the spa vibe without the “why is my faucet doing that?” side plot.
Wrap-Up: The Best Floor Mounted Tap Is the One You Planned For
A floor mounted tap can make a bathroom feel custom, modern, and high-endespecially next to a freestanding soaking tub. But it shines brightest when
the installation is engineered as carefully as the design is chosen. Prioritize structural support, confirm rough-in requirements early, validate flow
expectations, and don’t treat temperature safety like an optional accessory.
Choose wisely, install thoughtfully, and your faucet won’t just look like luxuryit will live like it.
SEO Tags


