Table of Contents >> Show >> Hide
- The One Step I Always Do Ahead: Prep Before You Preheat
- Why Prepping Ahead Works So Well
- What You Can Safely Do Ahead (Without Ruining Dessert)
- How This Looks in Real Life: A Before-and-After Baking Day
- How to Build Your Own Make-Ahead Baking Routine
- Common Mistakes to Avoid When Prepping Ahead
- Extra : Real-Life Experiences with Prepping Baking Steps Ahead
If you’ve ever planned to “just whip up” a batch of cookies and somehow turned your kitchen into a flour-covered crime scene, this one’s for you. For years, I thought the secret to stress-free baking was a fancier mixer, a new set of pans, or a magical cookie scoop. Turns out, the real game changer is much less glamorous:
Prepping one key baking step ahead of time.
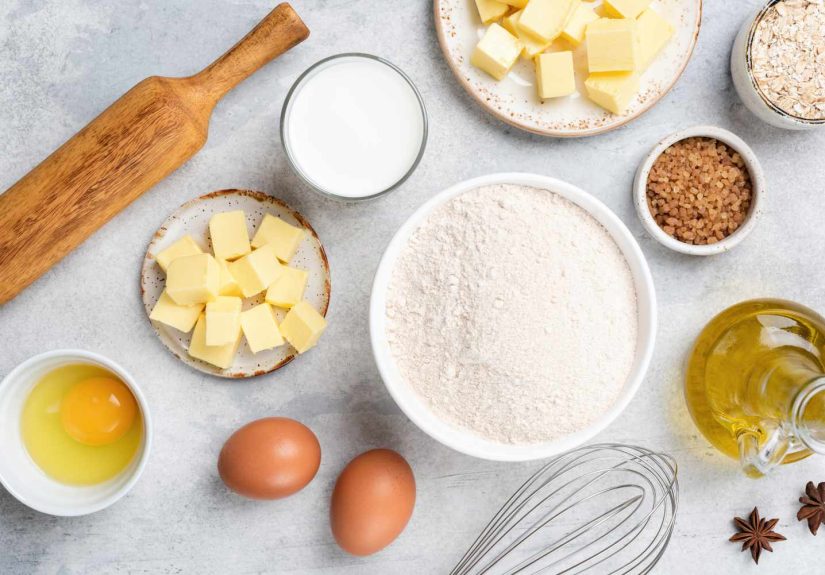
Specifically, I’m talking about doing your ingredient prep in advancepre-measuring and mixing dry ingredients, chilling dough, and even par-baking pie crusts before the day you actually need dessert. It’s the home-baker version of the pro-chef rule mise en place (“everything in its place”), and once you start using it, you’ll wonder why you ever baked any other way.
The One Step I Always Do Ahead: Prep Before You Preheat
Professional kitchens swear by mise en place for a reason: you get all your ingredients measured, chopped, and organized before the heat ever turns on. That way, the moment it’s time to bake, you’re assemblingnot running around trying to figure out where you put the vanilla.
At home, this translates into one simple rule that changed everything for me:
The day (or night) before I bake, I prep as much as the recipe safely allows.
That often means:
- Pre-mixing dry ingredients for cakes, muffins, or brownies
- Chilling or freezing cookie dough
- Refrigerating cake batter (for the right types of cakes)
- Shaping and par-baking or freezing pie crusts
So when Baking Day arrives, most of the “thinking work” is done. All I have to do is grab what’s ready, add the wet ingredients, and bake. It feels a bit like cheating, but the good kind.
Why Prepping Ahead Works So Well
Doing this baking step ahead isn’t just about convenience; it literally improves your results and your mood.
1. It cuts your active time in half
Measuring flour, sugar, spices, and leaveners takes more time than we thinkespecially if the vanilla has migrated to the back of the pantry and the baking powder is behind three jars of peanut butter. Prepping dry ingredients in one go for a recipe (or several recipes) on a calm evening means that tomorrow you’ll be able to go from “I should bake” to “cookies are in the oven” in minutes, not half an hour.
2. It reduces mistakes
How many times has this happened: you put the cake in the oven and suddenly think, “Wait… did I add the salt?” Pre-measuring when you’re not rushed makes it much easier to follow the recipe accurately. You’re less likely to double the sugar, forget the baking soda, or mix up teaspoons and tablespoons.
3. It’s easier on your brain
After work, school runs, or hosting guests, you may not have the mental energy to both interpret a recipe and execute it perfectly. Prepping ahead means you’ve already made the decisionsfuture you just has to assemble and bake. It turns baking from a multi-step project into something that feels almost like a kit.
4. Some recipes actually bake better this way
Chilling cookie dough, resting cake batters, and properly chilling or par-baking pie crusts can improve texture, flavor, and structure. So your “time-saving hack” also becomes a “these cookies are strangely incredible” hack. Win-win.
What You Can Safely Do Ahead (Without Ruining Dessert)
Not every step can be done in advance, but many can. Here’s how I break it down in my own kitchen.
Pre-mix dry ingredients a day or two in advance
For most standard cakes, muffins, quick breads, brownies, and cookies, you can absolutely mix the dry ingredients ahead of time and stash them in an airtight container.
That usually includes:
- All-purpose or cake flour
- Sugar (granulated or brown)
- Baking powder and/or baking soda
- Salt
- Cocoa powder and spices
Just keep these rules in mind:
- Keep it bone-dry. Moisture is the enemy. If humidity sneaks in, baking powder can start reacting early, and you’ll end up with flatter baked goods.
- Follow the structure of the recipe. If a recipe says to cream butter with sugar first, don’t throw sugar into the “dry mix” bag. In that case, only combine the ingredients the recipe says to add together later (like flour, cocoa, baking powder, and salt).
- Label everything. Future you doesn’t want to play “mystery powder blend” with random containers of white stuff.
Doing this one step ahead means that when you’re ready to bake, you can simply cream the butter, crack the eggs, and stir in your perfectly mixed dry ingredients. It feels like you’re baking from a box mixbut it’s entirely homemade and customizable.
Make cookie dough ahead: chill or freeze
Cookie dough is the overachiever of make-ahead baking. It loves a good chill and handles freezing beautifully.
In general:
- Refrigerator: Most homemade cookie doughs do well in the fridge for a couple of days. Many bakers even prefer chilling for at least several hours or overnight because it improves flavor and helps cookies spread less in the oven.
- Freezer: Portion your dough into balls, freeze them on a tray, then store in a freezer bag. You can bake them straight from frozengreat for “emergency cookie situations” and holiday trays.
From a time-saving perspective, this is huge. You can mix a big batch of dough on Sunday, bake a dozen cookies for dessert, and keep the rest of the dough in the freezer for the next time someone texts “I’m stopping by” or your craving for a warm chocolate chip cookie becomes non-negotiable.
Refrigerate cake batter (for some cakes)
This one comes with a few more asterisks, but it can still be a major time saver.
Standard butter or oil-based cake batters can usually rest in the fridge for several hours, and many sources note that refrigeration for up to a day can still produce decent results, especially if the cake is leavened with baking powder rather than relying mostly on whipped egg whites. The key is to keep the batter chilled, covered, and to give it a quick stir before baking.
However, delicate batterslike sponge cakes, chiffon, and angel food cakesdon’t like to wait. They rely heavily on air whipped into eggs, and that structure can deflate while the batter sits. For those cakes, prep everything else ahead (measure your dry mix, separate your eggs, prep pans), but mix and bake the batter the same day.
Make and par-bake pie crusts ahead
If you’re ever in charge of holiday pies, this tip is a sanity saver.
You can:
- Make pie dough, form it into disks, and freeze it for later rolling.
- Roll out the crust, fit it into the pan, and chill or freeze it unbaked.
- Par-bake or fully blind-bake crusts, cool them, then store them (tightly wrapped) at room temperature for a couple of days or in the freezer for weeks.
That means your “pie day” could be as simple as: pull a crust, make the filling, pour, and bake. No floury counters, no last-minute dough drama.
How This Looks in Real Life: A Before-and-After Baking Day
Before I started doing this step ahead
Picture this: I decide at 4:30 p.m. to make brownies “really fast” before dinner. I pull out the recipe and realize I don’t have enough sugar. I run to the store. I come back, can’t find the 8×8 pan, line a weirdly sized dish with foil that keeps folding over, and then discover the cocoa is clumpy and the baking powder is past its prime. By the time the brownies go into the oven, I’m exhausted, the kitchen looks like a cocoa bomb went off, and dinner is… pizza delivery.
After I started prepping ahead
Now, I flip that process. The night before, while I’m already in the kitchen cleaning up dinner, I:
- Measure and mix the dry ingredients for brownies into a labeled container.
- Set out the pan I’ll use and line it with parchment, ready to go.
- Check that I have enough eggs, butter, and sugar.
The next day, when I’m ready to bake, I melt butter, whisk in sugar, eggs, and vanilla, dump in the premixed dry ingredients, and pour into the pan. Active time? Maybe 10 minutes. Energy required? Minimal. Kitchen meltdown level? Zero.
Same brownies. Completely different experience.
How to Build Your Own Make-Ahead Baking Routine
If you want to start doing this baking step ahead but aren’t sure where to begin, here’s a simple system that works for busy home bakers.
1. Choose your “core” recipes
Pick 3–5 recipes you make oftenmaybe chocolate chip cookies, banana bread, brownies, and a basic vanilla cake. These will give you the biggest payoff because you’ll get faster and more confident every time you prep them ahead.
2. Create labeled “baking kits”
For each recipe, use a container or reusable bag for the dry ingredients and label it with:
- Recipe name
- Any remaining ingredients to add (like butter, eggs, milk)
- Oven temperature and baking time
It’s like having your own custom cake mixes, but you control the quality and ingredients.
3. Use “prep windows” you already have
You don’t need a special baking day to do this. Use little pockets of time you’re already in the kitchen:
- While water boils for pasta, measure dry ingredients for tomorrow’s muffins.
- After dinner, mix a double batch of cookie dough and freeze half.
- On weekends, roll out and freeze a couple of pie crusts for future events.
4. Keep a “bake soon” section in your pantry or fridge
Group your make-ahead baking items in one spot: jars of pre-mixed dry ingredients, containers of dough, and labeled crusts. When you feel like baking, you can literally shop your own “baking stash” first.
5. Make friends with your freezer
Your freezer is not just for ice cream and mysterious leftovers. It’s an extension of your baking plan:
- Cookie dough balls: freeze up to a few months and bake from frozen.
- Pie dough disks or rolled shells: wrap tightly and freeze for future pies.
- Baked cakes: cool completely, wrap well, and freeze for later frosting.
This spreads out your effort and lets you show up to birthdays, potlucks, and holidays with impressive desserts and minimal stress.
Common Mistakes to Avoid When Prepping Ahead
Doing this baking step ahead is pretty forgiving, but a few missteps can sabotage your efforts.
1. Mixing the wrong things together early
If the recipe has a specific methodlike creaming butter and sugar, or whipping egg whites separatelydon’t ignore that structure. Follow the recipe’s “teams”: only pre-mix ingredients that are meant to be combined at the same time later.
2. Forgetting to protect leaveners and fats
Baking powder, baking soda, and butter all react to air, temperature, and moisture. Keep dry mixes in airtight containers and doughs wrapped tightly so they don’t dry out or pick up freezer smells (nobody wants onion-garlic snickerdoodles).
3. Leaving batters at room temperature too long
Many cake batters and dairy-based mixtures shouldn’t hang out on the counter for long. If you’re not baking right away, refrigerateand when in doubt, mix and bake the day-of, and prep everything else ahead instead.
4. Not labeling anything
Future-you deserves clarity. Date everything, note what it is, and jot down basic baking instructions. The goal is to be able to pull something out of the freezer and know exactly how to turn it into dessert without going on a detective mission.
Extra : Real-Life Experiences with Prepping Baking Steps Ahead
The first time I truly understood the power of prepping this baking step ahead, it was the night before a holiday cookie exchange. I had ambitiously promised three different kinds of cookies, clearly forgetting I am one human with exactly one oven and a questionable relationship with time management.
Past me would’ve waited until the morning of the party to start from scratch. Instead, I tried a new strategy. After dinner the night before, I put on some music, made tea, and treated my kitchen like a tiny bakery. I measured out the dry ingredients for all three recipes into labeled containers, then mixed and chilled the dough for the two cookie types that do well after a good rest in the fridge.
It didn’t feel frantic at all. There was no ticking clock, no guests on the way, no oven preheated and glaring at me like a deadline. I was just calmly scooping flour, weighing sugar, and whisking together cocoa and leaveners, knowing tomorrow would thank me.
The next morning was shockingly peaceful. Instead of waking up and immediately sprinting into full baking chaos, I preheated the oven, lined a couple of baking sheets, and pulled out my labeled containers. One by one, the recipes came together in what felt like fast-forward: wet ingredients in one bowl, dry mix added from the container, dough scooped or rolled, trays into the oven. Because the dough had chilled overnight, the cookies baked up thicker with better flavor and less spreading. People at the exchange actually asked what I’d done differently this year.
Another time, I saw the payoff with pie crust. I used to dread pies because I always tried to do everything in one day: making dough, chilling it, rolling it out, fitting it in the pan, chilling again, blind baking, cooling, and then finally making the filling. I’d reach the “fill and bake” stage already exhausted, which is not the mindset you want when dealing with hot sugar or delicate custards.
These days, I treat pie crust as a separate project. A week before any big event, I’ll make and roll out a few crusts, fit them into pie plates, and freeze them. Sometimes I even par-bake the crusts and store them tightly wrapped once they’ve cooled. When it’s time to make the actual pie, I feel like a magician pulling perfectly prepared crusts out of nowhere. All my energy can go into the fillingcaramelizing apples just right, or whisking together a silky pumpkin custardbecause the hardest part is already done.
Even on regular weeknights, prepping one baking step ahead changes the emotional tone of my kitchen. If I know tomorrow is going to be long, I might spend ten quiet minutes after dinner measuring the dry ingredients for banana bread and leaving ripe bananas on the counter. The next evening, when everyone’s tired and the day feels heavy, I can pull out the prepped mix, mash the bananas, add eggs and oil, and have a loaf in the oven in minutes. The house fills with that warm, cozy smell, and it feels like I’ve summoned comfort out of nowhereexcept I didn’t. I just did the smart part yesterday.
What surprised me most is that this doesn’t make baking feel less special or spontaneous. If anything, it makes it easier to say “yes” to baking more often. Because the hardest, messiest parts are already out of the way, throwing together a batch of muffins or a pan of brownies becomes something I can do on a Tuesday, not just on carefully planned weekends.
That’s the real magic of doing this baking step ahead: it doesn’t just save time; it gives you more good moments in the kitchen. More cookies baked just because. More pies that don’t involve panic. More chances to say, “Sure, let’s make something sweet,” and actually enjoy the process instead of rushing through it.