Table of Contents >> Show >> Hide
- The Apple Pie Blueprint (So You Can Improvise Like a Pro)
- Recipe 1: Classic Double-Crust Apple Pie (The Gold Standard)
- Recipe 2: Deep-Dish Spiced Cider Glaze Apple Pie (For the Dramatic Entrance)
- Recipe 3: Dutch Apple Crumb Pie (When You Want Streusel Therapy)
- Recipe 4: Freezer-Friendly Apple Pie (Future-You Deserves Nice Things)
- Serving, Storage, and “Why Did My Pie Turn Into Cement?”
- Apple Pie Experiences (The Stuff You Only Learn After a Few “Oops”)
- Conclusion
Apple pie is basically America’s edible group project: apples show up with ambition, butter shows up with confidence, and flour shows up like “I can hold this together.” And when it all works? You get that perfect sliceflaky crust, warm cinnamon perfume, and a filling that’s juicy without turning your plate into a shallow lake.
This guide brings you several apple pie recipes (classic, deep-dish, Dutch crumb, and freezer-friendly), plus the real-world techniques that separate “grandma-level legendary” from “why is my crust crying?”
The Apple Pie Blueprint (So You Can Improvise Like a Pro)
1) Choose apples that won’t collapse into applesauce
The “best apples for apple pie” aren’t a single varietythey’re a team. A mix creates depth: one apple brings tartness, another brings sweetness, another holds its shape like it has strong opinions. Look for firm, flavorful apples such as Granny Smith, Honeycrisp, Pink Lady, Braeburn, Jonagold, or Golden Delicious. Skip apples that tend to bake up soft and bland (the pie deserves better than “meh”).
Practical tip: if you only buy one type, choose a firm, tart-sweet apple. If you buy two, pair a tart one with a sweeter aromatic one. Your filling will taste more “apple” instead of “sugar wearing a fruit costume.”
2) Build a flaky pie crust without stress-baking
Great homemade apple pie starts with cold fat and calm hands. Butter gives flavor; shortening can add tenderness; and some bakers use a splash of vodka in the liquid because it helps the dough stay workable while limiting toughness. The golden rule: if the dough gets warm and sticky, it’s not “ruined,” it’s just asking for a quick chill break.
3) Make a filling that’s saucy, not soggy
Apple pie filling needs three things: flavor, structure, and a thickener. Flour works, but for a clearer, glossier filling many bakers reach for cornstarch or tapioca. Tapioca is especially popular in classic fruit pies because it thickens without getting cloudy. If your pie has ever sliced like a puddle, your thickener-to-juice ratio was simply outvoted by gravity.
Flavor-wise, cinnamon is the headline, but don’t underestimate lemon juice (it sharpens apple flavor) and a pinch of salt (it stops sweetness from feeling flat). If you want “bakery-level” depth, reduce apple cider into a syrupy glaze and toss it with the apples.
4) Avoid the three classic pie problems
- Soggy bottom: bake on a preheated sheet/stone, and don’t be shy about a hot start. Another sneaky trick: freeze an assembled pie and bake from frozen so the crust has more time to crisp before the filling overcooks.
- The “gap” under the top crust: apples shrink. To reduce that empty cavern, lightly precook apples (or at least macerate them with sugar) so they settle before baking.
- Burnt edges: your crust rim is thinner and cooks faster. Halfway through baking, shield the edges with foil or a pie shield.
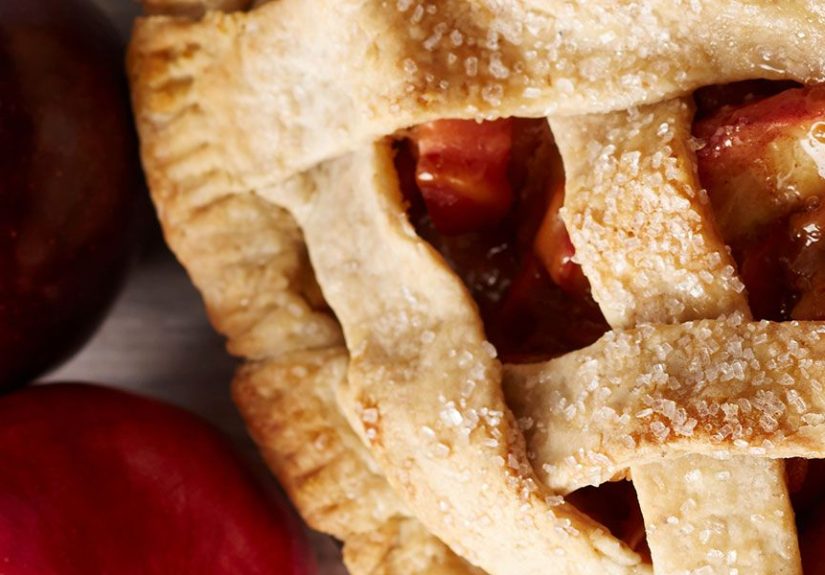
Recipe 1: Classic Double-Crust Apple Pie (The Gold Standard)
This is the “movie apple pie”: a flaky top, bubbling filling, and that moment when the kitchen smells like you have your life together. (Whether you do is between you and your laundry pile.)
Ingredients (9-inch pie)
- Crust: 2½ cups all-purpose flour, 1 tsp salt, 1 tbsp sugar (optional), 1 cup cold unsalted butter (or ¾ cup butter + ¼ cup shortening), 6–10 tbsp ice water (optional: replace 2 tbsp water with vodka)
- Filling: 7–8 cups peeled, cored, sliced apples (mix varieties), ¾ cup sugar (adjust to taste), 2–3 tbsp thickener (flour/cornstarch/tapioca), 1½ tsp cinnamon, ¼ tsp nutmeg, pinch salt, 1 tbsp lemon juice
- Finish: 1 egg + 1 tbsp water for egg wash, 1–2 tbsp coarse sugar (optional)
Method
- Make the dough: Cut cold butter into flour/salt (and sugar) until you have a mix of pea-size pieces and sandy bits. Drizzle in cold liquid and fold just until the dough holds together when squeezed. Split into two disks, wrap, and chill at least 45 minutes.
- Prep the filling: Toss apples with sugar, thickener, spices, salt, and lemon. Let sit 15 minutes while the oven heats. This quick rest helps the apples start releasing juice so your thickener can do its job.
- Roll and assemble: Roll bottom crust, fit into a 9-inch pie dish, and chill 10 minutes. Add filling, mounding slightly in the center. Roll top crust, place it over, seal, and cut vents (or do a lattice if you feel like showing off).
- Egg wash and bake: Brush top with egg wash and sprinkle coarse sugar. Bake hot first, then lower the temperature until deeply golden and bubbly.
- Cool fully: Let the pie cool at least 2–3 hours before slicing. The filling sets as it coolsslice too early and you’ll get apple soup (delicious, but messy).
Suggested bake schedule
A reliable approach is a hot start (to set the crust) followed by a lower temperature (to cook the apples through). Bake on a rimmed sheet to catch drips, and shield edges if they darken too quickly.
Recipe 2: Deep-Dish Spiced Cider Glaze Apple Pie (For the Dramatic Entrance)
If classic apple pie is a friendly handshake, this one is a bear hug with a scarf. The idea: concentrate flavor by reducing apple cider into a glossy glaze, then coat thin apple slices so the filling tastes bold and appleynot watery.
What makes it different
- Deep-dish plate: more apples, higher dome, bigger payoff.
- Cider reduction: simmer cider until syrupy, then toss with apples for sheen and intensity.
- Thin slices: they pack tightly, bake evenly, and look gorgeous in a slice.
How to do it
- Reduce the cider: Simmer 2–3 cups apple cider until it’s reduced by about half and slightly thickened. Cool it (hot syrup + raw apples = premature apple slump).
- Season the apples: Toss 8 cups thin-sliced apples with sugar, spices (cinnamon, a touch of allspice or cardamom if you like), thickener, salt, lemon, and a few tablespoons of the cider glaze.
- Assemble and bake: Same crust method as the classic pie. Bake until the filling bubbles steadily and the top is deeply golden.
This style is especially good when you want the pie to taste “special occasion” without requiring a culinary degree or a tiny chef hat.
Recipe 3: Dutch Apple Crumb Pie (When You Want Streusel Therapy)
Dutch apple pie swaps the top crust for a buttery crumb topping. Translation: fewer rolling-pin emotions, more crunchy-sweet comfort. It’s also very forgiving if your apples are extra juicy, because the crumb top handles steam like a champ.
Crumb topping
- ¾ cup all-purpose flour
- ½ cup brown sugar
- ½ tsp cinnamon
- Pinch salt
- 6 tbsp cold butter, cubed
- Optional: ⅓ cup oats or chopped pecans
Method
- Par-chill the bottom crust: roll it into the dish and chill 10–15 minutes so it holds its shape.
- Fill: use the classic filling (or the cider-glaze filling if you want extra flavor).
- Top with crumbs: rub butter into flour/sugar/spices until clumpy, then scatter over apples.
- Bake: until crumbs are golden and the filling bubbles. If crumbs brown early, loosely tent with foil.
Dutch apple pie is the crowd-pleaser that makes people say, “Just one small slice,” and then immediately reach for a second “small” slice.
Recipe 4: Freezer-Friendly Apple Pie (Future-You Deserves Nice Things)
Want a pie that tastes freshly baked on a random Tuesday? Assemble it, freeze it unbaked, and bake straight from frozen. This technique helps the crust bake through and crisp up while the filling catches upan excellent strategy against the dreaded soggy bottom.
How to freeze an unbaked pie
- Assemble the pie fully (crust, filling, top, vents), but skip egg wash for now.
- Freeze uncovered until firm, then wrap tightly (plastic + foil) to protect from freezer odors.
- When ready to bake: brush with egg wash, add coarse sugar, and bake from frozenplan on extra time.
Serving, Storage, and “Why Did My Pie Turn Into Cement?”
Cooling matters more than your impatience
Fruit pie fillings set as they cool. If you cut too early, you’re not “bad at pie,” you’re just slicing before physics finishes its meeting. For cleaner slices, let the pie cool 2–3 hours, or chill and slice cold, then rewarm slices.
Storage
- Room temp: loosely covered for a day if your kitchen isn’t hot.
- Fridge: 3–4 days, covered.
- Reheat: warm slices in the oven so the crust stays crisp (microwaves are convenient, but they soften crust like a sleep spell).
Apple Pie Experiences (The Stuff You Only Learn After a Few “Oops”)
Most people don’t become confident pie bakers because they read one recipe. They get there the same way everyone else does: by making a few pies that are almost perfect, and one pie that makes them say, “Well… it’s definitely edible.” If you’ve ever watched a pie bubble over in the oven like it’s auditioning for a disaster movie, welcome to the club. The good news is that every classic apple pie mishap comes with a practical fixand a funny story you can tell later.
A common early experience is discovering that apples have opinions about volume. You mound them high, feeling proud, and then an hour later the filling settles and leaves a gap under the top crust. That’s not failure; it’s apple shrinkage. The next time you’ll either pack slices more tightly, let the apples sit with sugar a bit longer, or lightly precook them so they behave. Suddenly your pie looks like it graduated from “home kitchen” to “holiday centerpiece.”
Then there’s the crust learning curvespecifically, the moment you realize that warm dough is basically a sticky rumor. Early on, many bakers try to power through: flour everywhere, frustration rising, dough tearing like wet tissue paper. With experience, you start treating chilling as part of the recipe instead of an optional suggestion. Ten minutes in the fridge can save an hour of muttering at your rolling pin. You also learn little quality-of-life moves: roll the dough between sheets of parchment, rotate it often, and keep a bench scraper nearby so you can lift and move dough without panic.
Soggy bottoms are another rite of passage. At least once, almost everyone pulls out a pie that looks gorgeous on top and then discovers the bottom crust is pale and softlike it spent the whole bake day at a spa. That’s when you learn the “heat from below” trick: a preheated sheet pan or stone, a hot start in the oven, and (if you want extra insurance) baking an assembled pie from frozen. After that, you start noticing that your pies slice cleaner and hold their shape longer on the plate, which is a very satisfying form of victory.
And finally, you gain an appreciation for the cooling time. The first time you wait the full 2–3 hours before slicing, it feels like an act of heroism. But when you cut in and the filling stays where it belongsno flood, no collapseyou realize patience tastes amazing. The best part is that pie baking starts to feel playful. Once you’ve nailed the basics, you can experiment with add-ins (a splash of bourbon, a pinch of cardamom, a crumble top, a cheddar pairing) and make the pie match your mood. That’s when apple pie stops being intimidating and becomes what it was always meant to be: cozy, flexible, and fun.
Conclusion
The best apple pie recipes aren’t just lists of stepsthey’re a balance of smart choices (firm apples, a cold crust, a reliable thickener) and good timing (hot start, bubbling filling, proper cooling). Pick the style that matches your vibe: classic double crust for tradition, deep-dish cider-glaze for drama, Dutch crumb for crunch, or freezer-friendly for future happiness. Then bake boldly. If it’s not picture-perfect, call it “rustic” and take a bite.


