Table of Contents >> Show >> Hide
- Why Homemade Cleaning Sprays Still Make Sense
- The Core Ingredients That Do the Heavy Lifting
- Before You Mix Anything, Follow These Safety Rules
- How to Make Homemade Cleaning Sprays That Actually Work
- How to Match the Spray to the Surface
- Common Mistakes People Make With Homemade Cleaning Sprays
- When Homemade Sprays Are Not Enough
- Conclusion
- Real-World Experiences With Homemade Cleaning Sprays
- SEO Tags
There is something deeply satisfying about cleaning your kitchen counter with a spray you made yourself five minutes ago. Maybe it is the thriftiness. Maybe it is the simplicity. Maybe it is the small but glorious thrill of knowing exactly what is inside the bottle you are misting around your home. Homemade cleaning sprays have earned their place in modern households because they can be affordable, effective for everyday messes, and refreshingly easy to customize.
That said, this is where many DIY articles dramatically toss glitter into the air and pretend every pantry ingredient is a miracle worker. It is not. Vinegar is useful, but it is not a magic wand. Baking soda is handy, but it does not need to be invited to every cleaning party. And your spray bottle should never become the setting for a chemistry experiment gone wrong. The smartest way to make homemade cleaning sprays is to understand what each ingredient does, which surfaces it actually helps, and when to stop being crafty and use a proper disinfectant instead.
This expert guide walks you through practical homemade cleaning spray recipes, how to use them, what to avoid, and how to get a cleaner home without turning your sink area into a low-budget science thriller. Whether you want a simple all-purpose cleaner, a streak-free glass spray, or a kitchen formula that cuts grease, this guide will help you mix smarter, clean better, and avoid common mistakes.
Why Homemade Cleaning Sprays Still Make Sense
Homemade cleaning sprays are popular for good reason. First, they are budget-friendly. A bottle of distilled white vinegar, a little dish soap, some rubbing alcohol, and distilled water can stretch surprisingly far. Second, they reduce unnecessary packaging when you reuse the same spray bottles instead of buying single-purpose cleaners again and again. Third, they let you tailor the formula to the task. You do not need a heavy-duty commercial degreaser to wipe fingerprints off a light switch or remove water spots from a bathroom mirror.
For routine cleaning, the goal is usually to lift grime, dissolve grease, remove mineral buildup, and freshen surfaces. Homemade cleaners can absolutely handle those jobs. Where people get confused is assuming that “natural” means “disinfecting.” In everyday life, cleaning and disinfecting are not the same thing. Cleaning removes dirt and helps reduce germs on surfaces. Disinfecting is a separate step used when you need to kill more germs, especially after raw meat prep, stomach bugs, or illness in the home. That distinction matters.
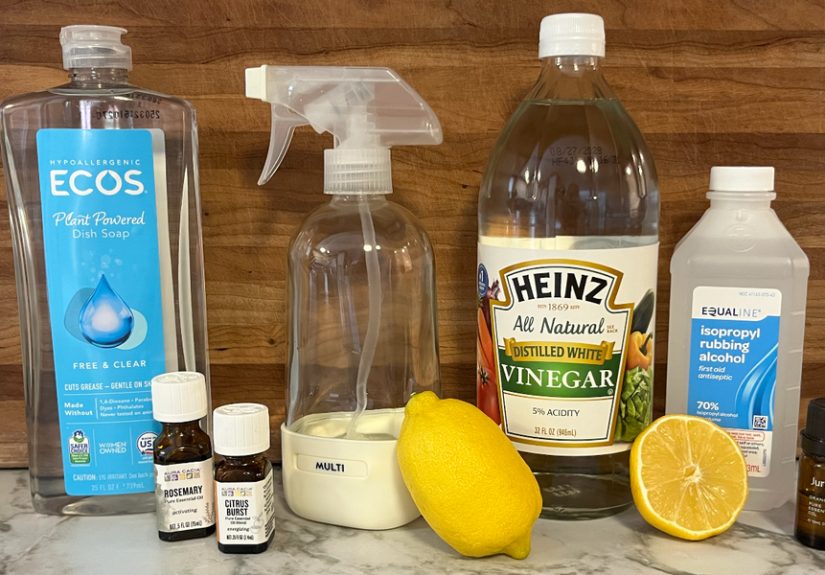
The Core Ingredients That Do the Heavy Lifting
1. Distilled White Vinegar
Vinegar is the MVP of many homemade cleaning sprays because its acidity helps break down mineral deposits, soap scum, and light grime. It is especially useful on glass, faucets, shower walls, and hard water spots. But vinegar is not for every surface. Avoid using it on natural stone such as marble, granite, and travertine, since acid can dull or etch those materials over time.
2. Dish Soap
Dish soap is the grease-cutting workhorse. A tiny amount goes a long way, especially in kitchens where cooking residue and hand oils build up on cabinets, backsplashes, appliance handles, and counters. If vinegar is the minimalist philosopher of cleaning, dish soap is the practical friend who actually gets things done.
3. Rubbing Alcohol
Rubbing alcohol helps with quick evaporation and streak-free finishes, which makes it especially useful in glass cleaners and some hard-surface sprays. It can also help lift oily residue. Because it evaporates quickly, it is a great choice for surfaces that look better without lingering dampness.
4. Water
Water sounds boring, but it is what dilutes your ingredients so they clean effectively without being overly harsh. Distilled water is especially helpful in glass cleaners because it can reduce streaking from mineral-heavy tap water.
Before You Mix Anything, Follow These Safety Rules
Homemade cleaning sprays should be simple, not reckless. Keep these rules in mind every time you make a bottle:
- Never mix bleach with vinegar, ammonia, or rubbing alcohol. That combination can create dangerous fumes or toxic compounds.
- Do not mix vinegar and hydrogen peroxide in the same bottle. They should not be stored together as one cleaner.
- Label every bottle clearly. “Mystery spray” is not a personality trait your cleaning closet needs.
- Test first on a small hidden spot. This matters on painted finishes, wood, specialty coatings, and delicate materials.
- Do not use vinegar on natural stone, unsealed grout, or surfaces that react badly to acid.
- Store sprays out of reach of children and pets.
- Ventilate the room while cleaning. Even simple ingredients can irritate eyes, skin, or airways when overused.
The golden rule is wonderfully unglamorous: if you are tempted to mix multiple cleaning products because it feels more powerful, do not. More dramatic bubbling does not always equal better cleaning. Sometimes it just means your countertop is front row at a bad chemical decision.
How to Make Homemade Cleaning Sprays That Actually Work
1. Everyday All-Purpose Cleaning Spray
Best for: sealed counters, sinks, appliance exteriors, tile, and everyday wipe-downs.
Ingredients:
- 1 cup distilled white vinegar
- 1 cup water
- Optional: 5 to 10 drops of lemon or orange essential oil for scent
How to make it: Pour the vinegar and water into a clean spray bottle. Add essential oil if desired. Shake gently.
How to use it: Spray lightly on the surface, let it sit for 30 to 60 seconds, then wipe with a microfiber cloth.
Do not use it on: marble, granite, natural stone, waxed wood, or unfinished surfaces.
2. Grease-Cutting Kitchen Spray
Best for: stovetops, cabinet fronts, range hoods, and greasy kitchen touchpoints.
Ingredients:
- 2 cups warm water
- 1 teaspoon dish soap
- 1 tablespoon rubbing alcohol
How to make it: Add the water first, then dish soap, then rubbing alcohol. Swirl gently instead of shaking like a maraca, unless you enjoy waiting for bubbles to calm down.
How to use it: Spray onto a cloth or directly onto the surface, wipe, and follow with a clean damp cloth if needed.
This is often a better choice than a vinegar spray for kitchens because grease responds beautifully to soap. If your cabinets feel sticky from cooking buildup, this is your hero bottle.
3. Streak-Free Glass and Mirror Spray
Best for: mirrors, glass tabletops, windows, and shiny chrome fixtures.
Ingredients:
- 1 cup distilled water
- 1/4 cup rubbing alcohol
- 3 tablespoons white vinegar
How to make it: Combine the ingredients in a spray bottle and shake gently.
How to use it: Spray lightly on glass and wipe with a lint-free cloth or microfiber towel. For best results, clean windows when the glass is cool rather than hot from direct sun.
This recipe works because the vinegar helps break down residue while the alcohol speeds evaporation, which means fewer streaks and less theatrical buffing.
4. Daily Shower Spray
Best for: fiberglass showers, ceramic tile, shower doors, and soap scum prevention.
Ingredients:
- 1 cup white vinegar
- 1 cup water
- 1 teaspoon dish soap
How to make it: Combine in a spray bottle and gently mix.
How to use it: After showering, mist the walls and door lightly and let the spray air-dry or wipe with a squeegee.
Do not use it on: natural stone showers or surfaces sensitive to acid.
This is one of the easiest ways to prevent soap scum instead of waiting for your shower to begin looking like it has gone through some things.
5. Mild Soap Spray for Delicate Surfaces
Best for: sealed wood, painted surfaces, quartz when manufacturer guidance allows, and places where vinegar feels too aggressive.
Ingredients:
- 2 cups water
- 1 teaspoon dish soap
How to make it: Combine in a spray bottle and swirl gently.
How to use it: Spray onto a cloth, not directly onto delicate furniture or trim. Wipe the surface, then dry it with a second clean cloth.
Sometimes the best homemade spray is the least glamorous one. A simple soap-and-water formula is often the safest choice for surfaces you do not want to strip, dull, or etch.
How to Match the Spray to the Surface
| Surface | Best Homemade Option | Avoid |
|---|---|---|
| Glass and mirrors | Glass and mirror spray | Too much dish soap, which can streak |
| Kitchen counters | Mild soap spray or all-purpose spray on compatible surfaces | Assuming a homemade spray is a full disinfectant |
| Natural stone | Mild soap spray | Vinegar-based sprays |
| Bathroom tile and fixtures | All-purpose spray or shower spray | Using acid-based sprays on stone tile |
| Cabinets and painted trim | Mild soap spray | Oversaturating the surface |
| Greasy appliances | Grease-cutting kitchen spray | Harsh abrasion without testing first |
Common Mistakes People Make With Homemade Cleaning Sprays
Thinking “natural” always means safer
Not automatically. Safe use matters more than trendy ingredients. Even familiar household products can irritate skin, eyes, and lungs when used carelessly or mixed the wrong way.
Using one spray for literally everything
Your windows, marble vanity, greasy stove, and wood dining table do not all want the same treatment. A smart cleaning routine is less about one miracle bottle and more about matching the formula to the job.
Adding too much soap
More soap does not always mean more cleaning power. It often means more residue, more streaks, and one extra pass with a damp cloth while you quietly question your life choices.
Skipping labels
If you reuse bottles, label them clearly. Include the ingredients and intended use. You should not need detective skills to clean the bathroom sink.
When Homemade Sprays Are Not Enough
Homemade cleaning sprays shine during routine upkeep, but there are times to bring in a registered disinfectant or follow manufacturer guidance instead. If someone in the home is sick, if you are cleaning up after raw meat or a stomach virus, or if a surface requires a product with a specific dwell time and efficacy claim, use an EPA-registered disinfecting product according to the label. Clean first, then disinfect if needed. Homemade sprays are excellent cleaners, but they should not pretend to be something they are not.
Conclusion
Learning how to make homemade cleaning sprays is less about becoming a DIY influencer and more about building a practical, safer, lower-cost cleaning routine that actually fits your home. Start with a few proven formulas, keep your ingredients simple, respect surface differences, and never mix products just because the internet once got excited about bubbles. With one all-purpose spray, one grease-cutting kitchen spray, one glass cleaner, and one mild soap formula for delicate finishes, you can handle most everyday messes with confidence. Clean smart, label everything, and remember: the best homemade cleaner is the one that works well, is used safely, and does not require an apology to your countertops afterward.
Real-World Experiences With Homemade Cleaning Sprays
One of the most interesting things about switching to homemade cleaning sprays is how quickly people realize the change is not just about cleaning. It is also about habit. In many homes, the first experience is surprise. People expect DIY cleaners to feel flimsy or second-rate, then discover that a simple vinegar-and-water spray handles everyday fingerprints, light bathroom grime, and sink splatter perfectly well. That first successful wipe-down tends to change the mood. Suddenly the cleaning routine feels less like a cabinet full of mystery bottles and more like a system that makes sense.
A common experience is learning that the right spray matters more than the fanciest recipe. Someone may begin with one all-purpose bottle and try to use it on everything, only to notice streaky mirrors, sticky kitchen residue, or dull-looking stone. That is usually the turning point. Once people start matching the spray to the task, results improve fast. A soap-based kitchen spray starts cutting grease better. An alcohol-based glass spray leaves mirrors clear instead of cloudy. A mild soap formula feels safer on wood and painted trim. In other words, success comes less from “natural cleaning magic” and more from understanding what each formula is actually designed to do.
Another real-life lesson is that homemade sprays tend to make people clean more often, not less. That sounds backward, but it makes sense. When the bottle is cheap to refill, easy to grab, and pleasant to use, small messes get handled before they become large ones. A quick mist on the bathroom sink at night prevents crusty toothpaste buildup. A fast pass over the stovetop after dinner keeps grease from becoming a future personality problem. The routine becomes lighter because the maintenance is more regular.
There is also the sensory experience. Many people enjoy that homemade sprays smell cleaner in a simpler way. Instead of the heavy “mountain rain thunderstorm citrus blast” scent found in some commercial products, homemade sprays often leave behind a lighter impression that fades quickly. That does not mean every homemade mix smells delightful right away. Vinegar has a reputation, and frankly, it earned it. But users often report that the smell disappears as surfaces dry, especially when the formula is diluted properly.
Perhaps the biggest experience people mention is confidence. Once you understand which ingredients work for glass, which cut grease, and which should never be mixed, cleaning feels less random. You stop buying duplicate products that do nearly the same thing. You start noticing surfaces differently. You become the person who reads labels, keeps bottles marked, and knows not to spray vinegar on marble. It is a very specific kind of adult power, but it counts.
Of course, homemade cleaning sprays do not solve every cleaning problem. People who stick with them long term usually do so because they become realistic about where DIY works best. They use homemade formulas for routine upkeep, quick wipe-downs, bathroom refreshes, and kitchen messes. But when illness hits the house or a surface needs true disinfection, they switch to the appropriate EPA-registered product without drama. That balance is what makes the homemade approach sustainable. It is not all-or-nothing. It is a smarter, simpler cleaning toolbox built from experience.


