Table of Contents >> Show >> Hide
- What Is a “Paver Path that Grows”?
- Step 1: Plan the Path (Before You Grab a Shovel)
- Step 2: Gather Tools and Materials
- Step 3: Build a Solid Base
- Step 4: Set the Pavers
- Step 5: Choose the Right Ground Cover Plants
- Step 6: Planting Between the Pavers
- Step 7: Ongoing Maintenance and Care
- Design Ideas to Make Your Growing Path Stand Out
- Common Mistakes to Avoid
- Real-Life Lessons from a DIY Growing Paver Path
Imagine a garden path that looks great on day one and gets better every season – no weeds popping up, no sad, cracked concrete, just pavers wrapped in lush, living green. That’s the magic of a “paver path that grows”: sturdy concrete or stone underfoot, soft ground cover in between, and serious curb appeal for surprisingly little money and muscle power.
In this guide, inspired by the practical, roll-up-your-sleeves spirit of Family Handyman, we’ll walk through how to plan, build, and maintain a DIY paver path that literally grows over time. You’ll learn how to choose pavers, build a durable base, pick the right ground cover plants, and avoid the classic mistakes that turn a cute idea into a muddy mess.
What Is a “Paver Path that Grows”?
A paver path that grows combines a solid paver surface with living ground cover plants between the joints. Instead of filling gaps with polymeric sand or gravel, you tuck in low-growing plants like creeping thyme, Irish moss, or blue star creeper. The result is a path that:
- Softens the hard edges of concrete or stone
- Helps suppress weeds when it’s fully filled in
- Can handle light to moderate foot traffic
- Adds color, fragrance, and texture to your landscape
It’s especially handy on slopes and high-drainage areas where traditional turf struggles, and it’s a stylish alternative to a plain gravel or poured-concrete walkway.
Step 1: Plan the Path (Before You Grab a Shovel)
Choose the Location and Layout
Start by deciding what your path needs to do. Is it a direct, high-traffic route from driveway to front door, or a meandering garden walk that people stroll along on weekends? A main entry path needs wider, more stable pavers placed closer together. A casual garden path can be narrower and more whimsical with larger gaps and curves.
- Width: For everyday use, aim for 30–36 inches so two people can pass without doing the sideways shuffle.
- Curve vs. straight: Gentle curves feel natural and help the path “belong” in the landscape. Sharp zigzags are harder to build and mow around.
- Grade and drainage: Avoid low, soggy spots. If you’re on a slope, plan for a gentle, consistent pitch so water drains off the path instead of pooling.
Pick the Right Pavers
For a growing paver path, you want something sturdy but not slippery and with enough surface area for safe footing. Good options include:
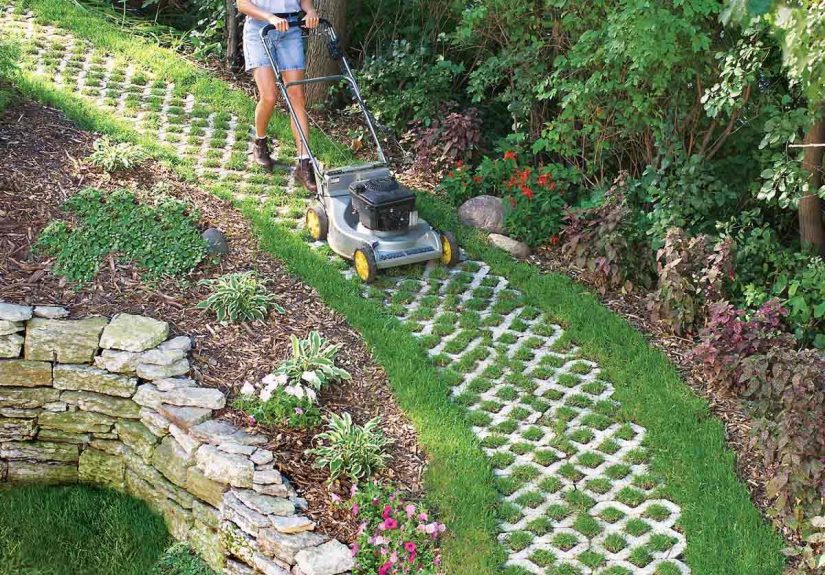
- Grid-style concrete pavers: Large rectangles with built-in openings that you fill with soil and plants.
- Stepping stones or flagstone: Irregular or cut stone pieces spaced with gaps in between.
- Concrete pavers or slabs: Simple rectangles or squares set with intentional joints wide enough for plants.
Whatever you choose, aim for at least 1.5–2 inches thick for durability and a non-glossy texture so the path isn’t slick when wet.
Step 2: Gather Tools and Materials
You don’t need a full construction crew to pull this off, but a few basic tools make the job smoother:
- Shovel and spade for digging and shaping the path
- Garden rake for leveling
- Hand tamper or rented plate compactor for firming the base
- Long, straight board and level for checking grade
- Measuring tape, stakes, and string to define the layout
- Rubber mallet for tapping pavers into place
For materials, plan on:
- Pavers or stepping stones enough to cover your chosen width and length
- Crushed stone or gravel base (often 3–4 inches for a garden path)
- Leveling sand (about 1 inch)
- Landscape fabric if you need extra weed control under the base
- Soil or soilless mix to fill planting pockets between pavers
- Ground cover plants in plugs, small pots, or flats
Step 3: Build a Solid Base
The secret to a path that “lasts a lifetime” instead of one that heaves and wobbles by next spring is the base. Even though you’re going for a natural, plant-filled look, this is still hardscaping.
Excavate and Shape the Path
- Use stakes and string or a garden hose to outline your path.
- Dig down the combined depth of your base gravel, sand, and pavers. For most DIY paths, that’s about 4–6 inches of compacted gravel, 1 inch of sand, plus the paver thickness.
- Slope the base very slightly (about 1/8 inch per foot) away from buildings to shed water.
Add and Compact the Base Layer
- Spread 2–3 inches of crushed stone or gravel in the trench.
- Compact thoroughly with a tamper or plate compactor. If your soil is soft or you’re in a freeze–thaw climate, add a second 2–3 inch layer and compact again.
- Optional: roll out landscape fabric on top of the compacted base to reduce weeds without blocking drainage.
Level with Sand
- Spread about 1 inch of coarse sand over the base.
- Use a straight board as a screed to pull the sand smooth and level along the path.
- Avoid walking on the sand after you level it; work from the sides as you set your pavers.
Step 4: Set the Pavers
Now for the fun part: laying the path. This is where your design comes to life.
Dry-Lay Your Pattern First
Before you commit, lay out your pavers on top of the sand without pressing them in. Adjust spacing until the path feels comfortable underfoot:
- For a solid walkway, leave gaps of about 1/2–1 inch for ground cover.
- For stepping stones, space them so your natural stride lands comfortably from stone to stone (usually 18–24 inches).
Set Pavers into the Base
- Press each paver into the sand and tap gently with a rubber mallet.
- Check with a level as you go to keep the surface even and maintain your drainage slope.
- Make sure neighboring pavers sit at the same height so you don’t create toe-stubbing edges.
Once everything is in place, lightly sweep sand into the joints just to hold things steady until planting. You’ll be replacing much of this joint material with soil later.
Step 5: Choose the Right Ground Cover Plants
Not every cute little plant is thrilled about being stepped on. For a growing paver path, look for low, dense ground covers that tolerate light to moderate foot traffic, full or partial sun, and well-drained soil.
Popular “Stepable” Ground Covers
- Creeping thyme (Thymus serpyllum and cultivars): The classic choice. Just a few inches tall, fragrant, and covered in pink, purple, or white flowers in summer. Handles sun, poor soil, and occasional trampling.
- Elfin thyme: A tiny, extra-dense version of creeping thyme that forms tight mats and stays incredibly low, perfect for narrow joints.
- Irish moss (Sagina subulata): Not a true moss, but a bright green cushion with tiny white flowers that looks great between stones.
- Blue star creeper (Isotoma/Pratia): Spreads quickly and puts out pretty star-shaped flowers, ideal if you want a more filled-in look around larger slabs.
- Woolly thyme or other specialty thymes: Great for softer, fuzzy texture and extra fragrance along the edges of the path.
Match the plant to your conditions: thyme loves full sun and good drainage, while mossier options may tolerate a bit more moisture and shade. If you have kids racing through in wet shoes, choose the tougher, denser options and keep more delicate plants toward the sides.
Step 6: Planting Between the Pavers
Prepare the Gaps
- Use a hand trowel or narrow spade to remove sand from between the pavers down to 2–3 inches.
- Refill the space with a loose, well-draining soil mix (garden soil blended with compost and a bit of sand works well).
- Lightly tamp the soil so it’s firm but not compacted like concrete.
Set the Plants
- Gently tease apart small plugs or cut larger flats of ground cover into pieces that fit your gaps.
- Plant them level with the surface of the paver, not buried below it. You want the plant to spread over the surface, not stay stuck in a trench.
- Space plugs a few inches apart. It’s okay if there’s bare soil showing at first; they’ll spread and knit together over time.
Water and Baby Them (At First)
Water thoroughly right after planting so soil settles around the roots. For the first few weeks, keep the planting pockets consistently moist but not soggy while the plants establish. After that, most stepable ground covers prefer to dry a bit between waterings.
Step 7: Ongoing Maintenance and Care
Once the path is established, maintenance is surprisingly light:
- Weeding: Hand-pull any weeds that sneak in before they get big enough to compete with your ground cover.
- Trimming: If plants start to creep over the edges of pavers where you need a clean tread, simply shear them back with scissors or hand pruners.
- Watering: Deep, occasional watering is better than frequent shallow sprinkles. Many ground covers, especially thyme and sedums, are drought tolerant once established.
- Fertilizing: Go easy. A light application of balanced, slow-release fertilizer in spring is usually plenty.
In cold climates, your path may look a bit ragged at the end of winter. Resist the urge to rip everything out. Clean up dead foliage, trim back damaged bits, and give the plants time to wake up once temperatures warm.
Design Ideas to Make Your Growing Path Stand Out
The basic “pavers plus plants” formula is simple, but how you arrange it can totally change the vibe of your yard.
- Checkerboard grid: Use large square pavers laid in a grid with wide planting gaps – perfect for tiny lawns or courtyard spaces.
- Curving woodland walk: Combine irregular flagstones with soft, mossy ground cover for a shady, storybook feel.
- Modern front walk: Pair crisp rectangular pavers with tight mats of a single low-growing ground cover for a clean, graphic look.
- Mixed texture path: Alternate sections of planted joints with areas of gravel for contrast and extra drainage.
Don’t forget lighting. Low path lights or small solar fixtures help show off the texture at night and keep visitors from accidentally testing how “stepable” your plants really are.
Common Mistakes to Avoid
- Skipping the base: Setting pavers straight on soil almost guarantees settling and uneven stones.
- Choosing thirsty plants for dry spots: If your path bakes in the sun, lean toward drought-tolerant options like creeping thyme or sedums.
- Planting too high: If plants sit higher than the paver surface, they’ll get shredded by feet and snow shovels.
- Expecting instant coverage: Ground covers need a season or two to fill in. Start with more plants if you’re impatient, or embrace the “under construction” look for a while.
Real-Life Lessons from a DIY Growing Paver Path
Building a paver path that grows is one of those projects that looks intimidating in photos but is very doable over a weekend or two. Here are some hands-on lessons and experiences that many DIYers discover along the way.
Lesson 1: Layout Tools Are Your Best Friends
It’s tempting to eyeball everything and start digging, but a simple line of stakes and string saves you from a wiggly path that always feels just a little off. One homeowner started with nothing but a garden hose outline, only to realize halfway through that the path angled awkwardly toward the neighbor’s driveway. A quick reset with string lines fixed it before the base went in – much easier than moving a yard of gravel later.
Lesson 2: Don’t Skimp on Compaction
The least glamorous part of the job – pounding on gravel with a tamper – is the part that decides how your path looks three years from now. Many first-timers compact once, shrug, and move on. A smarter approach is to work in layers: spread 2–3 inches of base, compact thoroughly, then repeat. The next time heavy rain hits or winter freezes arrive, you’ll be glad you did. People are often surprised at how “solid” the path feels underfoot even though it’s surrounded by living plants.
Lesson 3: Start with Smaller Plants, Not Big Pots
When you picture lush green between pavers, it’s natural to grab the biggest, bushiest thyme you can find. The problem? Squeezing a large plant into a narrow joint usually means mangled roots and poor contact with the soil. Smaller plugs and multi-pack starts settle in more easily and spread out in the direction you want them to go. Several gardeners report that a handful of inexpensive plugs filled an entire walkway within a year, especially with spreading varieties like creeping thyme or blue star creeper.
Lesson 4: Choose Plants to Match Your Lifestyle
A paver path with ground cover is not a freeway. If you host big backyard parties or your kids treat the path like a racetrack, choose the toughest ground covers you can find and keep them slightly back from the main stepping area. For calmer yards, you can be more adventurous with softer or more delicate plants. One family learned this the hard way when a gorgeous mossy path in a side yard turned to mush after one busy summer of traffic and lawn equipment.
Lesson 5: Expect an “Awkward Teenager” Phase
Right after planting, your path may look a little sparse – pavers, dots of green, and a lot of exposed soil. Don’t panic. Most stepable ground covers spend the first season building roots and then suddenly sprint across the gaps in year two. During that first year, weed lightly, water as needed, and resist the urge to yank everything out just because it doesn’t look like the Pinterest photo yet. A little patience turns that awkward teenager of a path into a grown-up showpiece.
Lesson 6: The Payoff Is More Than Just Looks
A growing paver path doesn’t just look good; it feels good. On a warm evening, brushing past thyme releases a burst of fragrance. Bees and butterflies wander through the flowers, and the path stays cooler under bare feet than solid concrete. Many DIYers say it quickly becomes their favorite part of the yard – proof that a simple, weekend-scale project can change how you experience your whole outdoor space.
With a thoughtful layout, solid base, and the right mix of pavers and plants, your “paver path that grows” will only get better with time. It’s one of those rare DIY projects where the finish line is just the beginning.


