Table of Contents >> Show >> Hide
- What Is a Shield in Minecraft?
- How to Craft a Shield in Minecraft
- How to Equip a Shield
- How to Use a Shield in Minecraft
- What Can a Shield Block?
- What Can a Shield Not Block?
- Best Uses for a Shield in Survival Mode
- Shield Enhancements: Best Enchantments for Shields
- How to Enchant a Shield
- How to Customize a Shield with a Banner
- How to Repair a Shield
- Advanced Shield Tips
- Common Shield Mistakes to Avoid
- Java Edition vs. Bedrock Edition Shield Differences
- Best Shield Strategy for Beginners
- Real Gameplay Experiences: What Using a Shield Actually Feels Like
- Conclusion
- SEO Tags
If Minecraft had a “do not get turned into pixel confetti” button, it would probably look like a shield. This humble plank-and-iron lifesaver is one of the most useful defensive tools in Survival mode, especially when skeletons start treating you like a walking archery target. Learning how to use a shield in Minecraft can completely change your early-game survival, your cave exploration strategy, and your confidence when a creeper gets a little too friendly.
A shield is not flashy like diamond armor or dramatic like a flaming sword, but it does something more important: it keeps you alive long enough to enjoy those things. Whether you play Java Edition or Bedrock Edition, shields can block many incoming attacks from the front, reduce danger from common mobs, deflect projectiles, and buy you precious seconds during combat. With the right enchantments, repairs, and banner customization, a shield becomes more than a wooden rectangle. It becomes your portable “nope” wall.
In this guide, we will cover how to craft a shield, how to equip it, how blocking works, what shields can and cannot stop, how to customize and enhance shields, and practical tips for using them in real gameplay. Grab some planks, find an iron ingot, and prepare to become the most stylish coward in the Overworld. That is not an insult. In Minecraft, smart cowards survive.
What Is a Shield in Minecraft?
A shield in Minecraft is a defensive item used to block incoming attacks. It is commonly equipped in the off-hand slot so you can keep a sword, axe, pickaxe, torch, or other item in your main hand. When raised at the right time, a shield can protect you from many front-facing attacks, including melee hits and many projectiles.
Shields are especially valuable because they are cheap to craft and useful almost immediately. You do not need diamonds, Netherite, rare loot, or a suspiciously generous village chest. One iron ingot and six wooden planks are enough to create a piece of gear that can save your inventory from becoming a tragic pile on the cave floor.
For new players, shields are one of the biggest survival upgrades after basic armor. For experienced players, they remain useful in caves, raids, Nether travel, PvP situations, Hardcore worlds, and any moment where the game decides to spawn three skeletons, two zombies, and a creeper behind a corner like it is organizing a surprise party.
How to Craft a Shield in Minecraft
To craft a shield, you need:
- 6 wooden planks of any type
- 1 iron ingot
- 1 crafting table
Open the crafting table and place the materials in a shield-like pattern. Put the iron ingot in the top-middle slot. Place wooden planks around it and below it, forming a rough “Y” shape. The result is one shield.
Shield Crafting Recipe
| Top Row | Middle Row | Bottom Row |
|---|---|---|
| Plank – Iron Ingot – Plank | Plank – Plank – Plank | Empty – Plank – Empty |
You can use oak, spruce, birch, jungle, acacia, dark oak, mangrove, cherry, bamboo, crimson, warped, or other plank types, depending on your version. The plank type does not change the shield’s base appearance or strength. Minecraft is not judging your wood choices here, which is good because most of us craft with whatever tree was unlucky enough to stand nearby.
How to Equip a Shield
The best place to equip a shield is usually your off-hand slot. In your inventory screen, place the shield in the small shield-shaped slot beside your character. Once equipped, it appears in your left hand by default, while your main hand stays free for a weapon or tool.
You can also hold a shield in your main hand, but this is less convenient because it prevents you from using your main weapon at the same time. For most players, off-hand shield use is the most practical setup.
Best Shield Setup for Survival
A strong early-game setup is simple: sword or axe in the main hand, shield in the off-hand, food on the hotbar, and torches nearby. This lets you block skeleton arrows, fight zombies safely, survive creeper encounters more consistently, and light up caves without constantly rearranging your inventory like a panicked librarian.
How to Use a Shield in Minecraft
Using a shield depends slightly on your edition and controls. In Java Edition, you generally raise the shield by holding the use button, commonly right-click on mouse and keyboard. In Bedrock Edition, shield behavior is often tied to sneaking or the platform’s use controls, depending on device and settings.
When the shield is raised, your movement slows, and the shield blocks many incoming attacks from the front. Direction matters. A shield is not a magical full-body bubble. If a zombie hits you from behind while you are proudly blocking forward, the zombie still gets to express itself.
Basic Steps to Use a Shield
- Craft or obtain a shield.
- Place it in your off-hand slot.
- Face the enemy or projectile source.
- Hold the correct block/use/sneak control for your platform.
- Wait for the attack to hit the raised shield.
- Counterattack when it is safe.
Timing matters because shields do not always protect instantly the exact moment you tap the control. Raise your shield before the arrow, trident, or melee swing lands. Against skeletons, it is often better to hold the shield up and advance slowly than to sprint in a straight line while shouting internally.
What Can a Shield Block?
A Minecraft shield can block many common threats when they come from the front. This includes most basic melee attacks from mobs, arrows from skeletons, thrown tridents, and many other non-magical projectiles. Shields are also famous for helping players survive creeper explosions when used correctly and when the explosion is in front of the shield.
Here are common examples of attacks a shield can help block:
- Zombie melee attacks
- Skeleton arrows
- Pillager crossbow shots
- Stray arrows
- Some thrown projectiles
- Creeper explosions from the front
- Many basic mob attacks
One of the most satisfying shield moments is blocking a skeleton arrow and watching it bounce away. It is Minecraft’s version of saying, “Return to sender,” except the sender is usually standing in a dark cave wearing no expression and making poor life choices.
What Can a Shield Not Block?
Shields are powerful, but they are not invincible. They do not protect you from every danger in Minecraft. If you fall off a cliff, drown, stand in lava, starve, or get attacked from the side or behind, your shield will not politely rewrite physics for you.
Common things shields may not fully protect against include:
- Fall damage
- Drowning
- Fire and lava damage from standing in flames or lava
- Poison and many magical effects
- Attacks from behind or sharp side angles
- Environmental damage such as suffocation
- Some special mob abilities
Axes are also a major shield problem. In many combat situations, an axe hit can temporarily disable your shield, leaving you open to follow-up damage. This is especially important in PvP and when fighting axe-wielding mobs such as vindicators or piglin brutes. If you see an enemy with an axe, do not rely on the shield alone. Move, create distance, use terrain, and avoid standing there like a decorative fence post.
Best Uses for a Shield in Survival Mode
1. Fighting Skeletons
Skeletons are one of the best reasons to craft a shield early. Raise your shield, face the skeleton, and move closer between shots. Once you are close enough, strike after blocking an arrow. This turns skeleton fights from “why am I being bullied by bones?” into a manageable rhythm.
2. Surviving Creepers
A shield can help protect you from a creeper explosion if you are facing the creeper and block before the blast. This does not mean you should start hugging creepers for sport. The safest strategy is still to back away, block if needed, and avoid tight corners where the explosion can surprise you.
3. Exploring Caves
Caves are full of narrow paths, dark corners, and mobs with terrible manners. A shield lets you peek around corners, block arrows, and survive sudden attacks while you place torches. In deep caves, a shield can be just as important as armor because it prevents damage instead of merely reducing it.
4. Fighting Pillagers and Raids
Pillagers use crossbows, and shields are excellent for blocking their shots. During raids, a shield can help you survive waves of ranged and melee enemies. Be careful around vindicators because their axes can make shield-based defense much less reliable.
5. Traveling in the Nether
The Nether is not exactly a relaxing vacation destination. A shield can help against certain attacks, especially when dealing with piglins, skeletons in Nether fortresses, or surprise hits while crossing dangerous terrain. However, shields do not make lava any less lava-like, so bring blocks, food, and common sense.
Shield Enhancements: Best Enchantments for Shields
Shields do not have a long list of special enchantments, but the available options are very useful. In regular gameplay, the most practical shield enchantments are Unbreaking and Mending. Curse of Vanishing can also be applied, though most players avoid it unless they enjoy making their future self mildly annoyed.
Unbreaking
Unbreaking increases the chance that your shield will not lose durability when used. This is the best basic shield enchantment because shields take durability damage when blocking attacks. Unbreaking III is ideal and can make one shield last much longer.
Mending
Mending repairs your shield when you collect experience orbs, as long as the shield is eligible to receive the repair. A shield with Mending can last indefinitely if you keep gaining experience. For long-term survival worlds, Hardcore worlds, and players who do not want to craft replacement shields every other adventure, Mending is excellent.
Curse of Vanishing
Curse of Vanishing causes the shield to disappear when you die instead of dropping with your items. In most normal survival situations, this is not helpful. It is more of a prank enchantment, a challenge choice, or something you accidentally accept from loot and then regret with the quiet intensity of a person who just mined straight down.
How to Enchant a Shield
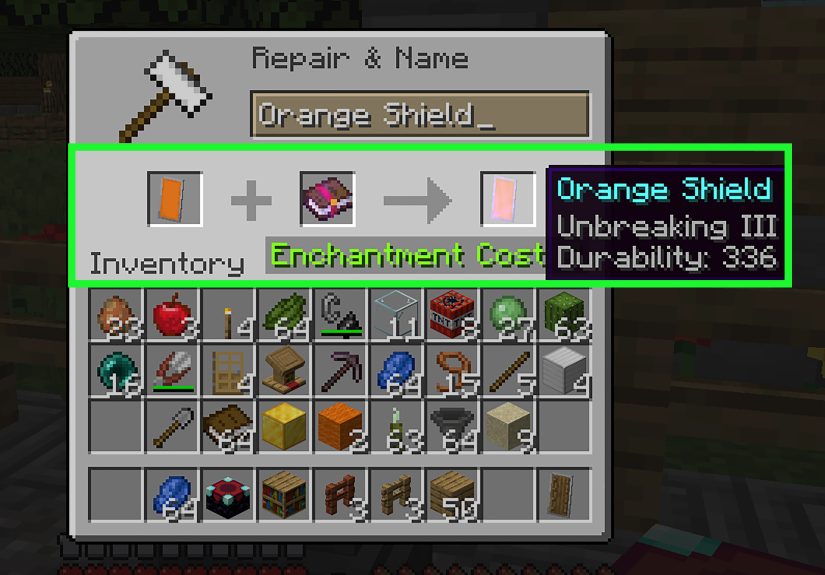
In most standard gameplay, shields are enchanted using an anvil and enchanted books. Place the shield in the anvil, add an enchanted book such as Unbreaking or Mending, and pay the experience cost. The enchanting table is not usually the go-to method for shields, so if your shield refuses to become magical there, it is not broken; it is just being very Minecraft about it.
The best shield enchantment combination is usually:
- Unbreaking III
- Mending
This combination gives you a durable, repairable shield that can stay useful for a long time. Add a banner pattern if you want style, and suddenly your shield says, “I block arrows and have branding.”
How to Customize a Shield with a Banner
One of the coolest shield enhancements is banner customization. You can combine a shield with a banner to apply the banner’s design to the front of the shield. This lets you create team shields, kingdom shields, clan shields, roleplay designs, or a deeply emotional tribute to your first dirt house.
To customize a shield:
- Create or obtain a banner.
- Design the banner with dyes and patterns.
- Place the banner and shield together in a crafting grid.
- Take the customized shield.
Keep in mind that banner patterns may look slightly different on a shield than they do on the full banner. The shield surface is smaller, so designs can appear compressed, shifted, or simplified. Simple patterns often look cleaner than extremely complicated ones.
Good Shield Design Ideas
- A creeper-face shield for a spooky base theme
- A red-and-white shield for a knight build
- A black shield with a skull-like pattern for Nether adventures
- A blue-and-white shield for ocean monuments
- A team-color shield for multiplayer servers
Custom shields are especially fun in multiplayer. Nothing says “organized civilization” like a group of players charging into a raid with matching shields, even if everyone immediately runs in different directions after the first ravager appears.
How to Repair a Shield
Shields lose durability when they block attacks. Eventually, a shield can break if you keep using it without repairs. You can repair a shield in a few ways.
Repair with an Anvil
Use an anvil with wooden planks or another shield to repair durability. An anvil is often the better option if you want to preserve enchantments or a banner pattern.
Combine Two Damaged Shields
You can combine two damaged shields to create one shield with restored durability. However, depending on the method and version, this may remove patterns or affect special properties. If your shield is enchanted or decorated, use caution before combining items casually.
Use Mending
A shield with Mending can repair itself when you collect experience. This is the best long-term solution. It is especially useful in worlds where you already have an XP farm, villager trading hall, mob grinder, or regular mining routine.
Advanced Shield Tips
Face the Threat
The shield protects the front, so camera control matters. If you hear a skeleton shoot, turn toward the sound before blocking. If a creeper hisses, face it quickly and raise the shield. If something is behind you, reposition instead of trusting the shield to cover your back. It will not.
Do Not Hold the Shield Forever
Blocking slows you down. If you keep the shield raised constantly, enemies can surround you, and you may lose control of the fight. Block at key moments, move between attacks, and counter when there is an opening.
Use Terrain
Shields work best when combined with smart positioning. Fight in doorways, tunnels, or narrow cave paths so enemies cannot easily surround you. Against skeletons, use walls and corners to force them closer. Against creepers, keep enough space to back away.
Carry a Backup Shield
In dangerous areas, carry a spare shield. This is especially useful in raids, Nether fortresses, ancient cities, and long cave trips. A broken shield during a fight feels like opening an umbrella during a meteor shower and discovering it is made of wet paper.
Common Shield Mistakes to Avoid
The first common mistake is equipping a shield but forgetting to raise it. A shield in your off-hand is not automatically blocking everything. You must use the correct control and face the danger.
The second mistake is trusting the shield from every direction. Mobs can still hurt you from behind, and multiple enemies can flank you. Keep moving and avoid getting surrounded.
The third mistake is ignoring durability. Shields are cheap, but not checking durability before a cave trip is asking for drama. Repair or replace your shield before major adventures.
The fourth mistake is relying on shields against axe users. Axes can disable shields, so change tactics. Use distance, blocks, water, bows, lava buckets, or quick movement instead of only blocking.
The fifth mistake is making banner designs too complicated. A six-layer banner might look amazing on a wall but messy on a shield. Simple, bold patterns usually look best.
Java Edition vs. Bedrock Edition Shield Differences
Java Edition and Bedrock Edition share the same general shield purpose, but controls and some behavior details can differ. Java players usually raise shields with the use button. Bedrock players often use sneaking or platform-specific controls. Bedrock also gained banner shield customization as a parity feature, meaning players can now create decorated shields instead of staring sadly at Java screenshots.
Because Minecraft updates can adjust combat details, always check your current controls and version if something feels different. Servers, add-ons, snapshots, previews, or custom settings can also change shield behavior. In other words, if your shield acts weird on a server, do not immediately blame the shield. Blame plugins first. Then blame lag. Then blame the skeleton, because skeletons deserve it.
Best Shield Strategy for Beginners
If you are new to shields, start with skeleton practice. Find a safe open area, equip your shield, and learn the rhythm of blocking arrows. Once you understand timing and direction, practice against zombies. Block the hit, step back, attack, and repeat. Then try using the shield in caves, where it becomes much more valuable.
For early survival, craft a shield before full iron armor if you already have one iron ingot. Armor reduces damage, but a shield can prevent many hits entirely. That makes it one of the best value items in the game.
Real Gameplay Experiences: What Using a Shield Actually Feels Like
The first time you seriously use a shield in Minecraft, it feels almost unfair. You walk into a cave with the confidence of someone who has watched exactly one tutorial and now believes they are ready for anything. A skeleton fires from the darkness, you raise the shield, and the arrow bounces away. Suddenly, you are not prey. You are a person holding a rectangle with boundaries.
In early-game survival, a shield changes the emotional temperature of Minecraft. Without one, every cave noise feels like a personal threat. With one, you can slow down, think, and handle mobs one at a time. It is not that you become invincible. You simply stop panicking every time a skeleton appears on a ledge with the accuracy of a professional esports athlete.
One of the best shield experiences is exploring ravines or large caves. Skeletons love high ground, and before you have a shield, they can knock you into holes, lava, or other mobs. With a shield, you can look up, block their shots, and build a safe path. It turns cave exploration from a chaotic sprint into a tactical crawl. Is it glamorous? No. Does it work? Absolutely.
Shields are also hilarious during creeper encounters. You hear the hiss, spin around, raise the shield, and hope your reflexes are better than your mining decisions. When it works, the explosion happens, your heart leaves your body for a second, and then you realize you are still alive. The terrain may look like a spoon attacked it, but you survived. That is a win.
In villages, shields become even more useful during raids. Pillagers fire crossbows, vindicators charge with axes, and ravagers behave like angry furniture with legs. A shield helps against ranged attacks, but raids also teach you not to rely on it blindly. Axe enemies can punish shield users, so you learn to move, retreat, use buildings, and fight smarter. The shield is not the whole strategy; it is the safety net that gives you time to create one.
On multiplayer servers, custom shields add personality. A group with matching banners feels like a real team, even if the team’s main achievement is arguing over who stole the potatoes. A decorated shield can represent a base, a faction, a kingdom, or just your favorite colors. It is one of those small details that makes a world feel lived in.
After using shields for a while, many players feel strange without one. Going into a cave with an empty off-hand feels like forgetting your phone, wallet, and survival instincts at home. A shield becomes part of your rhythm: block, step, strike, retreat, eat, repeat. It is simple, reliable, and quietly powerful.
The biggest lesson from real shield use is this: a shield rewards calm players. If you panic, turn the wrong way, or stand still too long, it will not save you. If you face the threat, manage distance, and time your blocks, it becomes one of the most dependable tools in the game. The shield is not just defense. It is breathing room. And in Minecraft, breathing room is often the difference between returning home with diamonds and returning to the death screen with regret.
Conclusion
Learning how to use a shield in Minecraft is one of the simplest ways to improve your survival skills. A shield is cheap to craft, easy to equip, and powerful against many common threats, especially skeletons, pillagers, zombies, and creepers. It works best when you face incoming attacks, block at the right time, and combine defense with movement and smart positioning.
For the best results, use a shield in your off-hand, enchant it with Unbreaking III and Mending, repair it before major trips, and customize it with a banner if you want extra style points. Just remember that shields do not block everything. Axes, attacks from behind, environmental damage, and bad decisions can still ruin your day.
Note: Shield controls and small combat details may vary between Java Edition, Bedrock Edition, snapshots, previews, servers, and add-ons. Always test your shield in your current version before relying on it during serious adventures.


