Table of Contents >> Show >> Hide
- Why Broken Tile Mosaics Work So Well
- What You Need Before You Start
- 1. Make a Mosaic Stepping Stone for the Garden
- 2. Create a Mosaic Tabletop or Serving Tray
- 3. Turn a Plain Planter into a Mosaic Showpiece
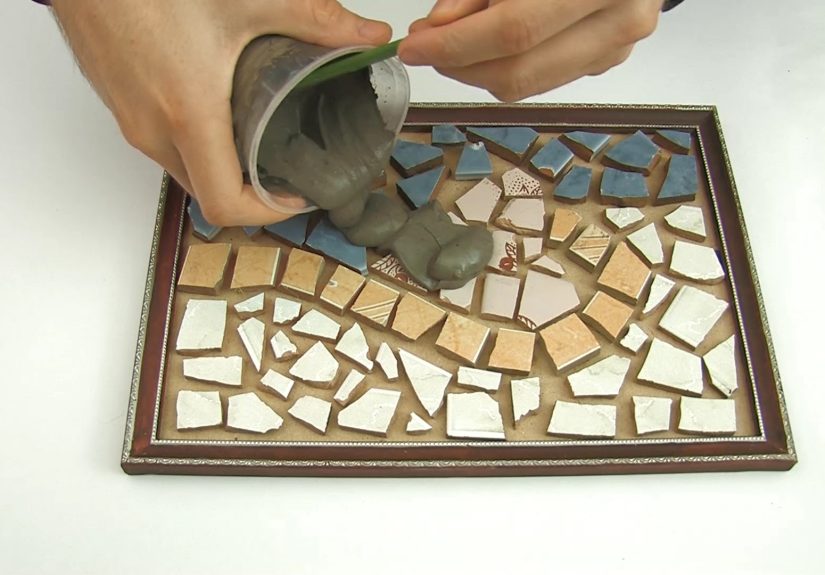
- 4. Make Mosaic Wall Art, a Mirror Frame, or a Picture Frame
- 5. Add a Mosaic Accent to Furniture, a Backsplash Panel, or a Decorative Insert
- Common Mistakes to Avoid
- How to Make Your Mosaic Look More Professional
- Conclusion
- Experiences and Lessons Learned from Making Broken Tile Mosaics
Broken tiles have two possible futures. In the first future, they sit in a dusty bucket in the garage, silently judging your organizational skills. In the second, much happier future, they become a mosaic that looks intentional, artistic, and just a little bit impressive. This article is about the second future.
If you have leftover ceramic, porcelain, or decorative tile from a renovation, do not rush to toss it. Broken tile mosaic projects can turn scraps into wall art, tabletops, planters, and garden accents with a lot of personality and a surprisingly small budget. Even better, mosaic work is forgiving. A perfectly cut tile demands precision. A beautifully placed broken tile says, “Relax, I meant to do that.”
Below, you will find five practical ways to make a mosaic from broken tiles, plus the tools, layout ideas, grout tips, and real-world lessons that make the difference between “handmade charm” and “why is this piece glued to my elbow?”
Why Broken Tile Mosaics Work So Well
A DIY mosaic made from broken tiles is one of the easiest ways to repurpose renovation leftovers. Small, irregular pieces naturally create movement, texture, and color variation. That means you do not need factory-perfect edges to create something polished. In fact, the tiny imperfections are part of the appeal.
Broken tile art also gives you a lot of design freedom. You can create a freeform pattern, a geometric layout, a floral motif, or a simple color-blocked design. Use ceramic tile for softness and color. Use porcelain for durability. Mix in bits of china, pebbles, or stained glass if you want extra contrast. The result can feel rustic, modern, whimsical, or downright dramatic depending on the materials and grout color you choose.
What You Need Before You Start
Basic Tools and Materials
- Broken ceramic or porcelain tile pieces
- Safety glasses and sturdy gloves
- Tile nippers or wheeled mosaic cutters
- A towel or canvas bag for safely breaking tiles
- Tile adhesive or thinset mortar
- A trowel or putty knife
- Grout float
- Unsanded or sanded grout
- Bucket, sponge, and clean water
- A backer surface such as cement board, wood panel, tabletop, planter, or stepping stone mold
- Optional sealer for grout or porous surfaces
Safety First, Because Tiles Fight Back
Always wear eye protection and gloves when snapping tile into smaller pieces. Place the tile in an old towel before tapping it with a hammer so fragments do not go flying across the room like tiny ceramic confetti. If you want more control, use tile nippers instead of brute force. Your future self will appreciate fewer sharp surprise edges.
Adhesive and Grout Basics
For most mosaic projects, a quality tile adhesive or polymer-modified thinset mortar works well. Thinset is especially useful for tabletops, wall panels, and outdoor projects that need better durability. Let the adhesive cure fully before grouting. For many tile products, that means waiting around 24 hours, though you should always follow the product label.
As for grout, use unsanded grout for delicate surfaces, narrow joints, or tiles that can scratch easily, such as glass. Sanded grout is usually better for wider joints and sturdier surfaces. Grout color matters more than people think. Matching grout creates a softer, blended look. Contrasting grout highlights each tile piece and makes the pattern pop.
1. Make a Mosaic Stepping Stone for the Garden
If you want the easiest entry point into broken tile mosaic work, start outside. A mosaic stepping stone is practical, decorative, and forgiving. Your garden does not care if one corner is a little quirky. Frankly, it may prefer it.
How to Do It
Use a premade stepping stone mold or a shallow round form filled with concrete. While the surface is still workable, press your broken tile pieces into the top in a simple pattern. You can go with a sunburst, spiral, floral design, or an abstract arrangement using two or three colors. Keep the top surface reasonably even so the stone stays walkable.
Leave a small gap between pieces for grout or for the concrete itself to frame the mosaic. Once cured, clean the surface and seal it if the materials are porous or if the stone will live outdoors year-round. For extra slip resistance, avoid creating a glass-slick finish on surfaces that will get wet.
Best Design Ideas
- Blue and white Mediterranean-inspired patterns
- Simple flower petals around a contrasting center tile
- Random earthy colors for a rustic garden path
- House numbers or initials for a personalized accent
This is a fantastic weekend project because it uses small amounts of material and does not require advanced cutting. If you can arrange puzzle pieces and resist overthinking every shard, you can make a charming garden mosaic.
2. Create a Mosaic Tabletop or Serving Tray
A mosaic tabletop is where broken tile starts to look less like leftover debris and more like “artisan décor.” It is one of the best ways to use flat tile pieces, and it works beautifully on side tables, bistro tables, plant stands, and wooden trays.
How to Do It
Start with a sturdy base. Old thrift-store tables are excellent candidates because they are inexpensive and often begging for a second chance. If the existing top is smooth, lightly sand it and make sure it is clean and stable. Spread a thin, even layer of adhesive, then lay out your tile pieces starting from the center or from the outer edge, depending on your design.
For a more polished result, dry-fit your pattern before gluing anything down. That step feels slightly annoying in the moment and incredibly wise later. Once the pieces are set, allow the adhesive to cure, then grout the surface using a float held at an angle. Wipe away haze with a damp sponge, rinse carefully, and buff the tiles after the grout firms up.
Best Design Ideas
- A geometric starburst using contrasting colors
- A freeform mosaic with mixed tile sizes
- A border design around a painted or plain center
- Vintage china mixed with plain ceramic for a collected look
For outdoor tabletops, choose weather-appropriate materials and seal grout if needed. If the table will be used for drinks and snacks, make sure the top is smooth enough to clean without snagging every napkin in sight.
3. Turn a Plain Planter into a Mosaic Showpiece
A mosaic planter is the home-and-garden version of putting on earrings before leaving the house. Is it necessary? No. Does it make everything look better? Absolutely.
How to Do It
Choose a terra-cotta pot, concrete planter, or other stable container. Clean the outside thoroughly and let it dry. Then spread adhesive in small sections and press in your broken tile pieces. Curved surfaces are easiest when you use smaller fragments rather than large chunks, so do not be shy about trimming pieces with nippers.
Leave consistent grout joints if you want a neat appearance, or go intentionally irregular for a more handmade style. Once the adhesive cures, grout the surface and wipe it clean. Avoid blocking the drainage hole, because pretty planters still need to function like planters.
Best Design Ideas
- Sea-inspired blue and green tones for herbs or succulents
- Warm terracotta, cream, and mustard for a Mediterranean patio look
- Black and white broken tile for a modern high-contrast finish
- Small mirrored accents for extra sparkle on a porch or balcony
This project works especially well with leftover bits that are too small for a tabletop but too pretty to discard. It is also a smart option for beginners because the scale is manageable and the results look charming even when they are not mathematically perfect.
4. Make Mosaic Wall Art, a Mirror Frame, or a Picture Frame
If you want a broken tile mosaic project with maximum visual payoff and minimum structural stress, wall décor is your friend. It is easier than a floor project, less fussy than a backsplash, and gives you total freedom with color and composition.
How to Do It
Start with a wood panel, cement board, mirror frame, or sturdy picture frame. Sketch your design lightly in pencil. You might create a sunflower, abstract waves, a monogram, or a simple border. Apply adhesive in small sections and place your tile pieces carefully. For curved lines or detailed shapes, use small shards and keep a pair of nippers nearby.
After the adhesive sets, grout the piece just as you would a tabletop. Be sure to clean the tile faces before the grout fully hardens. Once dry, you can hang the piece or display it on an easel. If your project includes a mirror, clean the glass after grouting so it does not look like your décor had an argument with a bag of flour.
Best Design Ideas
- Sun, moon, or floral motifs for garden walls
- A mosaic border around a plain mirror
- House numbers on a mounted plaque
- A family initial using contrasting grout for definition
This approach is perfect if you want mosaic art without worrying about weather exposure, foot traffic, or hot coffee mugs. It is also one of the best ways to experiment with intricate patterns before moving on to larger projects.
5. Add a Mosaic Accent to Furniture, a Backsplash Panel, or a Decorative Insert
This is the most design-forward option of the five. Instead of covering an entire surface, use broken tiles to create one intentional focal point. Think a cabinet door insert, the top of a garden bench, the front of a riser, or a small backsplash-style panel behind a sink or potting station.
How to Do It
Pick a contained area and define the edges clearly. This makes the project look deliberate instead of like tile fragments wandered into the room and decided to stay. Prep the surface, spread adhesive evenly, and set your tile pieces with attention to spacing. Because accent areas are usually more visible at eye level, a little extra planning pays off here.
Use trim, wood edging, or a border tile to frame the mosaic if you want a cleaner transition. Grout carefully and wipe diagonally across the joints with a float to keep the lines full and even. Seal cementitious grout if the area will deal with splashes or humidity.
Best Design Ideas
- A colorful insert on the top of a stool or side table
- A narrow mosaic border on a kitchen cart
- A small backsplash panel in a laundry room or potting shed
- Tile insets on cabinet fronts for a custom look
This method is ideal if you want the look of mosaic tile without committing to a full wall or major installation. It also lets you use especially beautiful fragments as statement pieces rather than filler.
Common Mistakes to Avoid
Using Pieces That Are Too Thick or Too Uneven
Mixing wildly different tile thicknesses can create an awkward surface that is hard to grout and harder to live with. Try to keep materials within a similar depth, especially for tabletops and functional surfaces.
Skipping the Dry Layout
Yes, it is tempting to glue first and figure it out later. That path leads to regret and weird spacing. Dry-laying your design helps balance color, shape, and proportion before anything becomes permanent.
Choosing the Wrong Grout
Not every grout works for every project. Delicate or glossy materials may scratch, outdoor surfaces may need better durability, and wide joints often call for a different grout than narrow ones. Read the label, not your intuition.
Rushing Cleanup
Grout haze is the clingy guest of the mosaic world. Clean the tile faces properly, rinse your sponge often, and buff the surface after the grout firms up. Do not wait until tomorrow and hope optimism solves it.
How to Make Your Mosaic Look More Professional
Start by limiting your palette. A mosaic made with three coordinated colors often looks more intentional than one made with every scrap in the history of your laundry room renovation. Repeat shapes or colors throughout the design to create rhythm. Use border pieces to frame the composition. Test grout colors before committing. Dark grout adds drama and hides stains, while light grout can feel airy and classic but may show more wear.
Also, think about scale. Tiny pieces can create intricate detail, but they take longer to place and grout. Larger pieces work better for bold patterns and beginner-friendly projects. There is no prize for using the smallest shard unless your goal is to develop a personal relationship with tweezers.
Conclusion
Making a mosaic from broken tiles is one of the most satisfying ways to turn leftovers into something worth showing off. Whether you choose a garden stepping stone, a tabletop, a planter, framed wall art, or a stylish accent panel, the process is part craft, part design exercise, and part treasure hunt. The broken edges that looked like trash at first can become the very detail that makes the finished piece feel original.
The best part is that you do not need professional-level tiling skills to get started. With the right safety gear, adhesive, grout, and a bit of patience, broken tile mosaic projects can be accessible, affordable, and genuinely beautiful. So the next time you find a box of leftover tiles lurking in the garage, do not think of waste. Think of opportunity. Or at least think, “Well, this could become a very impressive flowerpot.”
Experiences and Lessons Learned from Making Broken Tile Mosaics
The first time many people make a broken tile mosaic, they assume the hardest part will be the breaking. It usually is not. Smashing tile inside a towel feels oddly efficient, and tile nippers are strangely satisfying once you get the hang of them. The real challenge is learning when to stop adjusting every tiny piece. Mosaic work has a way of turning normal, reasonable adults into people who spend ten full minutes deciding whether one blue shard feels “emotionally balanced” next to a cream one.
One of the most common beginner experiences is underestimating how much the grout will change the look of the project. Before grouting, the mosaic often looks sharp, colorful, and a little chaotic. After grouting, it suddenly looks unified. The spaces fill in, the pattern settles down, and the whole thing starts to look intentional. This is the magical moment when a pile of broken tile finally stops resembling renovation debris and starts resembling art.
Another lesson people learn quickly is that small projects build confidence much faster than large ones. A planter, stepping stone, or tray can teach you almost everything you need to know about spacing, adhesive, grout cleanup, and design rhythm. Jumping straight into a giant tabletop or wall panel sounds ambitious, but it can become exhausting before it becomes beautiful. Most experienced DIYers eventually discover that finishing a smaller mosaic well is far more rewarding than abandoning a larger one halfway through because the grout bucket has ruined your mood.
There is also a practical lesson in choosing materials. Broken ceramic tile is usually easier to work with than very hard porcelain, and smaller pieces are far more forgiving on curved surfaces like pots. People often start with whatever scraps they have and then realize some pieces are too thick, too sharp, or too stubborn for the project. That is normal. A good mosaic is not about using every scrap. It is about using the right scraps. The leftover pieces can always wait for another project, another idea, or another weekend when you suddenly decide a birdbath deserves glamour.
Many DIYers also discover that color planning matters more than technical perfection. A mosaic with a loose but thoughtful palette can look fantastic even if the spacing is not laser-precise. Meanwhile, a perfectly grouted design with clashing colors can still look messy. That is why experienced makers often sort tile by color before gluing anything down. It feels a little obsessive, yes, but it saves time and leads to a much stronger finished design.
Perhaps the best experience of all is that mosaic projects tend to become conversation pieces. Guests notice a tiled planter. Neighbors comment on a mosaic stepping stone. Someone inevitably asks, “Wait, you made that from broken tiles?” That moment is deeply satisfying because it proves a simple point: beautiful home décor does not always begin with expensive materials. Sometimes it begins with leftovers, patience, and the willingness to turn broken things into something better.


