Table of Contents >> Show >> Hide
- Before You Polish: Quick Sterling Silver Reality Check
- Method 1: Soap-and-Water Shine (Best for Light Tarnish + Everyday Grime)
- Method 2: Baking Soda Paste Polish (Best for Moderate Tarnish)
- Method 3: Aluminum Foil “Bath” (Best for Heavy Tarnish, FastBut Not for Everything)
- Method 4: Commercial Silver Polish + Polishing Cloth (Best for Controlled Results and a Showroom Finish)
- How to Keep Sterling Silver from Tarnishing So Fast
- Common Sterling Silver Polishing Mistakes (So You Don’t Learn Them the Hard Way)
- Quick Cheat Sheet: Which Method Should You Use?
- Extra: Real-Life Polishing Experiences (500-ish Words of “Been There, Buffed That”)
- Conclusion
Sterling silver is basically the friend who looks expensive, acts classy, and then
randomly turns a little goth when you’re not paying attention. One day your 925 ring is
sparkling like it’s auditioning for a jewelry commercial. The next day it’s giving “Victorian
attic mystery.”
The good news: tarnish isn’t “silver going bad.” It’s a surface reaction (silver + sulfur
compounds in air, skin oils, lotions, even certain foods) that forms a dark film. The better
news: you can polish sterling silver at home without turning your sink into a chemistry
labor accidentally sanding your heirloom flatware into “modern minimalism.”
Below are four practical ways to polish sterling silverranging from gentle maintenance to
“this piece looks like it fought a chimney.” I’ll also cover what not to do (because
the internet loves chaos), plus storage tricks that slow tarnish so you’re not polishing every
other Tuesday.
Before You Polish: Quick Sterling Silver Reality Check
How to confirm it’s sterling silver
- Look for marks: “925,” “.925,” “Sterling,” or “Ster.”
-
Know the finish: Some pieces are intentionally oxidized (dark recessed details).
Aggressive polishing can erase that contrast.
What you’ll want on hand
- Soft microfiber cloths (or a clean cotton T-shirt in a pinch)
- Mild dish soap
- A soft toothbrush or small soft brush for crevices
- Warm water and a towel for drying immediately
- Optional: silver polish cream or a silver polishing cloth
Big “don’t do this” warning
Avoid abrasive shortcuts like toothpaste (especially whitening, charcoal, gritty types),
scouring powders, steel wool, and harsh chemicals like bleach. They can scratch silver, dull
the finish, or speed tarnish later. Also: skip the dishwasher for sterling silver if you want
it to keep looking like sterling silver.
Method 1: Soap-and-Water Shine (Best for Light Tarnish + Everyday Grime)
If your sterling silver jewelry looks dull from lotions, skin oils, or general “I wore this
while living my life” residue, start here. This method is gentle, low-risk, and surprisingly
effective for light tarnish.
Steps
-
Mix a bath: In a small bowl, combine warm water with a few drops of mild dish
soap. -
Wipe, don’t soak forever: Dip a soft cloth in the solution and gently rub the
silver. If it’s jewelry, a short soak (a few minutes) is fine. -
Detail the crevices: Use a soft toothbrush for chains, settings, or engraved
spots. - Rinse: Use cool to lukewarm water to remove soap residue.
-
Dry immediately and buff: Pat dry, then buff with a clean soft cloth to prevent
water spots.
When to use it
- Sterling silver jewelry you wear often (rings, bracelets, chains)
- Pieces with mixed materials (some gemstones, pearls, enamel) where harsher methods are risky
- Maintenance cleaning to delay heavier polishing
Example
Your everyday sterling silver necklace looks a little cloudy, especially near the clasp. A
quick soap-and-water clean removes oils and restores shineoften enough that you don’t even
need “real” polish.
Method 2: Baking Soda Paste Polish (Best for Moderate Tarnish)
Baking soda is the classic at-home option because it’s mildly abrasivejust enough to lift
tarnish, not enough to behave like sandpaper (assuming you use it gently). Think of this as
“exfoliation,” not “power sanding.”
Steps
-
Make a paste: Mix about 3 parts baking soda with
1 part water until you get a thick, spreadable paste. - Dampen the silver: Lightly wet the piece so the paste glides.
-
Rub gently with a soft cloth: Work in small circles or back-and-forth strokes.
Focus on tarnished areas. Don’t press hard. - Crevices: Use a cotton swab or soft brush for detailed areas.
- Rinse thoroughly: Remove all paste (leftover residue can look chalky).
- Dry and buff: Dry immediately, then buff with a clean cloth.
When to use it
- Sterling silver rings/bracelets with visible tarnish but no delicate surface treatments
- Flatware that’s dull or spotty (and safe to rinse and dry thoroughly)
- Quick rescue when you don’t have commercial polish
Use caution if…
- The item has an intentionally oxidized finish (you may remove the dark contrast you actually want).
-
The piece has porous materials or soft gems (pearls, opals, turquoise). In that case, stick to
Method 1 or a jeweler-approved approach.
Method 3: Aluminum Foil “Bath” (Best for Heavy Tarnish, FastBut Not for Everything)
This is the dramatic “science fair” method: line a dish with aluminum foil, add hot water and
baking soda (often with salt), and let chemistry do the heavy lifting. It can remove heavy
tarnish quickly because it’s not just scrubbingthere’s a reaction that helps transfer tarnish
away from the silver.
But: fast doesn’t automatically mean “best.” This method can dull certain finishes, mess with
patina, and is generally a bad idea for jewelry with gemstones, pearls, glued components, or
intentionally darkened details. Use it like hot sauce: powerful, not for everything, and
definitely not for your eyes.
Steps (basic home version)
- Line a non-metal dish: Use a glass or ceramic baking dish lined with aluminum foil.
- Add silver: Place the sterling silver so it touches the foil (that contact matters).
-
Add baking soda (and optional salt): Sprinkle in baking soda. Some approaches also add
a small amount of salt. - Pour in hot (near-boiling) water: Carefully add enough to cover the silver.
- Wait briefly: Tarnish should lift in minutes for many items.
- Remove safely: Use tongs. Rinse well and dry immediately. Then buff with a soft cloth.
When to use it
- Heavily tarnished sterling silver flatware
- Simple sterling items without stones, glue, or delicate surface finishes
- When you want speed and you’re okay with the finish becoming more uniformly bright
When NOT to use it
- Sterling silver jewelry with gemstones or pearls
- Antique pieces where patina is part of the value and look
- Pieces you can’t rinse and dry thoroughly (trapped moisture is not your friend)
Pro tip
Work in a well-ventilated area. Some guides note the process can smell unpleasant (that “rotten
egg” vibe) because of sulfur compounds involved in tarnish removal.
Method 4: Commercial Silver Polish + Polishing Cloth (Best for Controlled Results and a Showroom Finish)
If you want the most predictable shineespecially on heirloom sterling silver or pieces with
detailed patternsuse a reputable silver polish cream/lotion or silver wipes, plus a proper
polishing cloth. Many polishes also leave behind a thin protective layer that helps slow down
future tarnish.
Two common options
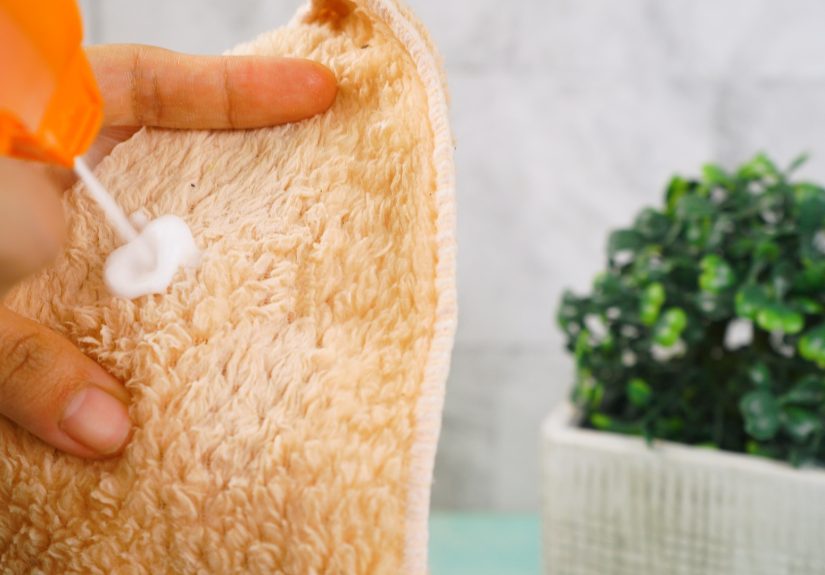
A) Silver polish cream/lotion
- Pre-clean: If the piece is greasy or dusty, wash gently (Method 1) and dry.
- Apply polish: Put a small amount on a soft cloth or the included sponge.
- Rub gently: Work it into tarnished areas and crevices. Use cotton swabs for details.
- Rinse or buff per instructions: Some products rinse off; others can be buffed away.
- Dry and buff: Dry immediately and finish with a clean cloth for a high shine.
B) Silver polishing cloth / wipes
- Rub the surface: Use light pressure. Let the cloth do the work.
- Flip to a clean section: As the cloth darkens, move to a fresh area.
- Finish buffing: Use a clean, untreated cloth for a final glow.
When to use it
- Detailed sterling silver patterns (engraving, filigree, decorative flatware)
- Heavier tarnish where you want control (not a “bath” approach)
- Quick touch-ups before events (“people are coming over and I want to look like I have my life together”)
Small but important note
With commercial polish, less is more. You can always do a second gentle pass,
but over-polishing can gradually wear down fine details over time.
How to Keep Sterling Silver from Tarnishing So Fast
Polishing sterling silver is satisfying, but doing it every week is a personality test you
didn’t sign up for. Prevention helps a lot:
Smart storage
- Store dry: Moisture speeds tarnish. Dry pieces completely before storing.
- Use anti-tarnish bags or cloth-lined boxes: They reduce exposure to sulfur compounds.
- Avoid rubber and certain papers: Some materials release sulfur and accelerate tarnish.
- Separate pieces: Prevent scratches by storing items individually.
Wear it (yes, really)
Frequently worn sterling silver often tarnishes less dramatically because gentle friction and
regular wiping keep it from building up. Just wipe pieces with a soft cloth after wearingespecially
if you used lotion, sunscreen, or perfume.
Cleaning schedule suggestion
- Weekly (or after wear): Quick wipe with a polishing cloth
- Monthly: Soap-and-water clean if needed
- Every few months (or before special occasions): Deeper polish with baking soda paste or commercial polish
Common Sterling Silver Polishing Mistakes (So You Don’t Learn Them the Hard Way)
1) Using paper towels
Paper towels can be more abrasive than they look and may create fine scratches. Use soft cloths instead.
2) Going too aggressive too soon
Start gentle. If soap and water works, you just saved yourself time and reduced risk.
3) Polishing jewelry with soft or porous stones like it’s plain metal
Some stones hate chemicals, soaking, and abrasives. When in doubt, use mild soap and a soft brush, then dry thoroughly.
4) Forgetting to rinse and dry completely
Polish residue and moisture trapped in crevices can cause dullness or new tarnish. Rinse well and dry right away.
Quick Cheat Sheet: Which Method Should You Use?
- Just dull or slightly yellowed? Method 1 (soap and water).
- Moderate tarnish, no delicate finish? Method 2 (baking soda paste).
- Heavy tarnish on simple items, need speed? Method 3 (foil bath, carefully).
- Heirloom pieces, detailed patterns, or you want precision? Method 4 (commercial polish + cloth).
Extra: Real-Life Polishing Experiences (500-ish Words of “Been There, Buffed That”)
I once watched someone try to “clean” a sterling silver ring with whitening toothpaste like it
was a kitchen sink. At first, it looked like a miracletarnish faded, shine returned, everyone
felt victorious. Then the light hit it at an angle and the ring looked… hazy. Not filthy. Not
ruined. Just oddly matte, like it had been softly sandblasted by a minty glacier. The lesson
wasn’t “never clean silver.” The lesson was “don’t confuse polishing with scrubbing.”
Sterling silver is durable, but finishes and fine details are surprisingly easy to dull when you
use something abrasive every time you notice a little darkness.
Another time, I used the aluminum foil method on a set of sterling silver spoons that had been
sitting in storage. It worked fastalmost comically fast. The tarnish lifted in minutes, and I
felt like a wizard. But the spoons also lost a bit of their “warm” antique glow. They became
uniformly bright, which is perfect if you want a crisp, shiny table setting. But if you love
patinathe soft, slightly aged look that makes old silver feel like it has storiesthe foil bath
can feel like giving your heirloom a high-school yearbook makeover.
With jewelry, the most useful habit turned out to be the least dramatic: a polishing cloth in a
drawer. Not a whole cleaning ritual. Just a quick wipe after wearing. It’s boring in the way
brushing your teeth is boring. But it prevents the “why is my necklace suddenly charcoal?” moment.
Especially if you live in humidity, wear perfume, or use skincare products that leave residue.
A polishing cloth doesn’t just add shineit keeps oils from feeding tarnish formation.
The biggest “aha” moment came from cleaning a sterling silver piece with tiny recessed details.
The first time, I polished too enthusiastically and accidentally erased the contrast that made the
design pop. That’s when I learned to treat oxidized (darkened) sterling silver like a graphic
design choice, not a problem. If the darkness is intentional, your goal is to polish the high
points and leave the shadows alone. Gentle passes. Soft cloth. Minimal product. Think “highlight
and contour,” but for metal.
Finally: storage is half the battle. The silver I used most often stayed brighter. The silver I
forgot in a random drawer tarnished faster. Once I started storing sterling pieces in separate
pouches (dry, away from rubber bands and mystery plastics), I spent less time polishing and more
time enjoying themwhich, honestly, is the whole point of having nice things.
Conclusion
Polishing sterling silver doesn’t have to be intimidatingor involve sacrificing your entire
afternoon to the gods of tarnish. Start gentle with soap and water, level up to a baking soda
paste when needed, use the foil bath only when it truly makes sense, and reach for commercial
polish and a quality polishing cloth when you want the most controlled, showroom-worthy shine.
Do it thoughtfully, store smart, and your sterling silver will stay bright enough to blind your
enemies (or at least impress your guests).