Table of Contents >> Show >> Hide
- What Is DIY Photogrammetry?
- How Photogrammetry Turns Photos Into a 3D Model
- The Gear You Need for DIY Photogrammetry
- Choosing the Right Subject
- How to Capture Photos for a Strong 3D Scan
- Processing the Scan
- Cleaning and Optimizing the Model
- Common DIY Photogrammetry Problems and Fixes
- DIY Photogrammetry vs. Other 3D Scanning Methods
- Best Practices for Better Results
- Example DIY Workflow: Scanning a Small Ceramic Mug
- Extra Experience Notes: What DIY Photogrammetry Teaches You in Practice
- Conclusion
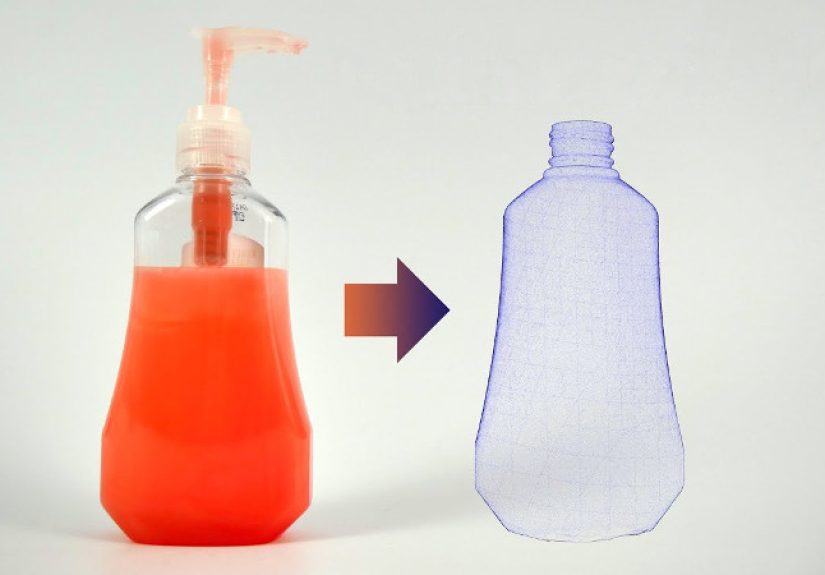
There was a time when 3D scanning sounded like something that belonged in a secret lab, next to a laser cannon and a scientist shouting, “Enhance!” Today, you can create a usable 3D scan with a phone, a camera, a lamp, a turntable, and enough patience to take many, many photos of the same object without questioning your life choices. That process is called DIY photogrammetry, and it is one of the most accessible ways to turn real-world objects into digital 3D models.
At its simplest, photogrammetry uses overlapping photographs to reconstruct shape, depth, surface detail, and texture. Software compares shared visual points across multiple images, estimates camera positions, builds a point cloud, generates a mesh, and wraps the model in photographic texture. The result can be used for 3D printing, game assets, online product previews, cultural documentation, education, augmented reality, and creative experiments.
The beauty of 3D scanning via DIY photogrammetry is that it does not require expensive hardware to get started. The catch? It rewards preparation. Good lighting, sharp photos, enough overlap, a cooperative subject, and clean processing matter more than buying the fanciest gadget in the room. Think of it as cooking: the software is the oven, but your photo set is the recipe. If the ingredients are blurry, shiny, and badly lit, dinner is going to be weird.
What Is DIY Photogrammetry?
DIY photogrammetry is the process of capturing a series of overlapping photos around an object, room, landscape, or structure, then using software to convert those images into a 3D model. It is related to professional reality capture methods used in archaeology, architecture, geoscience, museums, game development, and digital preservation. However, the DIY version focuses on affordable tools and practical workflows.
Instead of projecting laser lines or structured light onto a subject, photogrammetry depends on photographs. The software identifies matching featurescorners, scratches, wood grain, stone texture, printed patterns, fabric detailsand calculates how those features shift from one camera angle to another. With enough good images, it can infer the object’s shape surprisingly well.
Common Uses for DIY 3D Scanning
DIY photogrammetry is useful for hobbyists and professionals alike. A maker might scan a broken plastic knob to recreate it in CAD. A game artist may capture realistic rocks, tree bark, or props for a digital environment. A small business could make interactive 3D product previews. A teacher might digitize classroom objects for online lessons. A museum volunteer could document artifacts for research and public access. Even home renovators can scan a room corner before planning built-ins, although measuring twice is still recommended unless you enjoy surprise carpentry.
How Photogrammetry Turns Photos Into a 3D Model
The technical pipeline sounds intimidating, but the basic idea is manageable. First, you photograph the subject from many angles. Second, the software aligns the photos by matching shared details. Third, it creates a sparse point cloud, then a denser point cloud. Fourth, it builds a mesh, which is the polygon surface of the 3D model. Finally, it creates a texture map from the original photos so the model looks like the real object.
Most photogrammetry apps hide much of this complexity behind buttons such as “Align,” “Reconstruct,” “Mesh,” “Texture,” or “Export.” Still, understanding the pipeline helps you troubleshoot. If the software cannot align images, your photos may not overlap enough. If the mesh looks melted, the object may be shiny or featureless. If the texture looks muddy, you may need sharper close-up photos or better lighting.
The Gear You Need for DIY Photogrammetry
You do not need a Hollywood VFX budget. A basic DIY photogrammetry kit can be surprisingly humble:
Camera or Smartphone
A modern smartphone can work well for small objects, especially if it captures sharp images with consistent exposure. A DSLR or mirrorless camera gives more control over focus, aperture, shutter speed, and image quality. The most important rule is consistency. Avoid changing zoom, exposure, white balance, or focus halfway through the shoot unless you want your software to stare at your photo set like it just found a tax form in ancient Greek.
Tripod or Stable Handheld Setup
A tripod helps with sharpness, especially indoors. For small objects, you can either move the camera around the object or place the object on a turntable and rotate it. Moving the camera is often safer for photogrammetry because the background changes naturally with perspective. A turntable can work, but the background must be controlled carefully so the software understands what is moving and what is not.
Lighting
Soft, even lighting is a secret weapon. Harsh shadows create inconsistent features, while reflections confuse the reconstruction. Use diffused lamps, softboxes, a light tent, or indirect daylight. Avoid direct sunlight, glossy glare, and changing light conditions. If a cloud keeps photobombing your shoot, wait for stable light.
Background and Surface
A matte, textured background helps the software identify camera movement. For objects, a neutral surface is helpful, but avoid pure white or pure black if the object blends into it. If the subject is small and plain, adding coded markers or a textured mat around it can improve alignment.
Computer and Software
Photogrammetry can be demanding. High-resolution images produce better detail but require more memory and processing time. Popular options include RealityCapture/RealityScan, Meshroom, Metashape, Polycam, KIRI Engine, Autodesk tools, and Apple Object Capture on supported devices. Blender is often used after reconstruction for cleanup, retopology, decimation, scaling, and export preparation.
Choosing the Right Subject
Some objects are photogrammetry supermodels. Others are chaos wearing a disguise. Good subjects have visible surface texture, matte finishes, stable shapes, and enough detail for the software to match across images. Rocks, statues, shoes, carved wood, ceramics, tools, fossils, toys, and weathered objects often scan well.
Difficult subjects include clear glass, mirrors, glossy plastic, shiny metal, plain white objects, black objects with no visible detail, thin wires, hair, leaves moving in the wind, and anything that changes shape while you photograph it. Photogrammetry likes texture and consistency. It does not enjoy reflective chaos, transparent mysteries, or a houseplant doing interpretive dance in a breeze.
How to Capture Photos for a Strong 3D Scan
The capture stage determines most of your final quality. Software is powerful, but it cannot invent missing viewpoints or recover detail from blurry images. A reliable beginner workflow is to shoot in rings around the object: one ring at a low angle, one at mid-height, one above, and extra close-ups for important details. Maintain generous overlap between photos so each image shares plenty of visual information with the next.
Step 1: Prepare the Object
Clean dust, remove distracting loose items, and place the object on a stable surface. If the object is shiny, you may need to reduce reflections with diffused lighting. For non-valuable objects, some advanced users apply removable matte spray, but beginners should be careful with delicate, collectible, or historic items.
Step 2: Lock Camera Settings
Use consistent exposure, focus, and white balance. On a phone, tap and hold to lock focus and exposure if your camera app supports it. On a dedicated camera, use manual mode when possible. A narrow enough aperture helps keep the object in focus, but avoid settings that force slow shutter speeds and cause blur.
Step 3: Shoot With Overlap
Move around the object slowly, taking photos every few degrees. For a small object, 80 to 150 photos is a reasonable starting range. Complex objects may need more. For room-scale or outdoor scans, overlap becomes even more important because the software must connect larger spaces and varied distances.
Step 4: Capture Top and Bottom Angles
Many beginner scans look great from the front and terrible underneath, like a movie set with only one finished wall. Capture high and low angles so the model has enough information around edges, overhangs, and recesses. If you need the underside, scan the object in two positions and merge or clean the model later.
Step 5: Review Before Processing
Delete blurry, dark, duplicate, or badly framed photos before importing. A smaller set of sharp, consistent photos is usually better than a giant pile of visual soup. Check that every major surface appears in multiple images.
Processing the Scan
Once the photo set is ready, import it into your chosen photogrammetry software. The exact buttons vary, but the workflow is usually similar: align photos, build dense data, create mesh, generate texture, clean errors, and export.
Alignment
Alignment is where the software estimates camera positions. A good result shows cameras arranged around the subject in a logical pattern. If many images fail to align, the photo set may lack overlap, include blur, contain moving shadows, or show a subject that is too reflective or featureless.
Mesh Generation
The mesh turns points into a surface. High-detail meshes can be huge, sometimes millions of polygons. That is useful for preservation and detailed rendering, but too heavy for games, websites, or mobile AR. After reconstruction, you may need to simplify or decimate the mesh while preserving shape.
Texturing
Texturing gives the model its realistic appearance. Good textures come from sharp, well-lit images. If the geometry is decent but the texture looks blurry, consider taking closer photos or increasing texture resolution during export.
Cleaning and Optimizing the Model
Raw photogrammetry models often include extra background pieces, floating triangles, holes, rough surfaces, and lumpy edges. This is normal. The first scan is rarely a museum-ready masterpiece. It is more like dough before baking: promising, but not yet a cookie.
Use tools such as Blender, MeshLab, RealityCapture, or your app’s built-in editor to remove unwanted geometry, fill holes, smooth rough areas, simplify polygon count, and set the model scale. For 3D printing, the model should be watertight, correctly scaled, and free of non-manifold geometry. For real-time web or game use, focus on lower polygon counts, clean UVs, compressed textures, and efficient file formats such as glTF or GLB.
Common DIY Photogrammetry Problems and Fixes
The Model Looks Melted
This usually happens when the software cannot understand the surface. Add more photos, improve lighting, avoid reflections, and make sure the object has visible texture. Featureless objects may need temporary markers or a more advanced scanning method.
Only Half the Object Appears
You probably missed angles. Shoot full rings around the object, including high and low passes. Do not assume the software knows what the hidden side looks like. It does not have imagination; it has math.
The Texture Looks Blurry
Use sharper images, better focus, closer detail shots, and higher texture settings. Avoid motion blur and low-light noise. Clean the camera lens too. Yes, the tiny fingerprint on your phone camera can sabotage a scan like a villain in a spy movie.
The File Is Too Large
Decimate the mesh, reduce texture size, remove hidden geometry, and export in a practical format. A 300-million-triangle scan may impress your computer for three seconds before it begins sounding like a leaf blower.
DIY Photogrammetry vs. Other 3D Scanning Methods
Photogrammetry is not the only way to capture 3D data. Structured light scanners project patterns onto an object and measure distortion. LiDAR uses laser-based distance measurements and is excellent for larger spaces, landscapes, and architecture. Smartphone depth sensors can be fast and convenient, though they may produce lower detail for small objects.
Photogrammetry’s main strengths are affordability, high-quality texture, flexible scale, and accessibility. Its weaknesses include difficulty with shiny or transparent surfaces, longer processing times, and dependence on photo quality. For many DIY creators, the tradeoff is worth it because the entry cost is low and the results can be excellent with practice.
Best Practices for Better Results
For stronger 3D scans, remember the golden rules: use soft light, keep settings consistent, shoot sharp images, maintain generous overlap, capture all angles, avoid reflective surfaces, and clean your model after processing. Work methodically. Take test scans. Change one variable at a time so you know what improved the result.
Also, think about the final use before scanning. A model for 3D printing needs clean geometry. A model for an online store needs efficient loading and appealing texture. A model for cultural documentation needs careful metadata, scale references, and original photo preservation. A model for a game may need retopology and baked maps. The same scan can serve different goals, but only if you plan ahead.
Example DIY Workflow: Scanning a Small Ceramic Mug
Imagine you want to scan a handmade ceramic mug. The mug has a matte glaze, visible ridges, and a slightly uneven rimgreat texture for photogrammetry. You place it on a textured mat near a window with indirect daylight and add a diffuser to soften shadows. You lock exposure and focus on your phone, then take 120 photos: 40 around the middle, 40 from a higher angle, 30 from a lower angle, and 10 close-ups of the handle and rim.
After importing the images, the software aligns most of them. You remove a few blurry shots, rebuild the mesh, and generate a texture. The first model includes part of the mat, so you trim it. The handle has a small hole in the geometry, so you fill and smooth it in Blender. Finally, you decimate the mesh for web viewing and export a GLB file. Congratulations: your mug is now digital, and it did not even complain about being photographed 120 times.
Extra Experience Notes: What DIY Photogrammetry Teaches You in Practice
The biggest lesson from 3D scanning via DIY photogrammetry is that the camera is only half the story. Beginners often assume that buying a better camera will instantly produce better scans. It can help, but technique matters more. A careful phone photo set can outperform a sloppy mirrorless camera shoot. The real skill is learning how the software “sees” the world: it wants recognizable details, steady exposure, overlapping viewpoints, and surfaces that behave predictably.
One practical experience is that lighting should be boringin the best possible way. Dramatic shadows may look beautiful in photography, but they create problems in photogrammetry because the shadow becomes part of the surface information. If the shadow changes from image to image, the software may treat it like a feature that moved. Soft, even, unchanging light is less glamorous, but it produces cleaner scans. Your goal is not to win a moody portrait contest for a rock. Your goal is to give the software dependable visual data.
Another lesson is that scanning small objects often requires more patience than expected. Tiny details, shiny edges, and underside geometry can become trouble spots. When scanning a figurine, for example, facial features may reconstruct well, while thin fingers, hair strands, or glossy accessories turn into lumpy artifacts. The fix is usually a combination of closer photos, better angles, and realistic expectations. Photogrammetry is powerful, but it is not magic. It cannot perfectly reconstruct surfaces it cannot see.
Background control is also more important than many beginners realize. A cluttered background can help alignment, but it can also become accidental geometry. A plain background can look clean, but it may not provide enough visual reference. A good compromise is a matte surface with subtle texture or markers placed around the subject. If you use a turntable, keep in mind that the object moves while the room stays still, which can confuse some workflows unless the background is masked or controlled.
File management becomes another quiet hero. A single project may include original images, processed files, mesh exports, texture maps, cleanup versions, and final optimized models. Name folders clearly. Keep the raw photos. Save versions before major edits. Nothing builds character like deleting a “bad” file and realizing it was the only version with the clean handle, correct scale, and texture that did not look like oatmeal.
Finally, every scan teaches you something. The first attempt might be rough. The second will be better because you notice blur. The third improves because you fix lighting. The fourth works because you finally stop rushing the capture. DIY photogrammetry is part photography, part geometry, part digital cleanup, and part humble negotiation with reality. Once it clicks, it becomes addictive. Suddenly every interesting object looks like a future 3D model, and your friends may need to stop you from saying, “Hold still, this would scan beautifully.”
Conclusion
3D scanning via DIY photogrammetry gives creators a practical bridge between the physical and digital world. With a camera, consistent lighting, overlapping photos, and the right software, you can transform real objects into textured 3D models for printing, design, education, games, archiving, and online experiences. The process is accessible, but it rewards patience and planning. Sharp photos, matte surfaces, complete coverage, and clean post-processing make the difference between a professional-looking scan and a digital potato wearing a texture map.
Whether you are scanning a sculpture, a shoe, a fossil, a handmade mug, or a weirdly photogenic garden rock, the workflow is learnable. Start small, test often, and treat mistakes as data. Photogrammetry is not just about making 3D models; it is about learning to observe objects from every angle. And yes, after a few successful scans, you may never look at a textured brick wall the same way again.
Note: This article is prepared for web publishing in standard American English and is based on real photogrammetry practices, current software workflows, and widely used 3D scanning principles.


