Table of Contents >> Show >> Hide
- Before You Adjust Anything: A 60-Second Reality Check
- Way #1: Center the Caliper (The “Stop the Rub” Alignment Fix)
- Way #2: Set Pad Clearance and Lever Feel (Mechanical Tuning + Hydraulic Reset)
- Way #3: Fix Rotor Issues and Noise (True the Rotor, Clean Contamination, Bed-in Pads)
- Quick Troubleshooting: What Your Disc Brakes Are Trying to Tell You
- Conclusion: Three Fixes, One Quiet Bike
- of Real-World Disc Brake “Experience” (a.k.a. The Stuff Riders Actually Run Into)
Disc brakes are amazing right up until they start singing you the Song of Their Peopleusually at the exact moment you’re trying to roll quietly past a sleeping neighborhood, a skittish deer, or your ex’s house. (Not judging. Just… pedal faster.)
The good news: most disc brake problems come down to a few small adjustments, not dark magic. Whether you’ve got mechanical (cable-actuated) disc brakes or hydraulic ones, you can usually fix rubbing, weak bite, or mushy lever feel with three practical moves: center the caliper, set pad clearance/lever feel, and correct rotor issues + finish with clean bedding-in.
Before You Adjust Anything: A 60-Second Reality Check
A lot of “my bike disc brakes are rubbing” cases aren’t actually “bad brakes.” They’re “the wheel isn’t seated the same way it was yesterday” problems. So do this quick check firstit saves time and prevents you from adjusting your brake to match a crooked wheel.
1) Make sure the wheel is fully seated
If you removed the wheel recently (flat tire, car rack, dramatic parking-lot dismount), reseat it carefully. For quick-release axles, close the lever with firm resistance. For thru-axles, snug them properly. A slightly mis-seated wheel can shift the rotor just enough to cause ruband no amount of caliper fiddling will make that “go away” reliably.
2) Look for obvious rotor rub vs. “one-spot” rub
- Constant rub (shhhk-shhhk the whole rotation) usually points to caliper alignment.
- Rub in one spot (shhhk… silence… shhhk) often means a slightly bent rotor.
3) Clean the braking surfaces (yes, even your “clean” bike)
Oil contamination is the fastest way to turn powerful disc brakes into dramatic noisemakers. Keep lube, grease, sunscreen, and finger oils off pads and rotors. If you touched anything you shouldn’t have, wipe rotors with rubbing alcohol and use clean rags. If pads got contaminated, you may need to clean and lightly scuff them (very gently) and re-bed them.
4) Don’t squeeze hydraulic levers with the wheel removed
Hydraulic systems self-adjust as pads wear, which is great… until you pull the lever with no rotor between the pads. The pistons can creep inward and reduce clearance. If that happened, don’t panicWay #2 covers how to reset pistons/pad gap.
Tools that make life easier
- 4/5mm hex keys (or what your caliper bolts use)
- Clean rags + isopropyl (rubbing) alcohol
- A business card (seriously) or thin cardboard
- Optional: torque wrench, rotor truing tool/fork, pad spreader or plastic tire lever
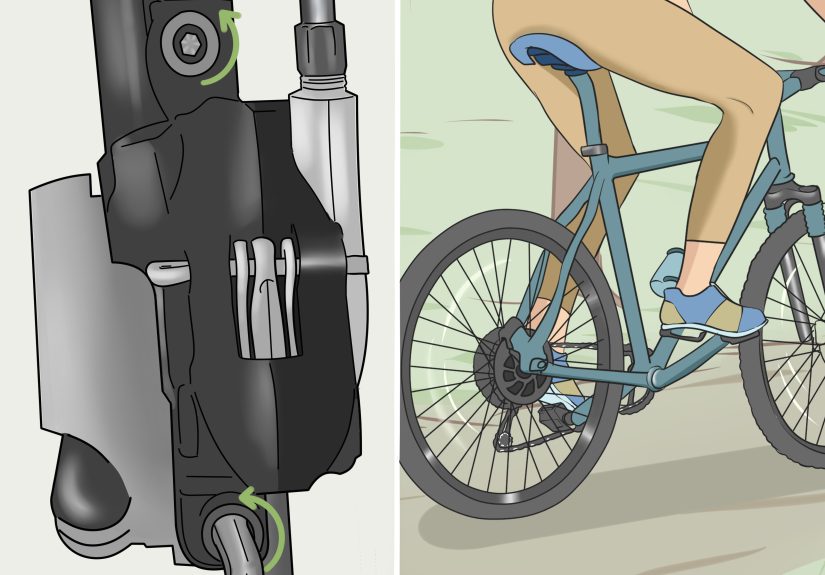
Way #1: Center the Caliper (The “Stop the Rub” Alignment Fix)
If your rotor is rubbing and everything looks “mostly straight,” the caliper is probably just a hair off-center. This is the most common disc brake adjustment, and it fixes a large chunk of issuesespecially after wheel removal.
Step-by-step: the classic center-and-tighten method
- Loosen the caliper mounting bolts just enough that the caliper can move side-to-side. Don’t remove them. Think “wiggle,” not “free fall.”
- Squeeze and hold the brake lever so the pads clamp the rotor and (usually) center the caliper.
- While holding the lever, tighten the mounting bolts evenly. Alternate between bolts so the caliper doesn’t “walk” to one side.
- Release the lever and spin the wheel. Listen and look for rub.
If your caliper “moves when you tighten” (annoying but common)
Some calipers love to shift slightly as you bring bolts to final torque. If the squeeze-and-tighten method gets you close but not perfect, do the “micro-nudge” version:
- Loosen bolts slightly again (just enough to nudge).
- Spin the wheel and look through the caliper at the pad-to-rotor gaps.
- Nudge the caliper a tiny bit away from the rubbing side.
- Snug bolts gradually while re-checking the gap.
Pro tip: shine a small light behind the caliper or hold a piece of white paper behind it to make the gaps easier to see.
The business card trick (for extra-stubborn alignment)
If the pads clamp the rotor but still end up slightly off, slip a business card (or thin cardboard) between the rotor and one pad while you center and tighten. Some shops recommend this to help “bias” the caliper into a cleaner middle positionespecially on finicky setups.
Mechanical vs. hydraulic: why centering feels different
On many mechanical disc brakes, one pad moves more than the other. That can make the squeeze-and-tighten method less “automatic,” because the rotor may get pushed toward the fixed pad. If your mechanical brake has pad adjusters on both sides (common on some models), you can temporarily bring both pads closer for alignment, then back off to your preferred clearance after everything is centered.
When to stop and reassess: If centering doesn’t reduce rub at all, you likely have a bent rotor, sticky pistons, or a wheel seating/axle issue. Don’t keep “adjusting harder.” That’s how people end up with perfectly aligned calipers… on perfectly misaligned rotors.
Way #2: Set Pad Clearance and Lever Feel (Mechanical Tuning + Hydraulic Reset)
Once the caliper is centered, your next job is getting the lever feel you want: not too close to the bar, not too far out, and not “spongy.” This is where mechanical and hydraulic systems take different pathslike siblings who grew up in the same house and chose wildly different careers.
2A) Mechanical disc brakes: dial in pad clearance and cable tension
Mechanical disc brakes typically give you two adjustment zones: pad position (at the caliper) and cable tension (at the barrel adjuster or cable clamp).
Step-by-step mechanical adjustment
- Check pad wear first. If pads are worn thin, you’re “adjusting” a problem that needs replacing. Some guidance suggests replacing pads when total thickness gets too low (including backing plate), so inspect carefully.
- Set the “fixed” pad (often the inner pad) closer to the rotor until it’s just shy of rubbing. If you can’t get close without rub, your rotor may not be true (Way #3).
- Set the moving pad using the outer adjuster or by cable tension so the brake engages with a firm, controlled lever pull.
- Fine-tune with the barrel adjuster at the lever (or caliper) to remove slack. Go in small increments (quarter-turns) and re-test.
A practical “feel” target: your lever shouldn’t smash into the handlebar before you get real braking power. If it does, you likely need more pad/cable adjustment or you’ve got cable stretch/friction. Keeping cable systems clean and moving freely mattersjust keep lubricant far away from pads and rotors.
Common mechanical disc brake symptoms (and what they usually mean)
- Lever pulls too far: cable slack, worn pads, or sticky cable/housing.
- Brake is noisy + weak: contamination or pads too far from rotor.
- Rubs only when cornering: wheel flex, loose axle, or rotor slightly out of true.
2B) Hydraulic disc brakes: reset pistons/pad gap and fix spongy feel
Hydraulic disc brakes generally self-adjust pad spacing as pads wear, so you usually won’t find pad “dials” on the caliper. If your hydraulic brake is rubbing or the lever feels off, it’s often because the pistons didn’t retract evenly, the pad gap got reduced, or there’s air in the system.
Hydraulic piston reset (the safe, no-drama version)
- Remove the wheel. (Yes, again. Bikes love repetition.)
- Remove the pads if your brake design allows easy pad removal. Keep pads clean and away from oils.
- Push pistons back slowly and evenly using a pad spreader or a plastic tire lever. Don’t use a screwdriver unless you enjoy buying new pistons and learning humility.
- Reinstall pads and wheel.
- Pump the lever a few times to bring pads back to working position.
- Re-center the caliper using Way #1 if needed.
Some manufacturers also describe using a pad spacer/block and controlled lever pulls to help equalize piston movement and restore pad gapespecially if the lever was squeezed without a rotor/spacer installed. The key idea is the same: reset the pistons, then re-establish proper clearance and alignment.
When you need a bleed (and when you don’t)
If the lever feels spongylike you’re squeezing a stress ball instead of a brakeair may be in the hydraulic line and a bleed is often the correct fix. If the lever is firm but you still have rub, focus on piston reset, caliper centering, and rotor trueness before you jump to bleeding.
Quick safety note: hydraulic systems use specific fluids (DOT or mineral oil depending on brand). Don’t mix fluids, and don’t guess. If you’re not sure, a bike shop bleed is cheaper than “learning by destroying.”
Way #3: Fix Rotor Issues and Noise (True the Rotor, Clean Contamination, Bed-in Pads)
If you’ve centered the caliper and set pad clearance, but you still get that once-per-rotation rub, your rotor may be slightly bent. And yes, a rotor can be bent by things as technical as “a crash”… or as sophisticated as “someone leaned the bike against a wall.”
3A) Diagnose: is it rotor warp or caliper alignment?
Spin the wheel and watch the rotor pass through the caliper. If the gap opens and closes at a specific point, the rotor likely needs truing. Even a small wobble can keep you from setting pads close enough without rub.
3B) True a slightly bent rotor (gentle is the whole strategy)
- Find the rub spot by spinning the wheel slowly and listening/looking.
- Mark the area with a bit of tape on the spoke or a mental note (whichever you trust more).
- Use a rotor truing tool/fork to nudge the rotor away from the pad it’s touching.
- Make tiny adjustments and re-check often. Rotors are not impressed by brute force.
If the rotor is badly bent (impact damage, deep wobble, visible kink), replacement is often smarter than trying to turn it back into a flat, happy circle.
3C) Kill the squeal: clean rotors/pads and remove the “mystery grease”
Squealing disc brakes are frequently caused by contamination. Rotors should be cleaned with rubbing alcohol and a clean rag. Pads can sometimes be salvaged by careful cleaning and light scuffing, but heavily contaminated pads may need replacement. Also check that rotor bolts are snugloose hardware can create vibration, noise, and a whole lot of false suspicion toward your caliper alignment.
3D) Bed-in (break-in) new pads like you mean it
New pads often need a proper break-in so the pad material transfers evenly to the rotor. Many brake manufacturers recommend a bedding-in process (a series of controlled accelerations and firm stops). The goal is consistent power and quieter brakingwithout glazing pads by dragging the brake endlessly down a hill.
- Find a safe, flat area with room to stop.
- Do multiple firm slow-downs from moderate speed (not full skid stops).
- Let brakes cool briefly between sets if they get hot.
Proper bedding-in is the difference between “wow, these brakes are buttery” and “why is my bike auditioning for a horror movie?”
Quick Troubleshooting: What Your Disc Brakes Are Trying to Tell You
“My disc brakes rub after I tighten the bolts.”
That’s the caliper drifting as you tighten. Try tightening bolts gradually and alternately, or use the business card trick in Way #1. Also confirm the wheel is seated consistently.
“My hydraulic pads seem too close and the wheel barely spins.”
Reset pistons (Way #2). This can happen after the lever is squeezed with the wheel removed. Push pistons back evenly, reinstall, and pump the lever to restore normal position.
“It rubs in one spot only.”
Classic rotor truing situation (Way #3). Tiny bend, tiny correction. If you have to bend it like you’re opening a stubborn jar, it’s probably too far gone.
“The lever feels spongy.”
Usually air in the hydraulic line. A bleed is often needed. If you’re not comfortable with brake fluid procedures, this is a great time to outsourcebecause brakes are a spectacularly bad place to practice confidence.
Conclusion: Three Fixes, One Quiet Bike
Most disc brake problems aren’t complicatedthey’re just picky. Start with the basics: a properly seated wheel and clean braking surfaces. Then:
- Way #1: Center the caliper to eliminate constant rub.
- Way #2: Set pad clearance and lever feel (mechanical tuning or hydraulic piston reset).
- Way #3: True the rotor, clean contamination, and bed-in pads for smooth, quiet power.
After any adjustment, do a slow test ride in a safe area and confirm the bike stops firmly. When in doubtespecially with hydraulic bleedingget help from a professional shop. Your future self (and your teeth) will be grateful.
of Real-World Disc Brake “Experience” (a.k.a. The Stuff Riders Actually Run Into)
Here’s the thing nobody tells you when you buy a bike with disc brakes: you’re also buying a tiny percussion instrument that lives near your hubs. It may not play all the time, but when it does, it’s rarely subtle. The most common story goes like this: you remove a wheel, reinstall it, spin it once, and suddenly your bike sounds like it’s shuffling a deck of angry playing cards. Nine times out of ten, nothing “broke.” The rotor simply isn’t sitting in the exact same spot it was before. A millimeter is enough to start a rubbecause disc brakes are basically precision devices pretending to be outdoor equipment.
Another frequent scenario: someone cleans their drivetrain like a champion and thenoopsoversprays degreaser or lube near the rotor. The ride afterward is loud, weak, and oddly dramatic. The fix is rarely “tighten everything.” It’s usually “clean everything that stops the bike,” then re-bed the pads. Riders also learn quickly that touching pads with bare fingers is a crime against quiet braking. Skin oils are sneaky, and pads don’t forgive easily. If your brakes start squealing right after you “just checked something,” you’ve probably already met the culprit. (Spoiler: it was you. It’s okay. We’ve all been the villain.)
Mechanical disc brakes have their own personality: they’re wonderfully adjustable, but they also broadcast cable problems loudly. A little cable stretch or housing friction turns into a lever that creeps closer to the bar over a few rides. Many riders chase caliper alignment repeatedly when the real fix is simply taking up slack with the barrel adjuster and then dialing the pad adjusters back into a sensible gap. The best “experience-based” tip here is to adjust in tiny steps and re-test often. Mechanical brakes reward patience the way sourdough rewards people who enjoy waiting.
Hydraulic brakes, meanwhile, are the smooth-talking cousinsuntil they aren’t. They usually feel consistent for a long time, which can lull riders into ignoring pad wear. Because the lever doesn’t always move closer as pads thin, it’s easy to miss the “you should replace pads soon” window. And then one day the lever comes in farther than usual and it’s not a gentle suggestionit’s a last-minute warning. Checking pad thickness regularly prevents that. The other classic hydraulic moment is pulling the lever with the wheel out. The first time it happens, it feels like the bike is punishing you for curiosity. Resetting pistons fixes it, but it’s also a reminder: hydraulics are self-adjusting, and they’re very dedicated to that job.
Finally, rotor truing is where most riders discover their inner zen teacher. You can’t rush it. You nudge, you spin, you listen, you nudge again. The rotor slowly becomes quieter, and you realize the process is basically meditationexcept your mantra is “please stop rubbing, please stop rubbing.” Do it gently and you’ll get a quiet wheel. Do it aggressively and you’ll learn how much a replacement rotor costs. Either way, you gain wisdom. The quiet kind is cheaper.


