Table of Contents >> Show >> Hide
- Why leftover tile is DIY gold
- Before you start: a quick prep checklist
- 1) Tile coasters that look custom (and protect your furniture’s feelings)
- 2) A one-tile trivet or “hot dish parking spot”
- 3) A mosaic tabletop makeover (side table glow-up, no personality transplant required)
- 4) A tile-framed mirror that gives “boutique hotel” energy
- 5) A vanity tray or coffee table catchall (tile that finally gets invited to the party)
- 6) Plant saucers and drip trays (because water rings are not a decor style)
- 7) Wall art using tile like a mini gallery piece
- 8) A tiled backsplash “accent strip” or removable mini-splash zone
- 9) A handmade house number plaque or door-side sign
- 10) Garden stepping stones or path accents (mosaic, but make it outside)
- Common pitfalls (and how to avoid the “why is this sticky forever?” era)
- Conclusion: turn leftovers into “on purpose” decor
- Real-world DIY experiences: what you can expect (and why that’s a good thing)
- SEO Tags
If you’ve ever finished a tiling project and ended up with a small pile of “perfectly good” leftover tile, congratulations:
you now own the craft-world equivalent of extra guacamoletoo valuable to toss, too awkward to store, and somehow always
multiplying in the garage.
The good news? Leftover tile is basically pre-made decor material. It’s durable, easy to wipe clean, naturally heat- and
water-resistant, and it comes in colors and patterns that already look “designer” because… well, it was designed to be
on purpose. Below are ten genuinely useful (and surprisingly stylish) DIY decor ideas that help you repurpose leftover tile
into things you’ll actually want to display.
Why leftover tile is DIY gold
Tile has a few superpowers that craft supplies wish they had: it’s heavy enough to stay put, smooth enough to clean in one
swipe, and tough enough to survive real life. A tiny offcut can become a coaster. A handful of mismatched pieces can become
a mosaic that looks intentionally eclectic (the magic phrase is “Mediterranean-inspired,” said with confidence).
The key is matching the project to your tile type. Glazed ceramic is great for wipeable surfaces like coasters and trays.
Porcelain is especially durable. Natural stone is gorgeous but may need sealing depending on finish. And any tile with a
sharp cut edge should be sanded smooth or reserved for projects where edges are wrapped or framed.
Before you start: a quick prep checklist
- Sort by size and thickness: mixing thicknesses is fine for mosaics, less fun for “flat” projects like trays.
- Clean first: wash off dust; wipe with rubbing alcohol to remove oils so adhesives bond better.
- Soften sharp edges: lightly sand rough edges; aim for “touchable,” not “paper-cut deluxe.”
- Plan a dry layout: arrange pieces before glue or mortaryour future self will be emotionally grateful.
- Safety note: if cutting tile or using strong adhesives/epoxy, wear eye protection and work with adult supervision.
1) Tile coasters that look custom (and protect your furniture’s feelings)
A single 4×4 tile is practically begging to be a coaster. You can keep it minimalist (pretty tile + cork backing) or go full
personality with decoupage, photos, maps, or scrapbook paper sealed on top.
What you’ll need
- 4-inch tiles (or any small tile)
- Felt or cork pads for the bottom
- Decoupage medium (optional) + foam brush
- Clear sealer (spray or brush-on) if needed
How to do it
- Clean tile thoroughly and let it dry.
- If adding paper/art: cut to size, apply a thin coat of decoupage medium, press flat, and seal with additional coats.
- Add felt/cork to the bottom to prevent scratching and stop coaster “table skating.”
- Let everything cure fully before use (especially if sealing).
Make it look expensive
Create a set that matches a room: use leftover backsplash tile for kitchen coasters, bathroom tile for a guest bath set, or
mix patterns intentionally (same color family, different prints) for a boutique look.
2) A one-tile trivet or “hot dish parking spot”
Tile is naturally heat-friendly, which makes it ideal for trivets. One larger tile can work solo; smaller tiles can be
grouped and framed. Add little rubber feet and you’ve got instant countertop protection.
What you’ll need
- One large tile (or several small ones)
- Heat-safe feet (silicone bumpers or rubber feet)
- Optional: a simple wood frame if using multiple pieces
How to do it
- Sand any sharp edges.
- Stick on feet so the tile doesn’t trap heat directly on your counter.
- If using multiple tiles, mount them in a shallow frame and keep small gaps for grout (optional).
Make it look expensive
Use a single statement tile (bold pattern, handmade look) and treat it like functional art. It’s basically a tiny countertop mural.
3) A mosaic tabletop makeover (side table glow-up, no personality transplant required)
Got a tired little table? Tile can upgrade it into something that looks collected and charming. This is where “leftover” turns
into “I found this at a fancy vintage market,” even if you found it in your own hallway.
What you’ll need
- Small table or tabletop board
- Tile adhesive or mortar appropriate for the surface
- Grout + grout float (optional but recommended for mosaics)
- Sealer (especially for grout or porous tile)
How to do it
- Dry-fit your layout first; use spacers if you want even grout lines.
- Apply adhesive with a notched spreader for an even bed.
- Press tiles in, keeping consistent gaps.
- After curing, grout, wipe haze off gently, and seal if needed.
Make it look expensive
Choose one “hero” tile pattern and surround it with simpler solids. That contrast reads intentional (and saves you from a
chaos mosaic unless chaos is your brand).
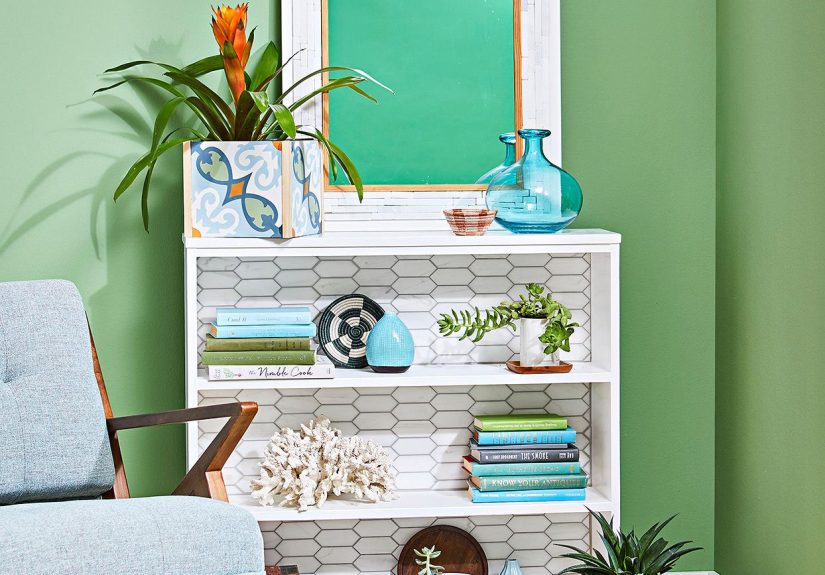
4) A tile-framed mirror that gives “boutique hotel” energy
Mirror frames can be wildly overpriced for what they are: a reflective rectangle wearing jewelry. Leftover tile makes great
“jewelry,” especially mosaic sheets, small subway tiles, or colorful offcuts.
What you’ll need
- Basic mirror
- Tile (small pieces work best)
- Strong adhesive suitable for tile + your mirror frame material
- Optional: grout for a classic mosaic finish
How to do it
- Lay tile pieces around the mirror to plan spacing and corners.
- Adhere tiles to the frame (not directly on the mirror’s reflective area).
- Grout if desired, then clean carefully and let cure.
Make it look expensive
Use a limited palette: two neutrals plus one accent color. It looks curated, not “I dropped a sample box and called it art.”
5) A vanity tray or coffee table catchall (tile that finally gets invited to the party)
Tile is perfect for trays because it’s wipeable and water-friendly. Create a tiled base inside a thrifted tray or build a
simple wood frame around a few tiles. Bonus: it makes everyday clutter look intentional.
What you’ll need
- Old tray or shallow wood frame
- Tile pieces (flat is best)
- Adhesive
- Optional: grout for mosaics
How to do it
- Measure the tray base and dry-fit tile.
- Glue tiles down; grout if using small pieces.
- Seal grout if the tray will face splashes (bathroom, bar cart, plant zone).
Make it look expensive
Pair glossy tile with matte wood, or matte tile with shiny brass handles. Mixing finishes = instant design credibility.
6) Plant saucers and drip trays (because water rings are not a decor style)
If you have a few sturdy tiles, you can protect shelves and windowsills from plant drips without buying new saucers. A large
tile can sit under a pot as-is. Multiple tiles can be grouped into a bigger “plant runway.”
What you’ll need
- One large tile or several medium tiles
- Felt pads (optional, for delicate surfaces)
- Silicone caulk (optional, to “seal” seams if combining tiles)
How to do it
- Choose tiles that are flat and stable.
- Add pads to the bottom if the surface scratches easily.
- If using multiple tiles, keep them in a shallow frame or seal seams so water doesn’t sneak through.
Make it look expensive
Use the same tile under a trio of pots for a “styled” shelf moment. Suddenly your plants look like they have an interior designer.
7) Wall art using tile like a mini gallery piece
Sometimes a tile is already artworkespecially patterned cement-look tile, Moroccan-inspired prints, or hand-painted designs.
Frame one tile like a print, or arrange a grid of small tiles for a graphic wall display.
What you’ll need
- A decorative tile (or a set)
- Shadow box frame or deep picture frame
- Strong mounting adhesive (or frame backing supports)
How to do it
- Test-fit tile depth in the frame.
- Secure the tile so it can’t shift (especially if hanging).
- Hang with hardware rated for the weight.
Make it look expensive
Go oversized with a single statement tile in a wide mat. It reads like a gallery installation, not a leftover.
8) A tiled backsplash “accent strip” or removable mini-splash zone
If you have just a few tiles left from a backsplash, you can still use them as a deliberate accent: a narrow strip over the
stove, a coffee station splash guard, or a small wet-zone behind a bathroom sink (where local rules and surfaces allow).
Even a tiny tiled panel can protect paint in high-splash areas.
What you’ll need
- Matching leftover tiles
- Backer board (if making a removable panel)
- Adhesive suited to the surface + optional grout
How to do it
- Decide whether this is permanent or a removable panel.
- For a panel: mount tiles to a board, grout, then place it where needed.
- Seal grout for easy wipe-down if it’s near water or cooking.
Make it look expensive
Treat it like an intentional “feature band.” Use a contrasting tile (same tone, different texture) for subtle designer vibes.
9) A handmade house number plaque or door-side sign
Leftover tile is weather-friendly in spirit, but outdoor success depends on using exterior-rated adhesive/grout and sealing
properly. The payoff is huge: a house number sign that looks custom and makes delivery drivers love you.
What you’ll need
- Flat board backing (exterior-rated if outdoors)
- Tile pieces
- Outdoor-safe adhesive + grout
- Number decals, stencils, or pre-made metal numbers
How to do it
- Create a layout that leaves clear space for the numbers.
- Attach tiles, grout, and let cure fully.
- Add numbers and seal for weather resistance.
Make it look expensive
High-contrast numbers (black on light, white on dark) look crisp and modernand they’re practical from the street.
10) Garden stepping stones or path accents (mosaic, but make it outside)
This is the big, satisfying project for scraps: embed leftover tile into stepping stones or pavers. It’s a classic way to
use odd shapes and broken pieces while creating something cheerful for a garden path.
What you’ll need
- Stepping stone form or pre-made concrete pavers
- Tile pieces (avoid razor-sharp edges)
- Mortar/thinset suitable for outdoors
- Sealant (optional, depending on materials)
How to do it
- Plan a simple design: spirals, sunbursts, initials, or an easy border.
- Press tile into mortar/concrete at an even depth.
- Let cure fully before placing outdoors.
Make it look expensive
Keep the palette tightgreens and whites for a garden feel, or black/white for modern. One cohesive scheme looks intentional.
Common pitfalls (and how to avoid the “why is this sticky forever?” era)
- Wrinkled paper under decoupage: use a thin, even coat and press gently from center outward.
- Grout haze that won’t quit: wipe with a barely damp sponge in light passes; don’t flood the surface.
- Tiles popping off later: rough glossy surfaces lightly and choose an adhesive suited to the materials.
- Wobbly mosaics: keep thicknesses similar for flat projects or frame the mosaic to hide uneven edges.
- Outdoor heartbreak: use exterior-rated mortar/adhesive, let it cure fully, and seal if recommended.
Conclusion: turn leftovers into “on purpose” decor
Leftover tile doesn’t have to live in a dusty box labeled “SOMEDAY.” With a little planning, it becomes decor that’s durable,
giftable, and frankly kind of impressive. Start small with coasters or a trivet, then level up to trays, mirrors, and
tabletops when you’re ready. Your space gets more personalityand your tile stash finally stops auditioning for a long-term
storage unit.
Real-world DIY experiences: what you can expect (and why that’s a good thing)
Most people go into leftover tile projects thinking the hard part is the “crafting.” In reality, the most memorable moments
happen before you ever open a glue bottle: you’ll spend ten minutes admiring the tile you forgot you had, five minutes trying
to remember the name of that pattern (“Was it ‘Coastal Fog’ or ‘Mystery Greige’?”), and an impressive amount of time just
arranging pieces like you’re directing a tiny stage play.
The first hands-on lesson is usually about layout. Dry-fitting feels optional until you skip it oncethen you
discover your “simple border” needs one extra tile you do not have. The fix is almost always easy: rotate pieces, widen grout
lines slightly, or turn the missing spot into a feature (a small blank space for a hook, a number, or a painted detail). Many
DIYers end up liking the revised plan more because it looks less rigid and more handmade.
Next comes the adhesive learning curve. You’ll notice quickly that tile is honest: if the surface is dusty or
oily, it will not bond well, and it will not pretend otherwise. A quick alcohol wipe can be the difference between “solid and
satisfying” and “why is this corner lifting like it’s waving hello?” If you’re working with glossy tile, lightly scuffing the
back can help, too. This part feels fussy, but it’s where a project goes from temporary craft to real decor.
If you try grout for the first time, expect two emotions: confidence while spreading it, and mild panic when everything looks
cloudy. That “cloudy” stage is normalgrout haze happens, and it usually wipes off with gentle passes once the grout starts to
firm up. People often describe the moment the haze clears as the “reveal,” because suddenly your colors sharpen and the design
looks finished. It’s also when you realize mosaics are basically magic: messy five minutes ago, gorgeous now.
Another common experience is discovering that tile projects are surprisingly giftable. Coasters made from the
same tile as your kitchen backsplash feel personal without being overly sentimental. A trivet with a bold patterned tile looks
like something you’d buy in a boutique. And a tiled tray turns “I don’t know what to get them” into “I made you something
practical that also looks expensive.”
Finally, there’s the quiet win: leftover tile decor tends to hold up. You wipe it clean. It doesn’t warp. It
doesn’t stain easily. And when you see it in daily useunder a plant, on a coffee table, near the sinkyou get that satisfying
feeling that you made something real, not just “cute.” The best part? You’ll start looking at future leftovers differently:
not as clutter, but as a stash of tiny design opportunities waiting for their moment.


