Table of Contents >> Show >> Hide
- What Deadheading Is (and Why It Works)
- Before You Start: A 60-Second Prep That Saves Headaches
- The Simple 5-Step Deadheading Method
- Where to Cut: A Quick “Cheat Sheet” That Prevents Awkward Stems
- Deadheading by Flower Type (Because Flowers Refuse to Be Consistent)
- Specific Examples: Exactly How to Deadhead Popular Garden Flowers
- When You Should NOT Deadhead (Yes, Sometimes “Do Nothing” Is Correct)
- Troubleshooting: “I Deadheaded… Why Isn’t Anything Blooming?”
- A Simple Weekly Routine That Keeps You From Getting Overwhelmed
- Conclusion
- Real-World Experiences: What Gardeners Notice After Deadheading Consistently (Plus a Few Lessons Learned)
Deadheading sounds like something a medieval knight would do to an enemy, but in the garden it’s a kindness.
You’re simply removing spent blooms so plants stop wasting energy on seed-making and start doing what you actually
invited them to do: bloom again, look tidy, and keep your beds from turning into a crunchy brown confession.
The best part? Deadheading is one of those rare chores that’s both quick and weirdly satisfying. It’s like giving
your flowers a haircut and watching them immediately feel better about themselves. (Same, honestly.)
What Deadheading Is (and Why It Works)
Deadheading is the removal of faded flowers (and sometimes part of the stem) after the bloom is past its prime.
Many flowering plants naturally shift into seed production once pollination happens. When you remove the spent bloom,
you often interrupt that “mission accomplished” signal, which can encourage more buds and extend the bloom period.
Not every plant will rebloom from deadheading, but many will:
annuals like zinnias and marigolds, repeat-blooming perennials like coreopsis,
and many roses are classic examples. Even when deadheading doesn’t cause more blooms, it can
improve appearance, reduce unwanted self-seeding, and help keep plants healthier by improving airflow and removing
decaying petals.
Before You Start: A 60-Second Prep That Saves Headaches
Grab the right tool
- Fingers for soft stems (petunias, some geraniums, many annuals).
- Snips or small scissors for clean, precise cuts in containers and dense borders.
- Bypass pruners for thicker stems (roses, woody perennials, flowering shrubs).
Keep it clean
Use sharp, clean tools. Dull blades crush stems and leave ragged wounds. If you’re working around disease
(powdery mildew, botrytis, black spot), wipe blades between plants with rubbing alcohol or a disinfecting wipe.
It’s not glamorous, but neither is spreading fungus like it’s a party favor.
Know your goal
Ask one quick question before each cut:
“Do I want more blooms, or do I want seeds/seedheads for wildlife, saving seed, or winter interest?”
Your answer changes everything.
The Simple 5-Step Deadheading Method
Here’s the repeatable, no-drama routine that works for most garden flowers:
Step 1: Spot the “done” bloom
Look for petals that are browning, wilting, dropping, or turning papery. Some flowers change color as they fade
(think: bright to dull, crisp to crumpled). If you see a seed pod forming behind the bloom, you’re definitely on
the right target.
Step 2: Follow the flower down to the next “decision point”
Slide your fingers down the flower stem until you find one of these:
a leaf pair, a side shoot with a bud, or a node (a little bump where new growth can emerge).
That’s where you usually want to cut.
Step 3: Cut (or pinch) just above healthy growth
Make your cut slightly above a leaf, bud, or side shootclose enough that you won’t leave a sad little stick
waving in the breeze, but not so close that you damage the bud. For soft stems, pinch off the spent bloom and
its little stalk with your fingernails.
Step 4: Remove the whole stalk when the plant blooms on spikes or clusters
If a flower grows on a tall spike or cluster (salvia, snapdragons, delphinium, many garden phlox),
you often remove the spent portion down to where you see new side buds or the first strong set of leaves.
When the entire stalk is finished and no new buds are forming, take the whole stalk back to the base.
Step 5: Clean up and reset
Collect the spent blooms. If they’re disease-free, compost them. If they’re moldy, slimy, or covered in fungus,
toss them in the trash (or your municipality’s green waste program if accepted). Then step back and admire the
fact that your garden looks 10% more intentional with about 2% effort.
Where to Cut: A Quick “Cheat Sheet” That Prevents Awkward Stems
Rule of thumb
For most repeat bloomers, deadhead back to the first set of healthy leaves or a visible bud/side shoot.
This keeps the plant tidy and encourages new growth where it’s strongest.
Three common patterns
- Single bloom on a stem: cut the bloom off with a short section of stem, ideally above a leaf node.
- Multiple blooms on a stalk/spike: remove the spent portion down to a side bud or leaf set; remove the whole stalk when finished.
- Stemless flower heads (or very short stems): snip/pinch the flower head cleanly without damaging nearby buds.
Deadheading by Flower Type (Because Flowers Refuse to Be Consistent)
Daisy-type flowers (coneflower, black-eyed Susan, daisies, coreopsis)
These often bloom from a central “disk” with petals around it. Once the petals fade, you can snip the flower head
back to a side bud or leaf. Some, like coreopsis, can rebloom heavily with frequent deadheading.
With coneflowers and rudbeckias, you might choose to leave some seedheads for birds and winter texture.
Flower spikes (salvia, snapdragon, delphinium, lupine)
Don’t chase each tiny spent floret individually (unless you enjoy unnecessary suffering).
When the spike starts fading, cut the stalk back to a strong leaf set or to a point where you see side shoots.
If the whole spike is finished and no new buds are forming, remove it at the base.
Cluster blooms (hydrangea, yarrow, garden phlox clusters)
Cluster bloomers vary. Some respond to deadheading with more flowering (certain perennials and annuals),
while othersespecially many hydrangeaswon’t reliably rebloom just because you removed an old flower head.
In those cases, deadheading is more about tidiness, shaping, and plant health than “instant new flowers.”
Self-cleaning annuals (some petunias, begonias, impatiens, modern hybrids)
Many newer varieties drop their spent blooms on their own. You can still “groom” them occasionally by removing
sticky or mushy spent flowers, trimming leggy stems, and encouraging branching. Think of it as a light
maintenance subscription rather than a full-time job.
Specific Examples: Exactly How to Deadhead Popular Garden Flowers
Roses
For repeat-blooming roses, remove spent flowers regularly to encourage more blooms and keep plants neat.
Where you cut depends on the rose type and growth stage, but a common approach is to cut the spent bloom back
above a healthy leaf set. Many gardeners use the “leaflet rule” on established roses (cutting back to a strong leaf)
to keep vigor and encourage solid regrowth.
Late in the season, consider stopping deadheading several weeks before your expected first frost so the plant can
slow down and, if you like, form hips for winter interest. A calendar cue some gardeners use is “after Labor Day,”
but your climate and rose type matter.
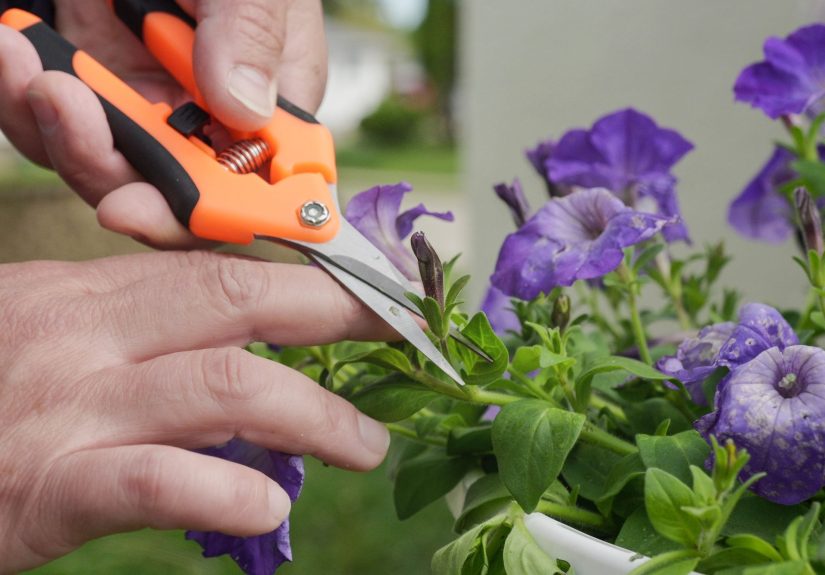
Petunias and calibrachoa
If they’re not self-cleaning, pinch off the faded bloom and the little green base behind it (the part that wants to
become a seed pod). If plants get long and stringy, deadheading alone won’t save the vibegive them a light trim,
then keep deadheading weekly to maintain bloom.
Geraniums (Pelargonium)
Remove the entire flower stalk once it’s finished. Don’t just pluck individual spent florets from the cluster and
leave the stalk; take the whole stem back to the main plant. This keeps it tidy and encourages more flowering.
Marigolds and zinnias
These are deadheading champions: cut off each spent bloom just above a leaf set or side bud. The more consistently
you do it, the longer they tend to flower. They’re also great “training plants” if you’re new to deadheading,
because they bounce back fast and reward you quickly.
Salvia (annual and perennial types)
When flower spikes fade, cut the flowering stem back to where you see new buds or fresh growth. Many salvias will
push another round of blooms if you stay on top of itespecially when combined with steady watering and light feeding.
Daylilies
Daylily blooms last a day (rude, but honest). You can remove individual spent blooms daily for cleanliness, and then
remove the entire flower scape (the leafless stalk) once all buds on it are finished. This keeps clumps looking fresh.
Hydrangeas
Deadheading hydrangeas is often about tidiness, shaping, and preventing old flower heads from weighing down stems.
The safe approach is to cut the spent flower head back to a healthy set of buds. Be mindful: timing and method can
vary by hydrangea type, and many won’t rebloom simply from deadheading.
Spring-flowering bulbs (tulips, daffodils, hyacinths)
Remove the spent flower head so the bulb doesn’t waste energy on seed production, but leave the foliage alone until
it yellows and naturally dies back. Those leaves are the bulb’s solar panels for next year’s blooms.
When You Should NOT Deadhead (Yes, Sometimes “Do Nothing” Is Correct)
-
You want wildlife value: Leaving seedheads on coneflowers, black-eyed Susans, and some grasses
can feed birds and add winter interest. -
You want self-seeding: If you love surprise volunteers, allow some flowers to go to seed
(cosmos, some poppies, columbine, and more). - You’re saving seed: Let a few of your healthiest, most vigorous plants produce mature seed.
-
Late-season roses in cold climates: Consider stopping deadheading well before frost to avoid
pushing tender new growth that can be damaged by cold. -
The plant doesn’t rebloom anyway: Some plants are “one-and-done” bloomers; deadheading may help
appearance but won’t produce more flowers.
Troubleshooting: “I Deadheaded… Why Isn’t Anything Blooming?”
1) Heat and drought are stealing the show
In peak summer, some plants slow flowering to survive. Deadheading helps, but it can’t override extreme stress.
Water deeply, mulch to reduce evaporation, and consider shade cloth for containers that roast.
2) You’re cutting in the wrong spot
If you leave long bare stems, the plant looks messy and may not redirect growth where you want it.
If you cut too far down and remove too much foliage, you can slow the plant’s ability to photosynthesize and rebound.
Aim for “just above healthy growth” whenever possible.
3) The plant needs food
Repeated blooming takes energy. For heavy bloomers in containers, a balanced fertilizer on a schedule can make a
noticeable difference. In beds, compost and a slow-release fertilizer (used appropriately) can support reblooming.
4) It’s a “self-cleaning” variety (or the opposite)
Some flowers don’t need deadheading much; others need it constantly. If your plant keeps dropping blooms and still
flowering, congratsyou’ve adopted an overachiever. If it stalls without deadheading, you’ve got a “needs reminders”
type. (We all know one.)
A Simple Weekly Routine That Keeps You From Getting Overwhelmed
Deadheading is easiest when it’s a habit, not a rescue mission. Try this:
- Twice a week: a 5-minute walk-through with snips for containers and front beds.
- Once a week: a 10–15 minute sweep of bigger borders, focusing on repeat bloomers.
- Monthly: light trimming of leggy annuals (especially in pots), then resume deadheading.
If you only have time for one area, prioritize plants that rebloom heavily (zinnias, marigolds, many salvias,
repeat-blooming roses, and prolific annual containers). Those are the ones that will pay you back fastest.
Conclusion
Deadheading isn’t about perfectionit’s about momentum. A few quick snips can keep flowers blooming longer,
prevent messy seed explosions, and make your garden look like you’ve got your life together (even if your laundry
situation says otherwise).
Start small: deadhead one container, one bed edge, or one favorite plant. Once you see how quickly many flowers respond,
you’ll stop thinking of deadheading as a chore and start thinking of it as “bloom budgeting.” Snip now, enjoy later.
Real-World Experiences: What Gardeners Notice After Deadheading Consistently (Plus a Few Lessons Learned)
Gardeners who make deadheading part of their routine often describe the same “aha” moment: the garden looks better
almost immediately, and the plants seem to “wake up” within a week or two. In community gardens and shared plots,
the difference is especially obvious because you can compare side-by-side beds. The deadheaded bed tends to stay
colorful longer, while the ignored bed starts drifting into a seed-and-brown phase that reads as “end of season,”
even when it’s only mid-summer.
One common experience is how much deadheading changes containers. Pots are like tiny stagesevery awkward stem shows.
When gardeners pinch off petunia blooms regularly (including the little green seed base), the plant often stays
fuller and keeps producing buds instead of getting sticky and leggy. Pair that with an occasional mid-season trim
and consistent watering, and the container can look “freshly planted” far longer than expected. People are often
surprised that the secret isn’t a complicated fertilizer plan; it’s removing the spent flowers before the plant
commits to seed production.
Another pattern shows up with zinnias and marigolds: gardeners who deadhead early and often usually get more stems
and more branching. The plants don’t just keep blooming; they often look bushier and more intentional, like they
were designed that way. The flip side is also real: if you skip deadheading for a couple of weeks, zinnias in
particular can pivot hard into seed-making. Then you end up doing a bigger “cleanup session,” which takes longer
and feels less rewarding because you’re cutting off a lot of structure instead of making quick, easy snips.
Perennials teach a different lesson: deadheading is sometimes about selective effort. Many gardeners end up
deadheading part of a planting and leaving the rest. For example, they’ll deadhead coreopsis, salvia, and garden
phlox to extend bloom, but intentionally leave coneflower seedheads later in the season for birds and winter texture.
This mix-and-match approach often creates a garden that feels both curated and alivemore blooms where you want them,
and more habitat where it matters.
Roses also create strong opinions, usually after the first year of experimenting. Many gardeners notice that regular
deadheading keeps repeat bloomers flowering more steadily, but they also learn to stop at the right time for their
climate. In colder regions, stopping several weeks before frost can help roses transition into dormancy rather than
pushing tender new shoots. In milder areas, gardeners might continue longer, but still adjust based on how the plant
is growing and whether they want hips for winter interest.
Practical “experience-based” takeaways
- Consistency beats intensity: 5 minutes twice a week usually outperforms a single 45-minute “garden apology tour.”
- Deadheading is a diagnostic tool: If you’re deadheading and nothing rebounds, it often flags heat stress, low light, or nutrient issues.
- Cut placement matters for looks: Most people don’t quit deadheading because it’s hardthey quit because they leave awkward stems and hate the result.
- Leave some seedheads on purpose: Gardens look more natural (and support wildlife) when you’re not trying to erase every sign of a flower aging.
- It’s okay to “triage”: If you’re busy, focus on the plants that respond dramatically (annuals and repeat bloomers), and let the rest be charmingly wild.
In the end, deadheading is less about chasing perfection and more about steering the season. You’re guiding energy:
away from seed production when you want more flowers, and toward seedheads when you want habitat, saving seed, or winter beauty.
Once you treat it as a choice (not a rule), it becomes one of the easiest ways to make your garden look betterfast.


