Table of Contents >> Show >> Hide
- Why a conversion kit is usually the best option
- The two main ways people do this conversion
- What to check before you buy anything
- The safest and smartest installation path
- How high should a pendant hang after the conversion?
- Where this conversion works best
- Common mistakes to avoid
- Is converting better than starting from scratch?
- Real-world experiences: what homeowners usually learn after the conversion
- Final thoughts
Recessed lights are the introverts of the lighting world. They do their job, they stay out of the way, and they rarely start conversations. Pendant lights, on the other hand, walk into a room like they own the place. They add character, define zones, and can make a kitchen island or breakfast nook look like it finally got its act together.
So what is the best way to convert a recessed light to a pendant light? For most homeowners, the smartest answer is this: use a listed recessed-light conversion kit if you want a true pendant fixture, solid support, and a finished look that does not scream “I made a questionable decision at 11:47 p.m.” A lightweight, no-tool pendant adapter can work well for a quick style upgrade, but a proper conversion kit is usually the better all-around choice when appearance, flexibility, and long-term confidence matter.
This approach gives you the charm of a pendant without the full mess of opening ceilings, moving wiring, and turning your weekend into a drywall support group. It also helps you avoid one of the biggest mistakes in lighting upgrades: treating every recessed can as though it was born ready to support any fixture you happen to like online at 1 a.m.
Why a conversion kit is usually the best option
A recessed-light conversion kit is the middle path between “leave it alone forever” and “call a crew, open the ceiling, and emotionally prepare for dust.” It is popular because it lets you transform many existing 4-inch, 5-inch, or 6-inch recessed housings into a proper mounting point for a decorative fixture. In plain English, it is the difference between a lighting hack and a lighting upgrade.
The biggest advantage is support. Many true conversion kits are designed to handle real pendant fixtures and often include a bracket, hardware, and a medallion or goof ring that helps create a more finished ceiling line. That means you are not just changing the vibe; you are creating a safer and more versatile mount for the new light. If you want a fixture with a little presence, this matters.
Another plus is flexibility. Once the conversion is done correctly, you have more freedom to choose a pendant style that actually suits the room. Glass globe? Sure. Metal shade? Go for it. Something that looks like it came from a modern farmhouse, a loft, or your friend’s suspiciously expensive kitchen remodel? Also fair game.
And finally, it is usually kinder to your ceiling. Many kits are designed to avoid major drywall cutting, patching, and repainting. That is excellent news because the quickest way to turn a lighting project into a life lesson is to discover that your “simple update” now requires spackle, primer, and a brand-new appreciation for joint compound.
The two main ways people do this conversion
1. The quick-change pendant adapter
This is the fast, style-first option. Some products are specifically marketed as instant pendant conversions and are made to turn a recessed light into a hanging pendant in minutes with little or no remodeling. They are appealing because they are easy, visually effective, and great for homeowners who want to refresh a space without going all-in on a bigger electrical project.
The catch is that this route is best for lightweight fixtures designed for that system. It is not the universal answer for every pendant you fall in love with. If your goal is a fast cosmetic upgrade, this option can be terrific. If your goal is “I want a real fixture with more weight, more presence, and more choice,” keep reading.
2. The recessed-light conversion kit
This is the better long-term answer for most people. A true conversion kit creates a sturdier mounting solution and gives you access to more traditional hanging fixtures. That means better design freedom, a cleaner finished look, and more confidence that the light is mounted the way it should be.
If your room is getting an actual design upgrade rather than a temporary glow-up, this is usually the best way to convert a recessed light to a pendant light.
What to check before you buy anything
Make sure you know your recessed can size
Not every recessed housing is the same. Some kits are made for 4-inch cans, while others are built for 5-inch and 6-inch housings. Buy the wrong size and your project can go from “easy upgrade” to “why is this medallion mocking me?” faster than expected.
Before choosing a kit or pendant, confirm the can size, housing style, and the product’s stated compatibility. That tiny bit of homework saves a surprising amount of frustration.
Respect the weight rating
This is the non-glamorous but absolutely essential part. A pendant may look modest online and still be heavier than expected once you factor in glass, metal, rods, and hardware. The safe choice is to follow the exact rating for the conversion system you buy and never assume all recessed cans are created equal.
If you are using a lightweight instant adapter, stick to fixtures designed for that method. If you want a more substantial pendant, choose a conversion kit with a clear fixture-support rating and do not improvise. Lighting should create drama in the room, not in the ceiling.
Think about the switch and bulb setup
A new pendant can change more than the look of a room. It can also change how the light feels, spreads, and performs. If you want dimming, warm LED light, or a smarter switch setup, check compatibility before installation. This is especially important if you already have a dimmer and do not want flicker, buzzing, or that awkward “romantic restaurant lighting at 2 p.m.” effect.
Watch for warning signs in older electrical systems
If your home has frequent breaker trips, dimming lights, uncertain grounding, or wiring that makes you feel like you should be wearing a helmet, this is not the moment to get bold. A pendant upgrade is supposed to improve your home, not audition it for a safety seminar. When in doubt, bring in a licensed electrician and let them verify the condition of the circuit before the project moves forward.
The safest and smartest installation path
Because this project involves ceiling electrical work, the safest approach is simple: shut off power before any work begins, verify the circuit is not live, and hand off hardwired conversion work to a licensed electrician unless you are fully qualified to do it. That is not a buzzkill. That is good judgment wearing work boots.
A professional can confirm the circuit, grounding, box support, and fixture compatibility, while also making sure your installation meets local code requirements. That matters even more if you are converting older recessed lights, changing dimmers, or hanging a heavier fixture over a kitchen island, dining area, or entry.
In practical terms, the best project flow looks like this: choose the right conversion method, choose a pendant that suits the kit and the room, confirm placement and drop length, then have the fixture mounted and adjusted so it looks intentional rather than accidental. Neat, centered, and properly scaled beats “technically hanging” every single time.
How high should a pendant hang after the conversion?
This is where good lighting becomes great lighting. A pendant can be gorgeous, but if it hangs too low, it becomes an obstacle with opinions.
Over a kitchen island or counter, a common rule is to hang the bottom of the pendant around 30 to 36 inches above the surface. That usually provides good task lighting without blocking sightlines. If you are using multiple pendants, spacing them with breathing room is just as important as choosing the right size.
In open walking areas, head clearance matters. A pendant in a foyer or room center should generally stay high enough that nobody has to duck under it like they are entering a secret tunnel. In rooms with standard 8-foot ceilings, oversized or long-drop pendants can look dramatic in all the wrong ways, so scale and drop length really matter.
If your recessed light is centered over a dining table, breakfast table, or island, you are in luck. Those are the spaces where pendant conversions tend to look the most natural, because the fixture is visually tied to a surface below it. When a pendant floats over empty traffic space, the room suddenly starts negotiating with your forehead.
Where this conversion works best
Kitchen islands
This is the superstar location. Recessed lighting can provide general illumination, but pendant lighting adds task light and visual focus. One or more pendants over an island instantly makes the space feel more layered and more custom.
Breakfast nooks and dining spots
If a recessed light currently sits over a table, converting it to a pendant is often a high-impact, low-chaos update. The pendant helps define the eating zone and makes the room feel finished instead of default.
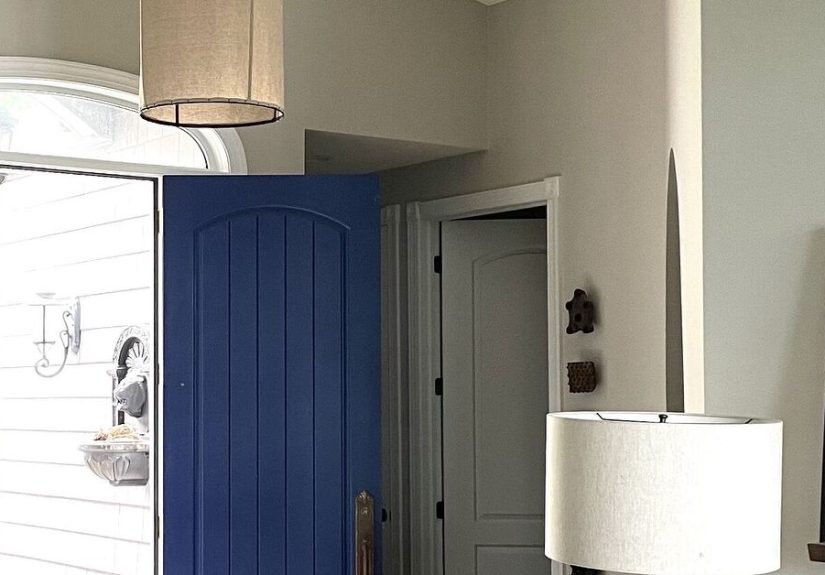
Entries and hall transitions
A well-scaled pendant in an entry or transition space can add personality where a recessed can once offered only basic illumination. Just be mindful of drop length and foot traffic.
Bedrooms and reading corners
In the right spot, a pendant can bring softness, style, and a boutique-hotel feel. In the wrong spot, it can become the thing you regret every time you change a fitted sheet. Placement matters.
Common mistakes to avoid
Choosing the wrong kind of fixture for the conversion method
A no-tool adapter is not a blank check for any pendant in the lighting universe. Match the fixture to the system and the stated support rating.
Ignoring proportions
Small pendant, giant island? It looks timid. Huge pendant, low ceiling? It looks like a dare. Scale is part of the project, not an afterthought.
Forgetting the room’s lighting layers
Pendant lights are wonderful, but they are not always meant to do every job alone. A room usually looks and functions better when ambient, task, and accent lighting work together.
Skipping dimmers
This is one of the easiest ways to leave comfort on the table. A dimmer gives your pendant more range, from bright prep-time lighting to a softer evening glow.
Trying to outsmart electrical safety
If the system is older, uncertain, or acting strange, do not “see what happens.” That phrase has launched too many household stories that end with a service call.
Is converting better than starting from scratch?
In many cases, yes. If the recessed light is already in the right location and connected to a circuit that makes sense for the room, conversion is usually the most efficient path. You get the visual reward of a pendant without reopening the entire ceiling plan. It is the renovation equivalent of taking the side door past the line.
Starting from scratch makes more sense when the recessed light is badly located, the ceiling height changes the math, or the room’s layout has evolved and the fixture really needs to move. But if the can is in a good spot, conversion is often the sweet spot between cost, effort, and design payoff.
Real-world experiences: what homeowners usually learn after the conversion
Here is the funny thing about converting a recessed light to a pendant light: people often start for style, then end up talking about function. They want the room to look prettier, of course, but what they usually notice first after the project is how much more intentional the space feels. A plain recessed light gives general brightness. A pendant creates a focal point. That small shift can make a kitchen island feel like the center of the room instead of just the place where mail, keys, and one lonely banana go to retire.
One of the most common reactions is surprise at how much scale matters. Plenty of homeowners assume that if the recessed light was in the right spot, any pendant will work. Then the pendant goes up and suddenly it is either too tiny to matter or so oversized it looks like it is demanding a speaking role. The lesson is simple: the conversion may be mechanical, but the success is visual. The fixture has to match the room, the ceiling height, and the furniture below it.
Another common experience is realizing that finish details matter more than expected. The medallion or trim ring that comes with many conversion kits may not sound exciting, but it can be the difference between “clean custom look” and “I can tell something happened here.” Homeowners who choose a paintable component or a finish that blends with the ceiling often end up happiest, because the final result feels integrated instead of improvised.
Then there is the lighting quality itself. Recessed cans tend to give broad downward light, but a pendant changes the personality of the illumination. Glass shades can feel airy and bright. Metal shades can feel more focused and moody. Warm LEDs can make the room feel calmer, while cool light can make everything look a little too ready for a dental cleaning. People often discover that the bulb choice is not a footnote. It is half the mood.
Homeowners also learn that the best pendant placement is not always what looked perfect in a product photo. Real life includes eye lines, cabinet doors, tall family members, bar stools, and that one friend who always gestures dramatically while telling stories. A pendant that is technically centered but visually too low can get old fast. That is why adjustable drop length is such a gift. It lets you fine-tune the light after you see it in the actual room, with actual humans doing actual human things.
And finally, many people discover that this project works best when they do not treat it like a stunt. The happiest outcomes usually come from choosing a conversion method that fits the fixture, respecting the support rating, and calling an electrician when the wiring situation is unclear. No award is given for heroically guessing at electrical work. The real win is a pendant that looks great, feels secure, and makes the room better every time you flip the switch.
Final thoughts
If you want the short version, here it is: the best way to convert a recessed light to a pendant light is usually with a proper recessed-light conversion kit, not a random collection of wishful thinking and ceiling optimism. A lightweight instant adapter can be excellent for a fast style update, but a true conversion kit is the better pick when you want stronger support, broader fixture choice, and a result that looks polished for the long haul.
Choose the right kit for your recessed housing, respect the weight rating, plan the drop carefully, and think about the room as a whole. Good pendant lighting is not just about swapping one fixture for another. It is about making the space look sharper, work better, and feel more like somebody actually designed it on purpose.


