Table of Contents >> Show >> Hide
- What You’re Buying: The Quick Reality Check
- Why PureBond Matters: Indoor Air, Compliance, and Material Confidence
- Poplar Plywood Behavior in the Real World
- Best Project Fits for 23/32 PureBond Poplar
- How to Buy Better Sheets in 5 Minutes
- Cutting and Machining: Crisp Edges, Less Tear-Out
- Finishing Paths: Paint-Grade Hero or Natural Look?
- Safety and Shop Hygiene: Non-Negotiables
- Cost, Value, and When This Panel Is Worth It
- Common Mistakes to Avoid
- Conclusion
- Extended Experience Section (500+ Words): Real-World Build Notes with PureBond 23/32 Poplar Plywood
Some materials are loud. They announce themselves with shiny labels, dramatic claims, and a “look at me” personality.
PureBond 23/32 in. x 4 ft. x 8 ft. Poplar Plywood is not that kind of material.
It is the dependable, workhorse panel that quietly makes your cabinets straighter, your built-ins cleaner, and your project photos suspiciously “professional.”
If your goal is to build something that looks custom, lasts for years, and doesn’t turn your living room into a chemistry experiment, this panel deserves real attention.
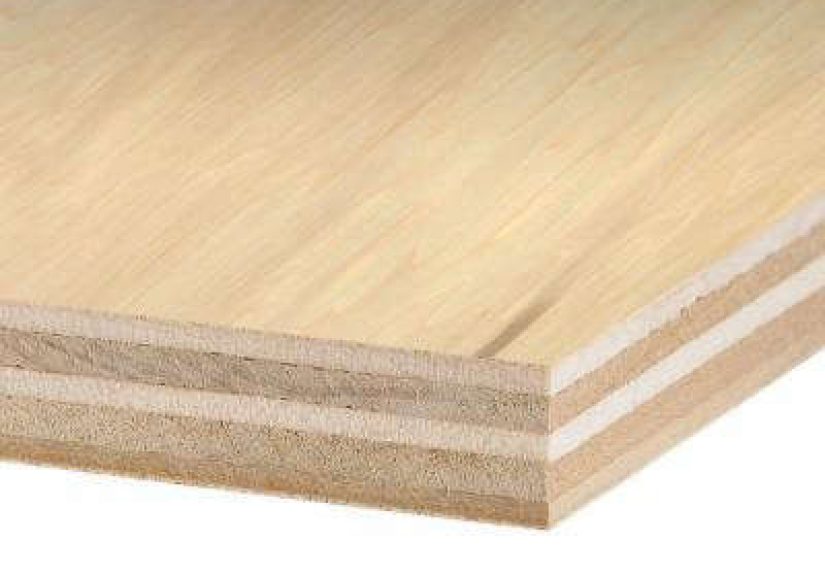
In practical terms, this is a full 4×8 interior hardwood plywood sheet with a nominal 23/32-inch thickness (the class most woodworkers casually call “three-quarter”).
That gives you a generous 32 square feet of usable material per panel and enough stiffness for shelving, cabinet sides, casework partitions, and furniture carcasses when designed correctly.
The poplar face and back veneer keep the look clean and modern, while the interior construction is designed for stability and everyday build quality.
Translation: it works hard without demanding drama.
This guide is built for DIYers, makers, and pros who want in-depth, no-fluff guidance.
We’ll cover what this sheet is best for, where it can disappoint you, how to cut and finish it like a grown-up woodworker, and how to avoid the rookie mistakes that cause “why is this shelf bowing?” moments.
You’ll also get a long-form experience section at the end with realistic project lessons from the field, because lumber yards don’t care about your optimism.
What You’re Buying: The Quick Reality Check
Core specs you should care about
- Nominal thickness: 23/32 in. (commonly treated as the 3/4 in. class in project planning)
- Panel size: 4 ft. x 8 ft. (32 sq. ft. coverage per sheet)
- Construction: 7-ply decorative poplar veneer face and back with hardwood plywood build
- Adhesive approach: PureBond no-added urea-formaldehyde assembly process (soy/PVA-based system)
- Typical uses: interior cabinetry, furniture, shelving, millwork, wall panels, and built-ins
If you only remember one line from this section, make it this:
this is a decorative interior hardwood plywood panel built for visible, finished projectsnot a do-everything outdoor sheet and not a flooring shortcut.
Why PureBond Matters: Indoor Air, Compliance, and Material Confidence
A lot of plywood conversations begin with strength and end with finish quality.
The smarter conversation includes indoor air quality too.
PureBond is known for no-added urea-formaldehyde assembly, which is a major reason it is popular with cabinet shops, designers, and homeowners who care about low-emission interiors.
Let’s keep this practical: “formaldehyde-free” in decorative plywood discussions usually means no formaldehyde is added in the core/lamination adhesive system.
It does not mean “this panel exists in a vacuum without naturally occurring wood compounds.”
That distinction matters because it keeps expectations realistic and specification language accurate.
For regulated contexts, hardwood plywood sits inside broader formaldehyde frameworks (like TSCA Title VI and CARB composite wood programs), which were created to reduce emissions and standardize compliance expectations.
If your project intersects with design specs, institutional purchasing, or green-building paperwork, this category awareness saves you time and prevents late-stage substitutions.
Green-building conversations without the buzzword soup
You’ll often see terms like FSC, LEED contribution, and third-party certification in the same breath as PureBond products.
The important point isn’t to collect acronyms like trading cards.
The important point is traceability and consistency:
if a project needs documented material pathways or specific procurement criteria, confirm those requirements at quote/order time, not after your CNC file is already loaded.
Poplar Plywood Behavior in the Real World
Poplar is popular for a reason: it tends to machine well, glue well, and accept paint exceptionally nicely.
In furniture and cabinet workflows, that combination is gold.
You get a relatively cooperative material that is less likely to fight you through every pass of the router.
That said, poplar isn’t magical.
The face veneer is decorative and therefore finite; aggressive sanding is a fast path to regret.
If you sand like you’re trying to remove a tattoo, you can burn through veneer and expose lower layers.
Use a measured grit sequence, light pressure, and frequent inspection under raking light.
For clear finishes, expect subtle green, cream, and brown tonal variationclassic poplar personality.
For stain-grade aesthetics, poplar can be less predictable than many people expect.
The good news: if your goal is a painted finish, this panel is one of the more pleasant paths to a smooth, modern look.
Best Project Fits for 23/32 PureBond Poplar
Excellent applications
- Cabinet boxes and carcasses: strong, stable, clean interior look
- Built-in bookcases: great for painted millwork with face-frame or edge-banded fronts
- Entertainment walls: large panel format helps keep seams and joints manageable
- Furniture carcasses: media consoles, sideboards, utility storage pieces
- Workshop cabinetry: better appearance and interior quality than basic construction sheets
Use caution or choose another material
- Outdoor projects: this is not your rain-and-sun warrior panel
- Wet-zone exposure: avoid sink splash zones unless fully engineered and protected
- Flooring applications: decorative face veneers are not intended as wear surfaces
- Heavy-span shelving without support: thickness helps, but span physics still wins
Bottom line: this panel shines when your project is interior, finish-focused, and built with normal cabinet/furniture engineering discipline.
How to Buy Better Sheets in 5 Minutes
At the rack: what to inspect before loading
- Flatness: sight down the long edge; reject obvious twist or bow if your project needs precision.
- Face quality: inspect both sides for patches, scratches, and shipping damage.
- Edge integrity: look for crushed corners, delamination clues, or impact bruises.
- Stack position: top and bottom sheets often take more abuse; pull from deeper in the stack when possible.
- Project fit: plan cut layout before purchase so your cleanest face ends where it matters visually.
If you’re buying for visible built-ins, grab one extra sheet when budget allows.
That one backup panel often saves a project when a planned cut sequence meets the real world and loses.
Cutting and Machining: Crisp Edges, Less Tear-Out
Table saw and track saw strategy
Use a sharp, fine-tooth blade suited for plywood and support the sheet properly.
If you’ve ever chased splintered veneer across a long rip, you already know why blade sharpness is non-negotiable.
Blue painter’s tape across the cut line plus a light score pass can dramatically reduce edge breakout on visible faces.
Router and joinery notes
For dados and rabbets, climb-cutting can reduce tear-out in tricky grain zones, but only when done safely and with control.
Test all settings on offcuts first.
Poplar plywood generally machines cleanly, but panel veneers still punish impatience.
Let bits cut; don’t force feed rates like you’re in a race against sunset.
Edge treatment that looks intentional
Exposed plywood edges can look stylish in modern interiorsor they can look unfinished.
Decide early.
For a painted built-in, wood filler plus sanding and primer can work.
For furniture-grade results, iron-on veneer edge banding gives a much more “solid wood” appearance with minimal complexity.
Finishing Paths: Paint-Grade Hero or Natural Look?
Paint-grade workflow
- Sand lightly and evenly (do not overwork edges and corners).
- Remove dust thoroughly (vacuum + tack cloth or microfiber).
- Apply a quality primer for adhesion and uniform topcoat appearance.
- Sand between coats with a fine grit for a furniture-level finish feel.
- Topcoat with your preferred enamel or trim system.
If your goal is a smooth built-in wall, primer selection matters more than most people admit.
A good primer helps hide small texture variation and improves topcoat consistency, especially on mixed surfaces where edge treatments and face veneer meet.
Stain and clear finish workflow
Poplar can absorb stain unevenly depending on surface prep and grain behavior.
If you want controlled color, test a pre-stain conditioner and stain schedule on offcuts from the same sheet.
Keep records: grit used, wait times, coat count, and wipe duration.
“I think this looked good yesterday” is not a repeatable finishing system.
Safety and Shop Hygiene: Non-Negotiables
Wood dust isn’t just annoying; airborne dust can irritate eyes and airways and contributes to long-term health risk in repeated exposure settings.
Use dust extraction at the source, clean frequently, and wear appropriate respiratory protection during cutting and sanding.
Also: never use compressed air to create a dramatic dust tornado in your shop unless your hobby is bad decisions.
Good workflow beats heroics:
cut station + extraction, sanding station + extraction, cleanup routine, and clean staging area for finishing.
Your lungs, finish quality, and future self will all send thank-you notes.
Cost, Value, and When This Panel Is Worth It
PureBond poplar plywood usually wins on total project value, not just sticker price.
The finish-ready face quality, consistent workability, and cleaner indoor-air positioning can reduce rework, sanding corrections, and post-install complaints.
On client-facing jobs, those reductions often matter more than saving a small amount per sheet with lower-grade alternatives.
For painted cabinetry and built-ins, this panel regularly hits the sweet spot:
better appearance than commodity sheets, less hassle than temperamental alternatives, and enough structure for most interior casework when span and joinery are designed correctly.
Common Mistakes to Avoid
- Assuming “3/4 in.” means exact thickness in every context: design with measured reality, not wishful labels.
- Ignoring acclimation and storage: store flat, supported, and dry; don’t lean expensive sheets in humidity roulette conditions.
- Over-sanding face veneer: light passes win.
- Skipping test boards: especially for stain and edge finishing.
- Treating interior decorative plywood like exterior structural sheathing: wrong tool, wrong job.
- No dust plan: your finish and lungs both pay the price.
Conclusion
PureBond 23/32 in. x 4 ft. x 8 ft. Poplar Plywood is one of those rare materials that rewards thoughtful builders at every stage:
selection, machining, assembly, and finish.
It is especially strong for interior cabinetry, built-ins, and furniture-grade paint projects where appearance and process reliability matter.
Add its no-added urea-formaldehyde adhesive story and broad relevance in modern indoor spaces, and you get a panel that fits both craft and conscience.
If your project plan is “clean lines, stable boxes, smooth finish, fewer headaches,” this sheet belongs near the top of your shortlist.
Buy carefully, cut patiently, finish intentionally, and you’ll get results that look far more expensive than they are.
Extended Experience Section (500+ Words): Real-World Build Notes with PureBond 23/32 Poplar Plywood
Over the past year, I’ve watched this exact class of panel move through wildly different interiors: a tight urban condo closet, a suburban media wall, a farmhouse pantry retrofit, and a compact home office where every inch mattered.
Across all of those projects, one pattern repeated: the sheet rewarded careful planning and punished shortcuts, but never in a mysterious way.
The behavior was consistent.
If a result looked bad, the process was usually bad first.
The condo closet project was the first wake-up call.
We had a narrow hallway, an elevator that felt allergic to full sheets, and a client who wanted “built-in luxury” on a modest budget.
We pre-broke the sheets with a track saw in a staging area, labeled every part with painter’s tape, and kept the best face orientation marked before final cuts.
That one habitlabeling visible faces earlysaved us from two near-miss assembly mistakes.
The final unit included tall cabinets, adjustable shelves, and a bench niche.
Once primed and painted, the surface looked clean and even, with fewer touch-up cycles than previous builds made from cheaper plywood.
Next came the media wall.
Long horizontal spans always tempt people to test physics with optimism.
Instead of betting on panel thickness alone, we designed hidden vertical partitions and a face-frame strategy to break spans and increase stiffness.
That changed the whole outcome.
Shelves stayed true, doors aligned, and reveals remained tight weeks after installation.
If there is a single “pro move” I’d recommend, it’s this: engineer the cabinet as a system, not as isolated boards.
The plywood can be strong, but structure is always a team sport.
The pantry retrofit taught finishing lessons.
The homeowner wanted a warm painted color with a satin topcoat.
We rushed one test panel and got slight texture mismatch between face veneer and filled edge zones.
On the second attempt, we switched to a stricter prep sequencelight sanding, thorough dust removal, primer, then a quick de-nib between coats.
Night-and-day improvement.
Same panel, better process, dramatically better finish.
That is the quiet truth about this material: it doesn’t need magic products, just disciplined prep.
Then there was the tiny home office build, where every dimension was exact and every mistake would be visible from three feet away on video calls.
We used edge banding on exposed fronts and reserved the cleanest veneer zones for door faces.
A few pieces had minor veneer personality (color variation), but we embraced it rather than fighting it.
Once installed, the project looked custom, not factory-flat.
Clients often say they want “perfect.”
What they usually love is “intentional.”
This panel can deliver that when you design around its strengths.
A few practical lessons from all four builds:
first, buy one extra sheet when the project is finish critical.
Second, carry sheets flat and store them flat.
Third, make finish decisions early: painted, stained, or cleareach path changes edge treatment and prep.
Fourth, never skip offcut testing for stains and topcoats.
Fifth, maintain dust control like it’s part of the design spec, because it is.
Fine dust ruins finishes long before it ruins your mood.
My favorite outcome with this panel wasn’t the fanciest project.
It was the one where the homeowner said, “It looks like it was always part of the house.”
That’s the real benchmark for cabinetry and built-ins.
Not viral photos.
Not complicated joinery flexes.
Just durable, clean, human-centered results.
PureBond 23/32 poplar plywood can absolutely get you thereif you treat planning, cutting, and finishing as one continuous craft instead of disconnected tasks.
In other words: measure twice, cut once, sand lightly, and keep your ego at half speed.


