Table of Contents >> Show >> Hide
- Why Layering Matters (Yes, We’re Getting Nerdy)
- Quick Overview
- Ingredients
- Tools You’ll Want (So This Feels Easy, Not Icy)
- Step-by-Step: How to Make a Layered Ice Cream Cake
- Whipped Topping Frosting (That Won’t Betray You)
- Unmolding, Frosting, and Decorating
- Slicing Like a Pro (No Ice Pick Required)
- Flavor Combos That Always Work
- Troubleshooting: Common Ice Cream Cake Problems
- Make-Ahead and Storage Tips
- Food Safety Notes (Because Fun Desserts Still Have Rules)
- Layered Ice Cream Cake Recipe Card
- Frequently Asked Questions
- Real-World Experiences: What It’s Like to Make This Cake (And Why People Love It)
- Conclusion
Ice cream cake is what happens when your inner child gets promoted to “Head of Party Planning.” It’s cold, creamy,
crunchy, and dramatic in the best waylike a dessert wearing sunglasses indoors.
This layered ice cream cake recipe is designed for real life: store-bought ice cream (because we’re busy),
a crunchy cookie layer (because texture matters), a fudge ribbon (because joy matters), and a whipped topping
“frosting” that doesn’t fight the freezer. It’s no-bake, make-ahead, and customizable enough to fit birthdays,
cookouts, and “Tuesday was a lot” celebrations.
Why Layering Matters (Yes, We’re Getting Nerdy)
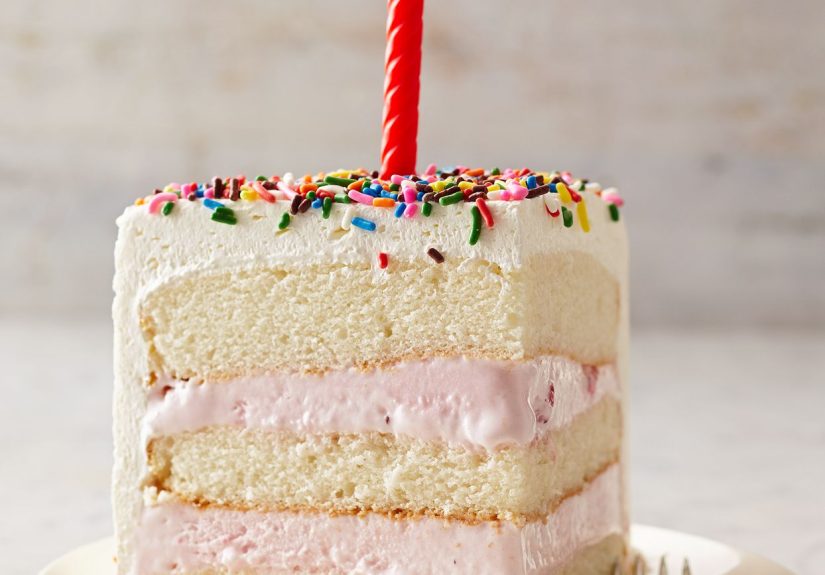
A great homemade ice cream cake isn’t just frozen sugar. The magic is contrast: creamy ice cream against something
crunchy, a soft fudge layer for chew, and a light topping so every bite doesn’t feel like a frozen brick.
Layering also helps the cake slice cleanlyif you build it with the right temperatures and the right order.
The goal is structure (so it stands tall) and texture (so it tastes exciting).
That’s why this recipe uses a firm cookie base, a “crunchy barrier” layer, and quick freeze breaks while you build.
Quick Overview
- Style: No-bake layered ice cream cake
- Pan: 9-inch springform pan (best), or deep cake pan/loaf pan
- Time: 25–35 minutes hands-on + 8–12 hours freezing
- Difficulty: Easy (the freezer does most of the work)
- Best for: Birthdays, BBQs, holidays, and dramatic entrances
Ingredients
Serves 10–12 (or 6 if your friends “just want a small slice” repeatedly).
Ice Cream Layers
- 1.5 quarts vanilla ice cream (or your favorite flavor), slightly softened
- 1.5 quarts chocolate ice cream (or a second flavor), slightly softened
Crunchy Cookie Layer
- 24–30 chocolate sandwich cookies (or chocolate wafer cookies), crushed
- 3 tablespoons melted butter (optional but helpful for a firmer “crust”)
- Pinch of salt (tiny ingredient, huge personality)
Fudge Layer
- 1 to 1 1/4 cups thick hot fudge sauce (store-bought or homemade), cooled to room temp
Whipped Topping “Frosting”
- 2 cups heavy cream, very cold
- 1/3 cup powdered sugar
- 1 teaspoon vanilla extract
- Optional stabilizer: 2 tablespoons instant vanilla pudding mix OR 1 teaspoon gelatin (see tips)
Optional Toppings (Pick Your Sparkle)
- Sprinkles, mini chocolate chips, chopped candy bars
- Crushed cookies, chocolate shavings
- Caramel sauce, extra fudge drizzle
- Cherries for the full sundae vibe
Tools You’ll Want (So This Feels Easy, Not Icy)
- 9-inch springform pan (ideal)
- Parchment paper (for the bottom) + plastic wrap (for lining sides)
- Food processor or zip-top bag + rolling pin (for crushing cookies)
- Offset spatula or sturdy spoon
- Freezer space (aka the true secret ingredient)
Step-by-Step: How to Make a Layered Ice Cream Cake
1) Prep the pan (this is your “clean slices” insurance)
- Line the bottom of your springform pan with parchment.
-
Line the inside wall with a strip of plastic wrap or acetate (optional but gives a smoother edge).
Leave a little overhang at the top so you can lift it later. - Place the pan in the freezer for 10 minutes while you crush cookies.
2) Make the cookie crunch layer
- Crush cookies into small crumbs (some tiny chunks are welcometexture is the point).
- If using butter, mix crumbs with melted butter and a pinch of salt until it looks like damp sand.
-
Tip: Want the “ice cream cake crunchies” vibe? Mix cookie crumbs with a spoonful or two of chocolate sauce,
then freeze briefly. It sets into a slightly crisp, chocolatey crumble.
3) First ice cream layer
-
Let the first ice cream soften just until spreadable. You should be able to press it with a spoon,
but it shouldn’t look like soup. - Spread about half of Flavor #1 into the chilled pan. Smooth the top.
- Freeze 15–20 minutes to firm it up.
4) Add the crunch + fudge (the “center of attention” layers)
- Sprinkle an even layer of cookie crumbs over the firmed ice cream. Gently press so it sticks.
- Drizzle cooled hot fudge over the crumbs. Spread gentlydon’t dig. You want distinct layers, not a frozen mudslide.
- Freeze 15–20 minutes again, just to set the fudge layer.
5) Second ice cream layer
- Spread the remaining Flavor #2 over the fudge layer.
- Smooth the top, cover tightly, and freeze at least 8 hours (12 is even better).
Whipped Topping Frosting (That Won’t Betray You)
Buttercream can turn rock-hard in the freezer. Whipped cream (especially stabilized) is friendlier: it matches the
softness of melting ice cream so you don’t get “frozen butter wall” energy.
How to make it
- Whip cold heavy cream, powdered sugar, and vanilla to medium-stiff peaks.
-
Optional: Stabilize it for longer-lasting showiness.
- Pudding mix method: add 2 tablespoons instant pudding mix while whipping.
- Gelatin method: bloom 1 tsp gelatin in 1 tbsp water, warm to dissolve, cool slightly, then stream in while whipping.
- Keep whipped topping chilled until you’re ready to frost.
Unmolding, Frosting, and Decorating
- Remove the cake from the freezer and let it sit 5–8 minutes so the outer edge releases more easily.
- Unlatch the springform ring. Peel away plastic wrap/acetate if used.
- Frost quickly with whipped topping. Keep it casualswirls hide everything and look intentional.
-
Add toppings. Sprinkles stick best when the frosting is still tacky. Drizzles look best when the cake is very cold
(so they set on contact). - Freeze 30–60 minutes after frosting so everything firms up again.
Slicing Like a Pro (No Ice Pick Required)
- Warm your knife: Dip in hot water, wipe dry, slice. Repeat for cleaner edges.
- Go slow: Press straight downdon’t saw aggressively or layers can slide.
- Serve fast: Put slices on plates and return the cake to the freezer promptly.
Flavor Combos That Always Work
Use this as your mix-and-match guide for an easy layered dessert that tastes “custom” without being complicated.
Classic Crowd-Pleasers
- Chocolate + vanilla with cookie crunch and fudge (the timeless “sundae cake”)
- Cookies & cream + chocolate with extra cookie crumbs
- Strawberry + vanilla with a thin layer of strawberry jam (reduce it so it’s not icy)
Fun Party Energy
- Birthday cake + vanilla with sprinkles and soft cake cubes
- Mint chip + chocolate with brownie bits (small pieces slice better)
- Salted caramel + coffee with crushed pretzels for crunch
“Grown-Up Dessert” Mode
- Chocolate + raspberry with a thin dark chocolate shell layer
- Pistachio + vanilla with toasted nuts (chop finely)
- Peanut butter + chocolate with crushed peanut butter cups
Troubleshooting: Common Ice Cream Cake Problems
My ice cream turned into soup while assembling
Your kitchen may be too warm, or the ice cream softened too long. Freeze the pan between layers, work in short bursts,
and soften ice cream just until spreadable. If it’s soupy, refreeze it for 10–15 minutes and try again.
My cookie layer got soggy
Cookie crumbs absorb moisture over time, especially if the fudge layer is warm. Make sure fudge is cooled and consider
mixing crumbs with a little melted butter (or even a thin chocolate shell) to create a moisture barrier.
The layers slide when I cut it
Usually: not frozen long enough. Freeze overnight whenever possible, and refreeze after frosting.
Also, keep fudge layers thintoo thick can act like an ice rink.
It tastes icy instead of creamy
Ice crystals can grow when frozen desserts experience temperature swings (like frequent freezer door openings).
Store your cake tightly wrapped and as far from the freezer door as possible. If you’re making homemade components,
recipes with enough sugar and fat tend to stay creamier.
Make-Ahead and Storage Tips
- Make ahead: Assemble the cake 1–7 days in advance.
- Wrap well: Plastic wrap + foil helps prevent freezer burn and off-flavors.
- Storage: Keep at 0°F for best quality; frozen foods stay safe indefinitely but quality drops over time.
- Best quality window: Enjoy within 1–2 weeks for peak texture and flavor.
Food Safety Notes (Because Fun Desserts Still Have Rules)
Ice cream cake is a frozen dessert, so keep it frozen as much as possible. For serving, pull it out, slice, serve,
and return it to the freezer. If it sits out too long, it won’t just get meltyit can get messy and lose its creamy texture.
The safest plan is short, efficient “cake time” and lots of freezer time.
Layered Ice Cream Cake Recipe Card
Ingredients
See full ingredient lists above.
Instructions
- Line a 9-inch springform pan with parchment (bottom) and plastic wrap/acetate (sides). Freeze 10 minutes.
- Crush cookies. Mix with melted butter and a pinch of salt (optional) for a firmer crunch layer.
- Spread half of Flavor #1 ice cream into pan. Freeze 15–20 minutes.
- Add cookie crumbs, press lightly. Spread cooled fudge sauce over crumbs. Freeze 15–20 minutes.
- Spread Flavor #2 ice cream on top. Cover and freeze 8–12 hours.
- Make whipped topping (stabilize if desired). Unmold cake, frost quickly, decorate, and refreeze 30–60 minutes.
- Slice with a warmed knife and serve immediately.
Frequently Asked Questions
Can I use a regular cake pan instead of a springform?
Yes. Line it very well with plastic wrap so you can lift the cake out. A springform is just easier for clean edges.
A loaf pan works too for a smaller “ice cream loaf cake.”
Do I have to use two flavors?
Nope. A single-flavor ice cream cake can still be layered with crunch, fudge, and toppings. One flavor is simpler and
still party-worthy.
Can I add real cake layers?
Yesthin cake layers work best. Avoid very dry sponge that freezes hard. Soft, moist cake or brownie-style layers are
easier to slice and eat while still cold.
How long should I let it soften before serving?
Usually 5–10 minutes at room temperature is enough for easier slicing. If your freezer runs extra cold, give it
closer to 10 minutesbut don’t forget it on the counter while you scroll your camera roll.
Real-World Experiences: What It’s Like to Make This Cake (And Why People Love It)
If you’ve ever volunteered to bring dessert to a party, you know the emotional roller coaster: you want something
impressive, but you also don’t want to spend the whole day negotiating with a stand mixer like it owes you money.
This is where a layered ice cream cake shines. It’s the rare dessert that looks like you planned your life, even if
you built it while listening to a playlist called “Motivation Please.”
The first “aha” moment most home bakers have is realizing that timing matters more than fancy technique. You don’t
need pastry chef skillsyou need a quick rhythm: soften, spread, freeze. That’s it. The freezer becomes your
co-baker, quietly doing the hard work while you clean up crumbs and feel suspiciously competent. The short freeze
breaks between layers are also surprisingly calming. They turn the process into manageable little steps instead of
one long dessert marathon.
Another common experience: the cookie layer is the hero nobody expected. People will absolutely comment on it.
They might not know what it is (“Is that… crunchy chocolate?!”), but they’ll know it makes every bite better.
That crunch is also a lifesaver for textureespecially if your ice cream flavors are both very creamy. Without a
contrasting layer, ice cream cake can taste flat after a few bites. With it, you get that “sundae in slice form”
feeling: cold, creamy, chewy, crisp, and sweet in a way that stays interesting.
Then there’s the frosting decision. If you’ve ever tried to frost an ice cream cake with something heavy, you’ve
probably met the show-stopping problem of “frozen cement frosting.” Whipped topping feels almost too easy, but it’s
exactly the right match. It softens along with the ice cream, so the cake stays pleasant to eat from the first bite
to the last. The stabilized version is especially popular for parties because it holds up longer and looks neat in
photosimportant when someone insists on taking “just one more pic” while the cake is slowly melting under the
spotlight like a celebrity.
Serving is its own mini adventure. A warmed knife feels like cheatingin a good way. It’s the difference between
clean layers and a slice that looks like it survived a small landslide. If you’re serving outdoors, people tend to
hover excitedly (and honestly, who can blame them). The best real-world move is to pre-slice a few pieces and keep
them on a chilled tray in the freezer, then bring them out in waves. It keeps the cake from spending too much time
in warm air and prevents the “everyone’s waiting while you wrestle the first slice” moment.
Finally, the biggest experience of all: layered ice cream cake is a happiness multiplier. Kids get excited because
it’s ice cream. Adults get excited because it tastes nostalgic and low-stress. And the person who made it gets
excited because the compliments feel wildly disproportionate to the effortwhich is the best kind of dessert math.
If you’re looking for a make-ahead party dessert that’s fun, flexible, and reliably impressive, this is the one.
Conclusion
A layered ice cream cake recipe is the ultimate no-bake win: easy assembly, big payoff, and endless ways to
customize it. Keep your layers thin and intentional, work in quick freezer-friendly steps, and don’t skip the crunch.
Whether you go classic chocolate-vanilla or build a wild flavor mashup, you’ll end up with a homemade ice cream cake
that slices beautifully and disappears quicklysometimes before you even get to say, “Wait, I wanted a photo.”


