Table of Contents >> Show >> Hide
- Step 1: Define “Perfect” (Because Your Yard Isn’t a Mind Reader)
- Step 2: Do a Site Analysis (The Most Underrated Glow-Up Tool)
- Step 3: Safety and Rules Check (Boring, But Saves You From Regret)
- Step 4: Design Your Yard in Zones (So It’s Useful, Not Just “Green”)
- Step 5: Use Design Principles Without Making It Feel “Designed”
- Step 6: Fix Grading and Drainage Before You Add the Pretty Stuff
- Step 7: Hardscape First (Because Plants Hate Being Trampled by Concrete Crew)
- Step 8: Plan Water-Wise Irrigation With Hydrozones
- Step 9: Choose Plants the “Right Plant, Right Place” Way
- Step 10: Build Your Installation Plan in the Right Order
- Step 11: Plan Maintenance From Day One (So It Stays “Perfect”)
- Common Landscape Planning Mistakes (And How to Avoid Them)
- Wrap-Up: The Real Secret to a “Perfect Yard”
- Experience-Based Lessons Homeowners Learn the Hard Way (So You Don’t Have To)
- 1) The plan you can explain is the plan you can finish
- 2) You will walk the same “desire paths” every day
- 3) Drainage is either your quiet hero or your loud villain
- 4) The “right plant, right place” rule saves the most money
- 5) Small repeats look high-end
- 6) Maintenance friction is real (and it changes behavior)
- 7) The first year is about roots, not perfection
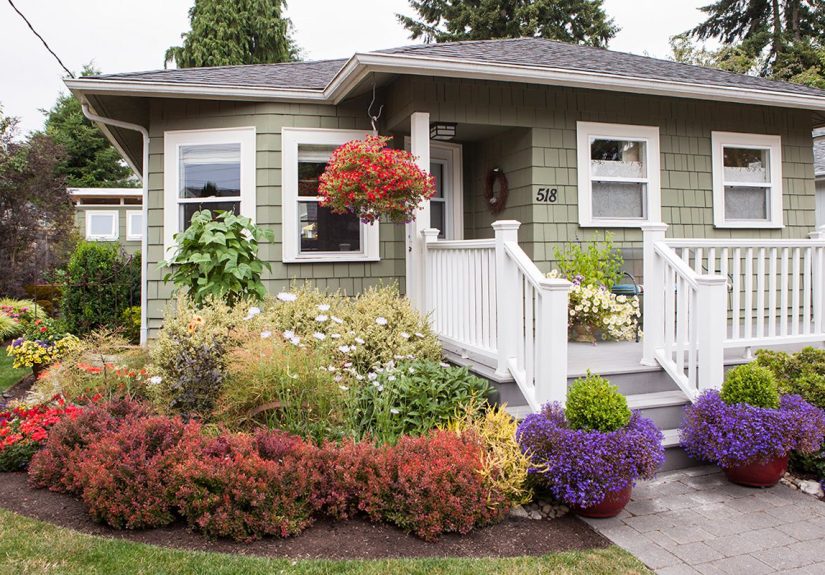
A “perfect yard” isn’t the one with the most expensive pavers or the fanciest fountain that scares your mail carrier.
It’s the yard that works: it fits your lifestyle, your climate, your budget, and your willingness to do yard work
on a Saturday morning (be honestare you a “coffee and pruning” person or a “I own one rake and it’s decorative” person?).
This start-to-finish guide walks you through smart landscape planning tipssite analysis, layout, hardscape, plants,
irrigation, installation order, and maintenanceso your yard looks intentional instead of “nature and impulse purchases had a meeting.”
Step 1: Define “Perfect” (Because Your Yard Isn’t a Mind Reader)
Before you sketch anything, decide what your yard must do. The best landscape design plan starts with
priorities, not Pinterest. Ask yourself:
- Who uses the yard? Kids, dogs, guests, you, all of the above?
- How do you live? Outdoor dining, gardening, lounging, entertaining, privacy, play space?
- What’s non-negotiable? Shade, low-maintenance, fewer mosquitoes, space for a vegetable bed?
- What’s your realistic maintenance level? “Monthly” is a lifestyle choice, not a schedule.
Budget like a pro (and plan in phases)
A perfect yard rarely happens in one weekend. Make a list of “must-haves,” “nice-to-haves,” and “future upgrades.”
Phasing helps you do foundational work first (drainage, grading, hardscape), then layer in plants and details without
redoing everything later.
Step 2: Do a Site Analysis (The Most Underrated Glow-Up Tool)
Site analysis is the difference between “this plant looked cute at the nursery” and “this plant thrives here.”
Walk your property and document the factsyour yard’s “personality.”
Make a simple base map
You don’t need fancy software. Start with a rough scaled sketch (or printed plot plan) and mark:
the house footprint, doors, windows, driveway, sidewalks, fences, existing trees, utilities you know about, and any slopes.
Track sun, shade, wind, and water
- Sun exposure: Note full sun, part shade, deep shadeespecially near structures and big trees.
- Wind patterns: Where does it whip through in winter or dry out beds in summer?
- Drainage: Where does water collect after rain? Where does it rush like it’s late for an appointment?
- Microclimates: Hot reflected heat by south-facing walls, protected corners, frost pockets in low spots.
Get a soil test (yes, really)
If you’re planning a “perfect yard,” don’t guess your soil’s pH, texture, or organic matter. A lab soil test helps
you understand what you’re working with and avoid over-fertilizing or “amending wildly” based on vibes.
It’s especially smart before you install new beds, turf, or a vegetable garden.
Step 3: Safety and Rules Check (Boring, But Saves You From Regret)
Call 811 before you dig
Any project involving diggingtrees, fence posts, drainage lines, irrigation, lightingshould start with a utility locate request.
It’s free, and it can prevent expensive damage and serious hazards. Do this early so you’re not standing outside with a shovel,
whispering, “Please be no gas line” like it’s a competitive sport.
Confirm local constraints
Check HOA rules, city/county permitting (retaining walls, fences, major grading), and any easements.
If you live in a wildfire-prone region, look up defensible space recommendations.
If you’re in a flood-prone area, prioritize stormwater strategies and avoid blocking natural drainage paths.
Step 4: Design Your Yard in Zones (So It’s Useful, Not Just “Green”)
A practical yard has outdoor “rooms.” Start with a bubble diagram: draw loose circles for functions, then refine.
Common zones include:
- Arrival zone: Front walk, entry planting, lighting, house numbers.
- Living zone: Patio, deck, seating, outdoor dining.
- Play/pet zone: Durable surfaces, shade, safe boundaries.
- Garden zone: Vegetable beds, compost area, tool storage access.
- Service zone: Trash bins, HVAC clearance, side-yard paths.
Plan circulation like you plan a kitchen
Paths should connect key points naturally: door to patio, patio to grill, driveway to front door, back door to trash bins.
If people keep cutting across your lawn, that’s not “bad behavior”it’s your landscape telling you where a path should be.
Step 5: Use Design Principles Without Making It Feel “Designed”
You don’t need to speak fluent Landscape Architect to make a yard look pulled together. A few classic principles go a long way:
Unity and repetition
Repeat a handful of materials and plant types. Too many different pavers, edging styles, and plant “characters” can look chaotic.
Think “supporting cast,” not “everyone gets a solo.”
Scale and proportion
Choose plants and features sized for your space at maturity. A tiny shrub in a huge bed will look like it got lost.
A gigantic tree crammed into a narrow side yard will eventually try to remodel your gutters.
Emphasis and focal points
Give each main view one focal point: a specimen tree, a layered planting, a water feature, a fire pit, or even a bold container.
Without a focal point, the eye wanders and the yard feels unfinished.
Step 6: Fix Grading and Drainage Before You Add the Pretty Stuff
This is one of the most important landscape planning tips from start to finish: handle grading and drainage early.
If your yard has soggy spots, runoff issues, or water heading toward your foundation, fix that firstbefore installing patios,
planting beds, or turf.
Smart stormwater options
- Regrade gently: Encourage water to move away from structures and toward appropriate outlets.
- Downspout improvements: Direct roof runoff into safe dispersal areas (or collection systems).
- Permeable hardscape: Consider permeable pavers or gravel paths to reduce runoff.
- Rain gardens: A shallow planted basin designed to capture and soak in runoff can reduce polluted stormwater and add beauty.
- Dry creek beds/swales: Guide water through the yard in a controlled, attractive way.
Step 7: Hardscape First (Because Plants Hate Being Trampled by Concrete Crew)
Permanent features set the structure of your yard. Plan and install hardscape before most planting.
That includes patios, walkways, steps, retaining walls, edging, and built-in seating. It’s easier to place plants around finished
structures than to rebuild structures around “that shrub you were emotionally attached to.”
Choose materials that match your life
- Concrete/pavers: Durable, clean edges, good for high traffic.
- Gravel/decomposed granite: Flexible and budget-friendly, but needs good edging and occasional raking.
- Wood decking: Warm feel, but requires maintenance and good drainage below.
Step 8: Plan Water-Wise Irrigation With Hydrozones
Efficient watering is easier when your yard is organized by plant water needs. Group plants into hydrozones:
higher-water areas (like new plantings or veggie beds), moderate-water areas, and low-water/native zones.
This makes irrigation smarter, saves water, and reduces plant stress.
Practical irrigation tips
- Use drip irrigation for beds and shrubs for targeted watering.
- Use soaker hoses for simple, flexible bed watering.
- Limit spray sprinklers to turf areas where appropriate.
- Consider a smart controller that adjusts to weather and seasons.
- Water early to reduce evaporation and disease pressure.
Step 9: Choose Plants the “Right Plant, Right Place” Way
The shortest path to a perfect yard is matching plants to your conditionssun, soil, drainage, and spacerather than forcing
the yard to accommodate a plant’s demands forever.
Use your USDA Plant Hardiness Zone (but don’t stop there)
The USDA Plant Hardiness Zone Map helps you understand winter cold tolerance for perennials. Use it as a guide, then also consider
summer heat, humidity, wind, salt exposure (coastal), and your soil’s drainage. Cold tolerance is only one piece of the puzzle.
Design with layers for a “finished” look
- Canopy: Shade trees for structure and cooling.
- Understory: Small ornamental trees or tall shrubs for mid-level interest.
- Shrub layer: Foundation plants, privacy screens, and seasonal color.
- Perennials/ornamental grasses: Texture, bloom cycles, movement.
- Groundcovers: Weed suppression and a tidy edge.
Pick plants for mature size (future you will be grateful)
That “cute little tree” may be plotting to become a 40-foot legend. Check mature height and width, keep clearance from structures,
and avoid planting large trees under utility lines. Spacing for mature size reduces pruning, disease risk, and maintenance.
Favor native and regionally adapted plants
Native plants can support pollinators and local ecosystems while often needing less water and fewer inputs once established.
If you choose non-natives, focus on proven, non-invasive performers suited to your region.
Step 10: Build Your Installation Plan in the Right Order
Here’s the “start to finish” sequence that prevents rework:
- Plan + permits + utility locate: finalize layout, confirm rules, call 811.
- Grading + drainage: fix water issues first.
- Hardscape: patios, paths, walls, edging.
- Irrigation + lighting infrastructure: trenching and lines before planting.
- Trees first: they’re hardest to move and define the space.
- Shrubs next: structure and privacy layers.
- Perennials + groundcovers: fill in and create seasonal interest.
- Mulch + finishing touches: stabilize soil moisture, reduce weeds, polish edges.
A quick example plan: “Front-yard curb appeal upgrade”
Suppose your front yard is mostly lawn with a narrow foundation bed and poor drainage near the walkway.
A solid plan might be:
- Regrade slightly to move water away from the foundation and add a small rain garden in a low spot.
- Widen the walkway planting zone with a defined edge (pavers or steel edging).
- Add one small ornamental tree as a focal point (placed for shade and scale).
- Layer shrubs for structure plus perennials for bloom sequence.
- Reduce lawn area and install drip irrigation in beds with hydrozones.
Step 11: Plan Maintenance From Day One (So It Stays “Perfect”)
Perfect yards aren’t “no maintenance”they’re right maintenance. A few smart choices keep upkeep reasonable:
Mulch like you mean it
Mulch helps conserve moisture, reduces weeds, and buffers soil temperature. Keep mulch away from direct contact with trunks and stems
to prevent rot and pest issues.
Water the establishment phase correctly
New plants need consistent moisture while roots establish. After establishment, transition to deeper, less frequent watering
(appropriate to the plant and your climate). This builds stronger root systems and reduces dependency.
Prune for form, not panic
The best pruning is the pruning you don’t have to do because you planned mature size correctly. When you do prune, aim for
plant health, safety clearance, and maintaining natural formrather than turning everything into identical green meatballs.
Common Landscape Planning Mistakes (And How to Avoid Them)
Mistake 1: Starting with plants instead of a plan
Plants are the easiest thing to buy and the easiest thing to misplace. Design structure first (zones, paths, drainage, hardscape),
then choose plants that fit.
Mistake 2: Ignoring water flow
Drainage issues don’t disappear because you planted a hydrangea. Fix grading and drainage early to protect your investment.
Mistake 3: Overcomplicating the plant palette
A smaller set of repeating plants looks more cohesive and is easier to maintain. Your yard can be interesting without becoming a botanical identity crisis.
Wrap-Up: The Real Secret to a “Perfect Yard”
A perfect yard isn’t a single decisionit’s a sequence. When you start with site analysis, design by zones, solve water issues,
install hardscape first, group plants by needs, and plan for maintenance, your landscape becomes easier to live with and nicer to look at.
That’s the goal: a yard that feels like it belongs to your home, your climate, and your actual life.
Experience-Based Lessons Homeowners Learn the Hard Way (So You Don’t Have To)
Here are real-world, experience-driven insights people tend to pick up only after a season (or three) of living with a new landscape.
Consider this the “wisdom section” of your landscape planning tipsearned in muddy shoes and slightly exasperated sighs.
1) The plan you can explain is the plan you can finish
Homeowners who succeed long-term usually have a simple story for their yard: “Outdoor dining here, play space there, privacy along this fence,
and low-water planting in the hot corner.” If your plan requires a 20-minute lecture and hand gestures, you’ll struggle to make decisions later.
A clear plan keeps you from buying random plants on sale that don’t match your sun, soil, or style.
2) You will walk the same “desire paths” every day
People naturally take the shortest comfortable route. If the layout doesn’t match daily habits, the lawn gets worn into a shortcut trailor worse,
you keep stepping through planting beds like a confused deer. A quick trick: for a week, notice where feet actually go (to the grill, to the bins,
to the gate). Then place paths where life already happens. Your yard shouldn’t require retraining your family like it’s a behavioral science project.
3) Drainage is either your quiet hero or your loud villain
Many homeowners don’t realize how much water movement shapes everything until they see mulch washing away, patio puddles that never dry, or plants that
“mysteriously” fail in one soggy strip. When drainage is addressed earlygentle grading, better downspout routing, maybe a rain gardenyards become
more reliable. Plants stop rotting in wet pockets, and hardscapes last longer. The payoff isn’t glamorous, but it’s enormous.
4) The “right plant, right place” rule saves the most money
People who match plants to conditions buy fewer replacements and do less “emergency gardening.” The most common regret is forcing a sun-lover into shade
(or a dry-climate plant into a low, wet area) and then spending the season trying to compensate with extra watering, fertilizer, and pep talks.
When the plant fits the spot, it behavesmeaning less work and better results.
5) Small repeats look high-end
A yard often looks “designer” when a handful of plants and materials repeat in a deliberate rhythm. Homeowners who keep adding one-of-everything
usually end up with a yard that feels busy, not cohesive. Repeating the same edging, using two or three main hardscape materials, and sticking to a
core plant palette makes everything feel intentionaleven if you installed it in phases over time.
6) Maintenance friction is real (and it changes behavior)
If watering requires dragging hoses through obstacles, people stop doing it consistently. If pruning means squeezing behind thorny shrubs, it gets delayed.
If the trash bins are annoying to reach, the side yard becomes a messy “storage zone.” The best planners reduce friction: hose bib access, clear bed edges,
space to move, and irrigation that matches hydrozones. The easier your yard is to maintain, the more it actually gets maintained.
7) The first year is about roots, not perfection
Many landscapes look “thin” at first. That’s normal. Perennials and shrubs need time to establish, and spacing for mature size can look sparse early on.
Homeowners who understand this avoid overplanting (which later creates crowding, disease, and constant trimming). A smart approach is to use mulch and a few
well-placed annuals or containers for instant color while permanent plants grow into their roles.
If you treat landscape planning like a sequenceobserve, plan, build structure, then layer plantsyou’ll end up with a yard that feels calm, functional,
and genuinely “finished.” And you’ll spend less time fixing mistakes and more time actually enjoying the space. Imagine that.


