Table of Contents >> Show >> Hide
- Before You Start: Choose Your Lights, Your Method, and Your Mood
- The Best Overall Technique: The Vertical Method
- The Classic Spiral Method (Fast and Familiar)
- The Designer Look: Branch-Wrapping for Maximum Depth
- Common Mistakes (and How to Fix Them)
- Pro Tips for a Tree That Looks Like It Belongs in a Holiday Movie
- Quick FAQ: The Questions Everyone Asks Mid-Decorating
- Real-Life Experiences: What I’ve Learned After Many Seasons of Tree-Light Wrestling (Extra )
- Conclusion
There are two kinds of people in December: the “I love holiday magic!” crowd and the “why are these lights
already tangled?” survivors. The good news? Stringing lights on a Christmas tree doesn’t have to feel like
you’re negotiating with a shiny, prickly octopus.
In this guide, you’ll learn three reliable methods (vertical, spiral, and branch-wrapping), how many lights
you actually need, how to make your tree glow from the inside out, and how to avoid common mistakeslike
ending up with one bright side and one “who turned off the sun?” side.
Before You Start: Choose Your Lights, Your Method, and Your Mood
1) Pick lights that match your vibe (and your patience)
For most homes, LED Christmas lights are the easiest choice: they run cooler, use less
energy, and usually let you connect more strands than older styles. Incandescent sets can look cozy, but they
can get warmer and often have stricter connection limits. When in doubt, read the tag on the light setholiday
lighting is one of those situations where “winging it” is not a charming personality trait.
Quick style choices:
- Warm white = classic, candle-ish glow.
- Cool white = crisp, icy sparkle.
- Multicolor = playful, nostalgic, “my inner child paid rent this month.”
- Green wire hides best on most trees; white wire can pop on flocked trees.
2) How many lights do you need?
Light-count rules vary because trees vary. A skinny 7-foot pencil tree and a fluffy 7-foot “I ate all the cookies”
tree do not need the same number of bulbs. Still, these guidelines help you start:
- Standard sparkle: about 100 lights per foot of tree height.
- Extra glow: 150+ lights per foot if your tree is very full or you love a bright look.
- Minimalist lighting: fewer lights can look chic if you’re intentionally going airy and simple.
Example: A 6-foot tree often looks great with roughly 600 lights for a “full glow” look. If you’re going more
minimalist or your tree is sparse, you may prefer fewer. If you want that “department store window” sparkle,
you may want more. The key is consistency: whatever amount you choose, distribute it evenly and add depth.
3) Do a 60-second safety and sanity check
Before the first strand hits the branches:
- Test every strand (yes, even the “brand new” one).
- Inspect cords for damage like fraying, cracked sockets, or loose connections.
- Plan your plug: pick the outlet closest to your tree so you don’t build a cord “bridge” across the living room.
- Fluff the tree first: shaping branches now saves you from redoing your lights later.
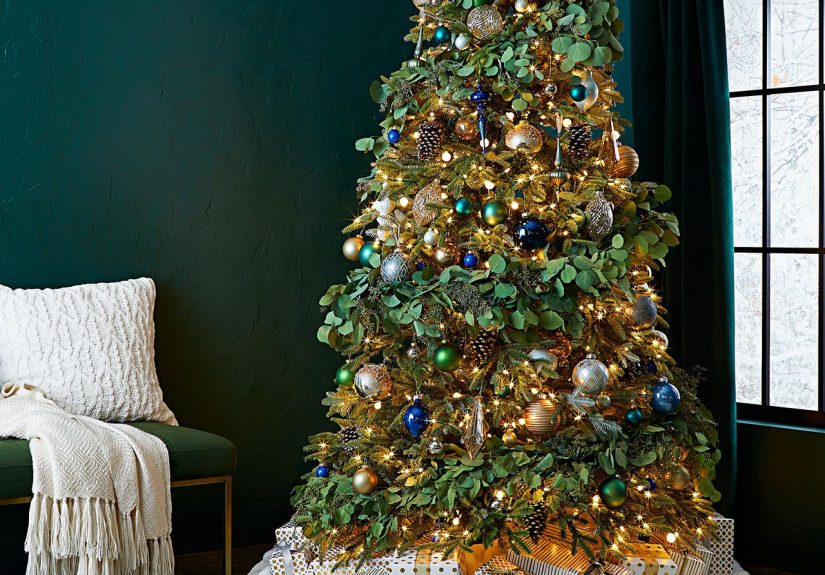
The Best Overall Technique: The Vertical Method
If you’ve ever wrapped lights around and around your tree like you’re putting a scarf on a snowman,
meet your new best friend: vertical Christmas tree lighting. Instead of circling the tree,
you drape lights up and down in sections. It’s faster, easier to adjust, and tends to look brighter because
more bulbs face outward.
Why the vertical method works
- Even coverage: It’s easier to see gaps and fix them immediately.
- Less tangling: You’re not wrestling the strand around the entire tree repeatedly.
- Better sparkle: Lights naturally sit on the surface and can be tucked inward for depth.
Step-by-step: how to string lights vertically
-
Start with the plug near the base.
Place the plug end close to the outlet (or route it down the trunk so it’s hidden). -
Secure the first section.
If your strand has an end without the plug, begin there at the top so the plug stays at the bottom.
If it’s easier, you can start at the bottom and work upwardjust keep the cord path tidy along the trunk. -
Drape straight down in a “curtain.”
Let a vertical line of lights fall from top to bottom, then move over a few inches and go back up (or back down),
creating long vertical columns around the tree. -
Work in “slices.”
Imagine the tree is a pizza. Light one slice at a time: front-right, front-left, back-right, back-left.
This keeps spacing consistent and prevents the classic “front is fabulous, back is forgotten” situation. -
Add depth as you go.
Every so often, tuck a few bulbs deeper toward the trunk. This creates that layered glow that makes
ornaments look like they’re floating in a cozy halo. -
Step back and adjust.
Turn the lights on, stand across the room, and look for dark zones. Fix them nowfuture you will be grateful.
Pro tip: If your tree sits in a corner and you truly only decorate the “viewing side,” you can use the vertical
method on the front two-thirds. Just be honest with yourself about angles… and with your guests about where they’re
allowed to stand for photos.
The Classic Spiral Method (Fast and Familiar)
The spiral (or horizontal wrap) is the traditional approach: you wrap the strand around the tree from top to bottom
or bottom to top. It’s simple and works wellespecially if you’re aiming for an evenly “banded” look.
Step-by-step: spiral lighting
- Begin at the base near the outlet. Keep the plug accessible and the cord hidden along the trunk when possible.
- Wrap around in gentle, even loops. Don’t yank the wire tightyour branches aren’t training for a marathon.
- Go up (or down) steadily. Keep each “ring” of lights the same distance apart.
- Tuck some bulbs inward. Every few wraps, push a small section slightly toward the trunk for depth.
- Check the full tree. Turn the lights on and look from multiple angles.
When spiral lighting goes wrong, it’s usually because the spacing changes halfway throughtight at the top,
loose at the bottom, and suddenly your tree looks like it’s wearing a glowing belt. Keep your wrap distance
consistent for the cleanest result.
The Designer Look: Branch-Wrapping for Maximum Depth
If you’ve ever stared at a magazine-perfect tree and thought, “How is it glowing like that from inside?”
the answer is often wrapping lights along individual branches.
How branch-wrapping works
Instead of treating the tree like a cone, you treat it like a collection of branches. You run the strand from
the trunk outward along a branch, then back toward the trunk, then move to the next branch. It takes longer,
but the payoff is a rich, layered glow that looks expensive (without requiring a second mortgage).
Step-by-step: branch-wrapping
- Start near the trunk. Anchor the strand so it doesn’t slide.
- Wrap out to the tip of a branch. Let bulbs sit naturallyno need to mummify the branch.
- Wrap back toward the trunk. This creates a “double depth” effect.
- Move to the next branch. Repeat up the tree, working in sections.
- Hide the cord path. Keep wires close to the trunk between branches.
This method is especially great for trees with big gaps between branches or for anyone who wants ornaments to pop.
Light depth makes everything else look betterlike good lighting in selfies, but for evergreen plants.
Common Mistakes (and How to Fix Them)
“My lights look patchy.”
Patchy usually means uneven spacing or not enough depth. Fix it by redistributing strands in sections and
tucking a few bulbs closer to the trunk. If you’re using the spiral method, consider switching to vertical for
easier gap control.
“My tree is glowing on one side only.”
That’s the classic “decorated from the couch” problem. Walk around the tree and make sure each quadrant gets attention.
If the tree is against a wall, still wrap some lights around the hidden side so the visible side doesn’t look flat.
“The cord is showing and it’s ruining my vibe.”
Run the main cord down the trunk and tuck it behind thicker branches. Use green twist ties or ornament hooks as tiny
guides (gentlyno branch bullying). Also: choose wire color that blends with your tree.
“My lights are tangled beyond human understanding.”
First: breathe. Second: plug them in so you can see where the strand is going. Third: work from one end, slowly,
like you’re untangling headphones in 2012. Next year, store lights by wrapping them around a piece of cardboard,
a reel, or a hanger so they don’t form a knot-based ecosystem.
Pro Tips for a Tree That Looks Like It Belongs in a Holiday Movie
Layer your lighting
The easiest upgrade is adding depth: put some bulbs near the trunk and some near the tips. Even if you’re using
the vertical or spiral method, a little “in and out” movement makes the tree glow instead of just sparkle.
Use a timer (because sleep is also festive)
A timer helps you enjoy the glow without leaving lights on all night. It’s also handy if you forget to turn
them off when you leave the housebecause holiday magic should not come with a side of worry.
Keep real trees hydrated and placed safely
If you have a live tree, water it regularly so it stays fresher longer. Place your tree away from heat sources
like fireplaces, space heaters, radiators, and candles. Also, don’t block exits with your treeholiday cheer is
best enjoyed with clear pathways.
Follow the manufacturer’s connection limits
Every set of lights has guidance for how many strands can be connected end-to-end. Read the tag. If you need more
strands than your set allows, use multiple outlets (or a power solution rated appropriately) rather than chaining
beyond what’s recommended.
Quick FAQ: The Questions Everyone Asks Mid-Decorating
Should I put lights on before ornaments?
Yes. Lights first, then ribbon/garland, then ornaments, then the topper. If you add ornaments first, you’ll spend
the rest of the evening playing “excuse me, sorry, coming through” with every branch.
Do I start at the top or bottom?
For vertical lighting, many people start at the top with the non-plug end so the plug finishes near the outlet.
For spiral, starting at the bottom is convenient. The “right” answer is the one that keeps your plug where you need it
and makes spacing easy to control.
What if my tree is pre-lit?
Pre-lit trees can still benefit from extra lights for depthespecially if you want a brighter look. Add one or two
strands using the vertical method, focusing on dark pockets and the outer tips for sparkle.
Real-Life Experiences: What I’ve Learned After Many Seasons of Tree-Light Wrestling (Extra )
The first time I decorated a Christmas tree on my own, I believed a very confident lie: “How hard can it be?”
Ten minutes later, I was trapped in a glowing spaghetti situation, holding a strand of lights like it had personally
offended my family. I learned three important truths that night: (1) lights tangle faster when you glare at them,
(2) stepping back to look at your progress is not optional, and (3) holiday decorating should come with snacks.
Over the years, I’ve tested all the methods. The spiral wrap is like the classic holiday movie: familiar, comforting,
and sometimes a little predictable. It works, especially when you’re short on time or decorating with kids who have
already moved on to ornaments and are now trying to hang a candy cane directly on the tree stand. But the spiral method
also taught me a sneaky lessonif you don’t watch your spacing, the top becomes a runway spotlight while the bottom
looks like it’s waiting for the sequel.
Then I discovered the vertical method, and it felt like upgrading from a flip phone to a smartphone. Suddenly I could
see where my lights were going. If a section looked dim, I didn’t have to unravel half the tree like a detective in a
holiday mystery. I just adjusted that vertical “curtain” of lights, tucked a few bulbs inward, andboombalanced glow.
It’s also the method that saved my patience when I started decorating fuller trees. Those big, lush branches can swallow
lights if you only stay on the surface. Going vertical gave me a natural rhythm: drape, tuck, step back, adjust, repeat.
My fanciest trees have always used some version of branch-wrapping, even if I only did it on the front half. It’s the
method that makes ornaments look like they’re floating. The first time I tried it, I took forever. I was wrapping each
branch with the careful focus of someone frosting a wedding cake. But I also learned you don’t have to be perfect. Even
wrapping just a few feature branchesthose at eye level and near the frontadds depth that makes the whole tree look
professionally done.
My most practical “experience tip” is this: decorate in stages and don’t be afraid to pause. I used to try to finish the
entire tree in one heroic sprint, which is how I ended up sweaty, annoyed, and suspiciously low on holiday spirit.
Now I do it like a calm adult (or at least an adult in training): fluff the tree, test the lights, do the first pass,
take a break, come back and fine-tune. The second pass is where the magic happenstiny adjustments that turn “nice”
into “wow.”
Finally, I learned that the best Christmas tree lights aren’t the ones with the fanciest marketing on the boxthey’re the
ones you can trust, the ones you’ve tested, and the ones you’ll actually enjoy looking at every night. When your tree
glows evenly, everything else feels easier: the ornaments pop, the room feels warmer, and you start to believejust a little
that holiday miracles are real (or at least that you can conquer one strand of lights without dramatic background music).
Conclusion
The secret to a beautifully lit Christmas tree is simple: pick the right amount of lights, choose a method that matches
your patience level, and distribute bulbs with both surface sparkle and inner depth. If you want the easiest “pro” look,
go vertical. If you want classic comfort, spiral works. If you want that magazine glow, add some branch-wrapping.
And no matter what: test your strands, keep cords tidy, and enjoy the processbecause the tree is supposed to sparkle,
not your stress level.


