Table of Contents >> Show >> Hide
- Before You Start: Know What You’re Replacing
- Tools and Materials You May Need
- How to Replace a Well Pump Step by Step
- Step 1: Confirm the Pump Is the Real Problem
- Step 2: Shut Off Power and Relieve System Pressure
- Step 3: Match the Replacement Pump Correctly
- Step 4A: Replacing a Shallow Well Pump
- Step 4B: Replacing a Deep Well or Submersible Pump
- Step 5: Check the Pressure Tank and Pressure Switch Before You Blame the New Pump
- Step 6: Test the System Thoroughly
- After Replacement: Water Safety and Maintenance Checklist
- Common Mistakes to Avoid
- How Much Does It Cost to Replace a Well Pump?
- Real-World Experiences and Lessons Homeowners Learn the Hard Way (About )
- Conclusion
- SEO Tags
If your faucets suddenly spit air, your shower pressure drops to “sad drizzle,” or your well pump sounds like it’s training for a marathon, you may be facing a well pump replacement. It’s one of those home repairs that sits somewhere between “weekend project” and “please don’t electrocute yourself.”
The good news: replacing a well pump is absolutely manageable in some casesespecially shallow well systemsif you diagnose the problem correctly, follow safety steps, and know when to call a pro. The not-so-good news: deep well and submersible pump replacements can get heavy, technical, and risky fast.
This guide walks you through the full process in plain English, with practical tips, common mistakes to avoid, and real-world experience notes at the end. We’ll also cover pressure tanks, pressure switches, and the testing steps many homeowners skip (and regret later).
Before You Start: Know What You’re Replacing
Shallow Well Pump vs. Deep Well Pump
The first step is identifying your system. In general, shallow well systems use a jet pump and are typically used when water is relatively close to the surface. Deep well systems often use submersible pumps installed down inside the well casing. That difference matters because the replacement process, tools, and risk level are completely different.
If you have a shallow well jet pump, the pump is usually above ground (often in a utility room, basement, or pump house), which makes access easier. If you have a deep well submersible pump, the pump and drop pipe assembly may need to be pulled from the wellsometimes with special tools, a helper crew, or a well contractor.
Signs Your Well Pump May Need Replacement
Before buying a new pump, confirm the pump is actually the problem. A bad pressure switch, waterlogged pressure tank, clogged filter, or system leak can mimic pump failure. Common warning signs include:
- Low or no water pressure
- Pump runs constantly or short-cycles (turns on/off too often)
- Spitting faucets (air in the lines)
- Unusual grinding or squealing sounds
- Dirty or discolored water (sometimes from sediment or pump wear)
- A sudden spike in electric bills from a pump that won’t stop running
Short-cycling is especially important to catch early. It can burn out pumps, damage pressure switch contacts, and wear out your system way faster than normal.
DIY or Call a Pro?
Here’s the honest answer: shallow well pump replacement is a possible DIY project for experienced homeowners. Deep well/submersible replacement is often better left to a licensed well contractor.
Why? Weight, wiring, depth, and risk. Some submersible pump assemblies are heavy, and pulling them can damage wiring, drop pipe, or the well itself if done incorrectly. Also, well systems involve electricity + water + pressure + confined areas. That’s a spicy combo.
Also check local rules before touching anything. In many states, well work, pump installation, or repairs are regulated, and licensed contractors may be required for some or all of the work.
Tools and Materials You May Need
Your exact list depends on your system and pump model, but these are common items:
- Replacement well pump (same type/horsepower unless a pro recommends otherwise)
- Pressure switch (if replacing at the same time)
- Pressure gauge (if old one is questionable)
- Pipe fittings, unions, thread sealant/PTFE tape
- Check valve (if needed and recommended by system design)
- Wire strippers, electrical connectors rated for the application
- Multimeter (for basic voltage checks)
- Wrenches, pliers, screwdrivers
- Garden hose/bucket for draining
- Air gauge and air compressor (for pressure tank precharge check)
- Strong rope (for some submersible setups)
- PPE: gloves, eye protection, non-slip shoes
Tip: If you’re replacing a shallow well pump, many homeowners also inspect the pressure tank and pressure switch at the same time. Replacing one worn part while ignoring the other two is a classic “save $80 now, spend $800 later” move.
How to Replace a Well Pump Step by Step
Step 1: Confirm the Pump Is the Real Problem
Do a quick system check before you buy anything:
- Check the breaker/fuse for the well circuit.
- Look at the pressure gauge. Normal residential systems often run in a range such as 30/50 or 40/60 PSI (depending on setup).
- Inspect the pressure switch. Burned contacts, corrosion, or rapid cycling can indicate switch or tank problems.
- Check for leaks in visible plumbing near the tank and pump.
- Listen to the pump. Constant running, humming without pumping, or harsh mechanical noises are red flags.
If the pressure tank is waterlogged or has lost air charge, the pump may short-cycle and act “bad” even when the motor is still okay. Always check the tank and switch before condemning the pump.
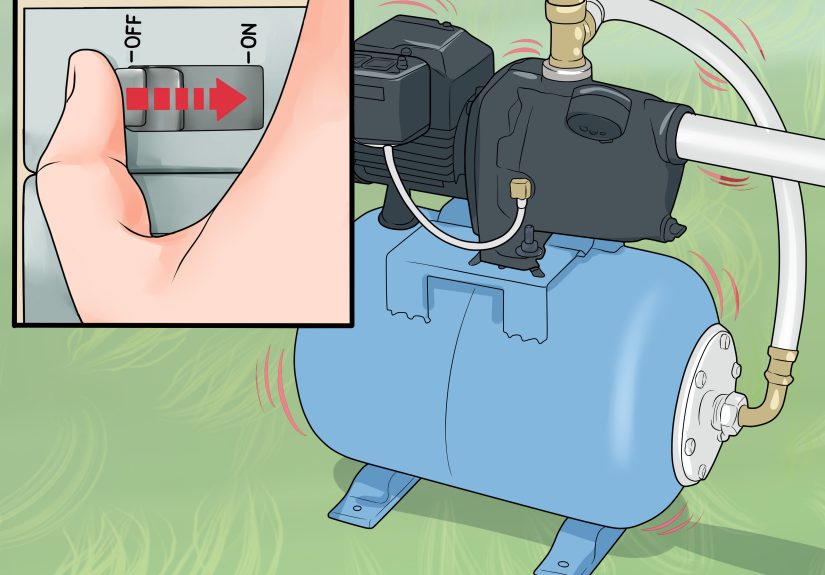
Step 2: Shut Off Power and Relieve System Pressure
This is the non-negotiable step. Turn off the breaker to the well pump and verify power is off. Do not rely on “I think it’s off.” Use a meter if you know how. If you don’t, call an electrician or well contractor.
Then:
- Open a faucet to relieve pressure
- Drain water from the system as needed
- Keep the discharge line under control while draining (it can move suddenly)
For systems near the wellhead, protect the well opening so tools, dirt, or debris don’t fall in. Contamination prevention matters here.
Step 3: Match the Replacement Pump Correctly
Don’t guess on horsepower or pump type. In many cases, replacing with the same type and horsepower is the safest moveunless your household demand has changed or a professional recommends an upgrade.
Important matching points:
- Pump type (jet vs. submersible)
- Horsepower rating
- Well depth and lift requirements
- Voltage and wiring compatibility
- Control box compatibility (for some deep well pumps)
If your home is now using more water (new bathroom, irrigation, extra family members), ask a pro whether your pump and pressure tank sizing still make sense.
Step 4A: Replacing a Shallow Well Pump
This is the more DIY-friendly scenario. The exact sequence varies by brand, but the general process looks like this:
- Disconnect the old pump. Remove electrical connections (after verifying power is off), disconnect plumbing, and remove the old unit.
- Inspect the suction and discharge lines. Replace rusted, scaled, or damaged sections. An old cracked line can cause air leaks and poor priming.
- Check/replace the check valve if your setup uses one and it’s worn or leaking back.
- Mount the new pump securely. Make sure the pump is supported and aligned so pipe weight doesn’t stress the housing.
- Make airtight, watertight connections. Poor sealing on suction-side fittings is one of the most common causes of frustration.
- Reconnect wiring exactly as the manufacturer directs and according to local electrical code.
- Prime the pump if required by your model (many jet pumps require priming).
- Restore power and test. Watch the pressure gauge, inspect for leaks, and verify the pump cycles normally.
Once the system is running, test water flow and look for sediment, silt, or cloudy water before normal household use.
Step 4B: Replacing a Deep Well or Submersible Pump
For deep well systems, the pump is usually down in the well and connected to drop pipe and electrical cable. The assembly may be heavy and awkward to pull, and the risk of damaging components is real.
At a high level, the process involves:
- Disconnecting power and controls
- Opening the well cap safely
- Pulling the pump/drop pipe assembly carefully
- Inspecting cable, pipe, fittings, and check valve(s)
- Installing the new pump assembly
- Reconnecting controls and pressure system
- Testing operation, pressure, and water quality
If this sounds like a lot, that’s because it is. For deep systems, hiring a licensed well contractor is often the smarter, safer, and sometimes cheaper option once you factor in risk and tool rental.
Step 5: Check the Pressure Tank and Pressure Switch Before You Blame the New Pump
A new pump can still behave badly if the pressure tank or switch is off. This is where many replacements go sideways.
Pressure tank basics: The pressure tank stores water under pressure, helps maintain steady flow, and reduces pump cycling. A failing or waterlogged tank causes frequent starts/stops, which is rough on the pump motor.
Pressure switch basics: The switch turns the pump on and off based on system pressure. It does not “create” pressureit only controls the on/off cycle.
Precharge rule (very important): On many systems, the pressure tank air charge (with the tank drained/empty) should be set to 2 PSI below the pressure switch cut-on setting. For example, if your system starts at 30 PSI, the empty tank precharge is typically 28 PSI.
Also, if your pressure switch is rapid-cycling, don’t assume the switch is bad. The cause may be:
- A failing pressure tank/bladder
- A leak in the well or plumbing system
- A bad check valve letting water drain back
- Sediment/debris at the pressure switch inlet
- An undersized pressure tank for the demand
Safety note: Pressure switches are energized components. If you’re not experienced with electrical work, do not adjust or replace a pressure switch live. Shut off power and call a licensed professional when in doubt.
Step 6: Test the System Thoroughly
Once the new pump is installed and the pressure system is set correctly, run a full test:
- Watch the gauge through several on/off cycles
- Check every fitting for leaks
- Confirm steady water pressure at multiple fixtures
- Listen for short cycling, chatter, or unusual noises
- Check water clarity (especially after a pump pull or plumbing work)
If the pump won’t shut off, overshoots the pressure range, or cycles too rapidly, stop and diagnose the pressure tank/switch/check valve system before assuming the new pump is defective.
After Replacement: Water Safety and Maintenance Checklist
Private well owners are responsible for the well system and water quality. After repair or replacement, it’s a smart time to test the waterespecially if you opened the system, had contamination concerns, or noticed changes in color, odor, or taste.
- Test the water after pump or plumbing replacement
- Schedule routine annual testing and a yearly well checkup
- Document the work (pump model, horsepower, pressure settings, date installed)
- Keep the wellhead clean and protected
- Monitor cycling behavior during the first week
If your well was affected by flooding, storm damage, or another emergency, treat that as a special case. Electrical and contamination hazards increase significantly, and well/pump contractor guidance is strongly recommended before restarting the system.
Common Mistakes to Avoid
1) Replacing the Pump Before Checking the Pressure Tank
A bad pressure tank can make a healthy pump look broken. Always test tank behavior and precharge first.
2) Ignoring the Pressure Switch
Burned contacts, clogged pressure ports, or incorrect settings can cause poor cycling and pump damage.
3) Wrong Pump Sizing
Too small and the system struggles. Too large and you may create pressure or cycling issues. Match the system, not just the price tag.
4) Poor Suction-Side Sealing (Jet Pumps)
One tiny air leak can ruin priming and cause maddening performance issues. Seal and tighten carefully.
5) Skipping Water Testing
You just opened a critical water system. Testing is cheap insurance.
6) Forgetting Local Rules
Well and pump work may be regulated in your area. Some states require licensed contractors for certain tasks and documentation.
How Much Does It Cost to Replace a Well Pump?
Costs vary by pump type, depth, labor, and components. In general, the pump itself may be a few hundred dollars, but total replacement cost is usually much higher once labor, fittings, wiring, and related repairs are included.
Shallow well jet pump replacements are generally less expensive than deep well submersible replacements. Deep systems often cost more because of labor, equipment, and time. If a pressure tank, pressure switch, or check valve also needs replacement, the total rises.
Budget for the entire system, not just the pump. The “cheap” replacement becomes expensive if a bad tank kills the new motor six months later.
Real-World Experiences and Lessons Homeowners Learn the Hard Way (About )
One of the most common experiences homeowners share after a well pump replacement is this: they expected a one-part repair, but it turned into a system repair. The pump got all the blame because it was the loudest and most dramatic component, but the real issue was a tired pressure tank or a crusty old pressure switch. The lesson? A well system is a team sport. When one player starts acting up, check the whole lineup.
Another frequent story comes from shallow well pump replacements: everything looks perfect on paper, but the new pump won’t prime. The culprit is often a tiny suction leak at a fitting that “looked tight enough.” Homeowners describe spending hours doubting the new pump, the motor, the voltage, and the alignmentonly to find one threaded joint leaking air. Once that connection is resealed, the system suddenly works like magic. It’s a humbling reminder that in plumbing, small leaks can cause big headaches.
Deep well pump jobs bring a different kind of experience: surprise weight and logistics. People often underestimate how heavy and awkward a submersible pump assembly can be once you include drop pipe, wire, and water. Many homeowners start the job thinking, “I watched three videos; I got this,” and end the day thinking, “I should have invited two more people and a professional.” It’s not a lack of skillit’s that deep well work is physically demanding and can go wrong fast if the pipe twists, the wire snags, or a component slips.
There’s also the “new pump, same problem” experience, which happens more often than anyone likes to admit. A homeowner replaces the pump, turns the system on, and the short cycling is still there. Then they discover the pressure tank bladder is bad, or the check valve is leaking back into the well. This is why experienced contractors often diagnose from the pressure tank and switch first. It’s not because they’re trying to complicate the job; it’s because they’ve seen this movie before.
Another smart lesson many homeowners learn is to keep records. The folks who write down their pressure switch settings, pump horsepower, installation date, and water test results have a much easier time later. When the next issue happens (and eventually, something always needs maintenance), they can troubleshoot faster, buy the right replacement, and explain the system clearly to a contractor. The homeowners who skip documentation usually end up crouched next to a pressure tank with a flashlight, trying to read a faded label while googling model numbers at 9:30 p.m.
Finally, the best experience-based advice is this: don’t confuse confidence with speed. The successful DIY well pump replacements usually happen when people go slow, cut power early, double-check fittings, and test the system over several cycles. The rushed jobs are the ones that end with a wet floor, a tripped breaker, and a new respect for licensed well contractors. In other words, well pump replacement is absolutely doable in the right situationbut it rewards patience more than heroics.
Conclusion
Replacing a well pump can be a straightforward repair or a full-on system project depending on whether you have a shallow well jet pump or a deep well submersible setup. The key to doing it right is not just swapping partsit’s diagnosing the whole system, working safely, and checking the pressure tank and pressure switch before and after installation.
If you’re dealing with a shallow well pump and you’re comfortable with plumbing and electrical safety, a DIY replacement may be realistic. If you’re working on a deep well, handling storm damage, or unsure about pressure settings and wiring, calling a licensed well contractor is the smartest move. Either way, finish the job with water testing, good records, and a quick victory shower (assuming the pressure is back where it belongs).


