Table of Contents >> Show >> Hide
- Before You Touch a Lug Nut: Safety & Setup
- Step-by-Step: How to Remove Lug Nuts and Take Off the Tire
- If Things Get Stubborn: Troubleshooting Like a Pro
- Reinstalling the Tire the Right Way (So It Stays On)
- Common Mistakes (and How to Avoid Them)
- When to Stop and Call a Professional
- Conclusion
- Experiences From the Road: What People Actually Run Into (and How They Deal)
Lug nuts are tiny metal circles with one job: keep your wheel attached to your car while you live your life.
And they do that job with the stubborn confidence of a toddler refusing bedtime.
If you’re here, you’re either (a) dealing with a flat tire, (b) rotating tires, (c) swapping wheels,
or (d) trying to remove one lug nut that has decided to become a permanent resident.
This guide walks you through safe, professional-style steps for removing lug nuts and pulling a tire/wheel off the hub,
plus what to do when things go sideways (rounded nuts, wheel locks, rust-welded wheels, and other fun surprises).
You’ll also learn how to reinstall the wheel correctlybecause “the wheel stayed on the whole drive home” is not a torque specification.
Before You Touch a Lug Nut: Safety & Setup
Choose a safe location (your future self will thank you)
- Flat, solid ground is non-negotiable. Avoid soft shoulders, gravel slopes, and “it’s probably fine” hills.
- Turn on hazard lights. If you have reflective triangles/flares, use them.
- Set the parking brake. Put the car in Park (or in gear for a manual).
- Chock the opposite wheels (wheel chocks are best; a solid wood block is a decent backup).
If you’re on a narrow shoulder with fast traffic and minimal space, the most “expert-certified” move might be:
don’t do it here. Call roadside assistance or move to a safer spot if the vehicle can roll.
Tool checklist (basic to “I’ve been burned before”)
- Lug wrench (or a 1/2-inch breaker bar + correct socket)
- Car jack (scissor jack is okay for emergencies; a floor jack is easier at home)
- Jack stands (highly recommended for any non-emergency work)
- Wheel chocks
- Tire pressure gauge (especially if you’re installing a spare)
- Torque wrench (the grown-up tool that prevents over-tightening)
- Penetrating oil (for stuck hardwareuse thoughtfully)
- Wheel lock key (if your car has locking lug nuts)
- Gloves and a small kneeling pad or towel (optional, but your knees will applaud)
Pro detail: If you’re using sockets, a 6-point socket typically grips lug nuts better than a 12-point socket when you’re applying real force.
Translation: fewer rounded nuts and fewer new swear words.
Step-by-Step: How to Remove Lug Nuts and Take Off the Tire
Step 1: Remove the hubcap/center cap (if you have one)
Some hubcaps pop off; others have plastic lug covers; some center caps pull off by hand.
If you need a flat tool, use gentle pressure so you don’t crack trim. Put the pieces somewhere you won’t step on them.
Step 2: “Break” the lug nuts loose while the tire is still on the ground
This is the step people skipand then wonder why the car wobbles like a shopping cart with one bad wheel.
With the tire on the ground, the vehicle’s weight keeps the wheel from spinning while you loosen the nuts.
- Seat the wrench or socket fully on the lug nut (no half-on, half-off drama).
- Turn counterclockwise to loosen (lefty-loosey).
- Loosen each lug nut about 1/4 to 1/2 turn. Do not remove them yet.
If the lug nuts are extremely tight, use controlled body weight on the wrench handle.
If you need more leverage, a longer handle (breaker bar) is safer than bouncing on a short wrench.
Step 3: Position the jack at the correct jack point
Your owner’s manual shows the manufacturer’s jack pointsuse them.
Jacking under the wrong spot can damage pinch welds, bend rocker panels, or (worst case) slip.
- Place the jack so it contacts the proper lift point.
- Make sure the jack is on stable ground, not on a tilt or soft soil.
- Lift the vehicle until the tire is just off the ground (an inch or two is usually enough).
If you’re working at home: lift the vehicle and set it down on jack stands.
A jack is for lifting, not for living under. Even if you’re not crawling under the car, stands add stability.
Step 4: Remove the lug nuts completely
Now that the wheel is off the ground, finish unthreading the lug nuts.
Put them somewhere safeinside a shallow tray, your pocket, or even the hubcapso they don’t roll into the next county.
Note: Some vehicles use lug bolts instead of lug nuts (common on certain European makes).
Same idea, but the bolt comes out of the hub. Support the wheel with a knee as you remove the last bolt so it doesn’t drop.
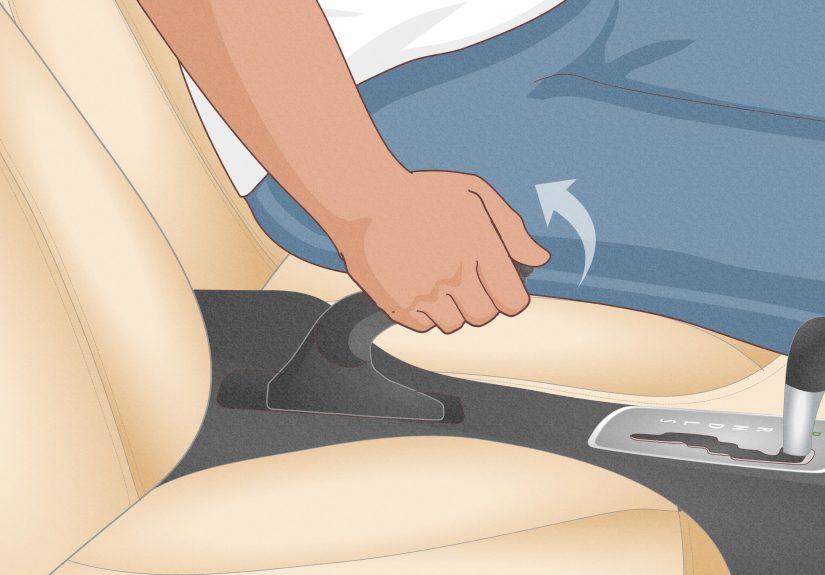
Step 5: Pull the tire/wheel straight off the hub
Grip the tire at the 3 and 9 o’clock positions and pull it straight toward you.
If it slides off easily: congratulations, you are living in a rust-minimized utopia.
If the wheel is stuck, don’t panicthis is common, especially in areas with road salt.
Try a firm wiggle. If it still won’t move, jump to the troubleshooting section below.
If Things Get Stubborn: Troubleshooting Like a Pro
Problem: Lug nuts won’t budge
- Re-seat the tool: Make sure the socket is the exact size and fully seated.
- Use a breaker bar: Longer handle = more controlled torque.
- Apply penetrating oil: Spray the threads area and let it soak 10–15 minutes (longer can help).
- Avoid frantic bouncing: Sudden force can slip and injure you (or strip the nut).
Quick example: If you’re using the factory lug wrench and it flexes like a cooked noodle,
switch to a 1/2-inch breaker bar with a 6-point socket. You’ll usually break the lug free with one smooth pull.
Problem: The lug nut is rounded, stripped, or “swollen”
Rounded or stripped lug nuts happen when the wrong size tool is used, the tool isn’t fully seated, or the nut is damaged.
“Swollen” lug nuts often come from two-piece chrome-capped designs where the cap deforms and the socket no longer fits cleanly.
- Try a slightly smaller socket only if it fits tightly and seats fully (no wobble).
- Use a lug nut extractor socket designed to bite into damaged hardware.
- If multiple lugs are swollen/rounded, consider a shop visitforcing it can snap studs.
If a stud snaps, you’re not “almost done.” You’ve unlocked a side quest involving new studs, a hub, or a shop tow.
Problem: The wheel is stuck to the hub
A wheel can seize to the hub from corrosion. The fix is usually persuasion, not violence.
- Thread the lug nuts back on two turns (leave a small gap). This prevents the wheel from launching off unexpectedly.
- Kick the tire’s sidewall with the heel of your shoe at a few points around the tire (not the rim).
- Wiggle the wheel side to side and pull again.
If you’re at home, a rubber mallet tapped around the tire (not the rim) can help. Avoid striking brake components.
Problem: You have locking lug nuts (wheel locks)
Many cars have one locking lug nut per wheel. You’ll need the matching wheel lock key (often stored in the glove box, trunk, or with the spare).
If it’s missing, a shop can usually remove the lock with specialty toolsbut it’s rarely a roadside-friendly job.
Problem: The “lefty-loosey” rule isn’t working
It’s rare today, but some older vehicles used left-hand (reverse) threads on one side of the vehicle.
These are often marked with an “L” or “R.” If your vehicle is a classic (or you suspect reverse threads),
pause and confirm before you Hulk-smash a fastener the wrong way.
Reinstalling the Tire the Right Way (So It Stays On)
Step 1: Clean and check before mounting
- Look for obvious damage to the wheel, studs/bolts, and brake area.
- If there’s heavy rust on the hub face, lightly brushing it can help the wheel seat evenly.
- Make sure the wheel’s mounting surface is flushno rocks, no debris, no mystery washers.
Step 2: Mount the wheel and hand-thread the lug nuts
Align the wheel with the studs (or bolt holes) and push it fully onto the hub.
Then hand-thread each lug nut or bolt.
If it doesn’t thread by hand, stopcross-threading turns a simple job into an expensive one.
Step 3: Snug the lugs in a star (crisscross) pattern
Tighten in stages so the wheel seats evenly. For a 5-lug pattern, a common order is:
1 → 3 → 5 → 2 → 4.
For 4 lugs, tighten in an “X.” For 6 lugs, alternate across the circle.
Use the wrench to snug them while the wheel is still in the air (not full force yet).
Think “firm handshake,” not “crush the soda can.”
Step 4: Lower the vehicle and torque to spec
Lower the car until the tire touches the ground enough that it can’t spin, then torque the lugs in the same star pattern.
Finish lowering fully, then do one more torque pass.
Torque specs vary by vehicle and wheel type. Check your owner’s manual.
Many passenger cars land somewhere around the 80–110 ft-lb range, but trucks/SUVs can be higher.
“Tight enough” is not a numberuse a torque wrench when possible.
Step 5: Re-torque after driving (especially with new wheels)
If you’ve installed new wheels or recently removed the wheels, it’s smart to re-check torque after about
50–100 miles of driving. It’s a quick check that can catch settling before it becomes a wobble.
Common Mistakes (and How to Avoid Them)
- Loosening after jacking: This can rock the car on the jack. Break lugs loose on the ground.
- Over-tightening with an impact wrench: Impacts can stretch studs and make roadside removal miserable.
- Skipping the star pattern: Uneven clamping can cause vibration and uneven seating.
- Cross-threading: Always start threads by hand.
- Working without wheel chocks: Cars can rollquietly, suddenly, and rudely.
When to Stop and Call a Professional
DIY is greatuntil the risk outweighs the reward. Consider professional help if:
- A lug nut is rounded and you don’t have extractor tools.
- You suspect a broken/stretched wheel stud.
- The car is in an unsafe location (narrow shoulder, low visibility, heavy traffic).
- The wheel won’t come off and you’re escalating from “kick” to “sledgehammer.”
Conclusion
Removing lug nuts and a tire isn’t complicatedbut it is a job where doing it in the right order matters.
Secure the vehicle, break lug nuts loose on the ground, lift safely at the correct jack point, remove the wheel,
and reinstall using hand-threading, a star pattern, and proper torque.
Do that, and you’ll get a wheel change that’s solid, smooth, and drama-freethe automotive equivalent of a quiet group chat.
Experiences From the Road: What People Actually Run Into (and How They Deal)
In real life, the “remove lug nuts” moment rarely happens in a clean garage with perfect lighting and a calm soundtrack.
It happens in a parking lot right as the sky starts doing its best impression of a leaking ceiling.
One of the most common experiences drivers report is the sudden realization that the factory lug wrench feels like it was designed
for someone with superhero forearmsor for a lug nut that was gently tightened by a considerate elf.
The workaround most people discover quickly: leverage matters. A breaker bar (or even a simple cross wrench) turns the job from
a wrestling match into a controlled pull. The key is staying steadysmooth pressure beats frantic bouncing every time.
Another classic scenario: the wheel comes off… except it doesn’t. The lug nuts are removed, the car is lifted,
and the tire just sits there, smugly fused to the hub by years of rust and road grime.
People often try yanking harder (understandable), but what tends to work is a more methodical approach:
re-thread a couple of lug nuts loosely for safety, then use a few firm heel-kicks to the sidewall and a wiggle-pull rhythm.
It’s not elegant, but it’s effectiveand it avoids damaging the rim or startling yourself when the wheel finally lets go all at once.
Then there’s the wheel lock saga. Many drivers only learn they have locking lug nuts when they’re already halfway through the job
and one nut looks differentlike it’s wearing a little anti-theft top hat.
The “experience” here is usually a frantic search through the glove box, trunk foam tray, and every random pouch you own.
When the key is found, it feels like winning a small lottery. When it’s missing, the lesson is painful but memorable:
keep the wheel lock key where you can find it, and consider writing its location in your phone notes.
A newer annoyance people talk about is the “socket won’t fit” mystery, even when the size should be correct.
That can happen with swollen, chrome-capped lug nuts. The cap deforms just enough to turn a routine tire change into a standoff.
Drivers often describe trying multiple sockets, questioning reality, and briefly suspecting the laws of physics have changed.
The practical fix is usually either the correct-size, tight-fitting 6-point socket that truly seatsor stepping up to an extractor
socket and replacing the damaged lug nuts afterward. It’s a good reminder that hardware is consumable, not immortal.
Finally, there’s the “I tightened it until it felt tight” storyoften followed later by steering vibration or a friend
mentioning torque specs. Many people learn the hard way that over-tightening can be just as problematic as under-tightening,
especially if impact tools were involved. The experience that turns folks into torque-wrench believers is simple:
using the proper star pattern and torquing to spec makes the wheel feel smoother at speed and makes the next removal
dramatically easier. It’s one of those small maintenance habits that pays you back every time you don’t have to
fight the lug nuts like they owe you money.


