Table of Contents >> Show >> Hide
- Why Make a Dollar Store Glass Bead Table?
- Materials and Tools You’ll Need
- Step 1: Prep and Paint Your Table
- Step 2: Plan Your Glass Bead Design
- Step 3: Glue the Glass Beads in Place
- Step 4: Let the Adhesive Cure Completely
- Step 5: Optional – Grout and Seal Your Glass Bead Table
- Step 6: Style and Use Your Glass Bead Table
- Common Mistakes (and How to Avoid Them)
- Real-Life Tips and Experiences with DIY Glass Bead Tables
If your patio looks like it’s been “under construction” since 2017 and your budget says absolutely not to a fancy outdoor side table, this DIY dollar store glass bead table is about to be your new favorite project. With a cheap table, a few bags of glass gems from the dollar store, and the right glue, you can turn a sad little surface into a sparkling showpiece that looks like it came from a boutique garden shop instead of the clearance aisle.
This tutorial walks you through everything: what materials to buy at the dollar store, which adhesive actually holds up outdoors, how to lay out the glass beads so they don’t look chaotic, plus sealing and styling tips. Think of it as a mash-up of Hometalk-style hacks and classic mosaic table techniquesjust simplified for real people who don’t have a tile saw in their garage.
Why Make a Dollar Store Glass Bead Table?
Before we dive into the step-by-step guide, let’s talk about why this project is so popular with DIYers, crafters, and dollar store addicts:
- It’s budget-friendly. Glass gems from Dollar Tree or other dollar stores are ridiculously affordable. A basic table plus beads and adhesive is usually far cheaper than buying a decorative patio table.
- It looks expensive. When the sun hits the glass beads, you get a sparkling, almost “stained glass” effect similar to higher-end mosaic or sea-glass tables.
- It’s beginner-friendly. You’re essentially gluing flat-back glass beads onto a surface. No grout lines to cut, no complex tools, and no advanced woodworking skills required.
- It’s customizable. Use all clear beads for a raindrop effect, mix blues and greens for a coastal vibe, or go full rainbow “candy table.”
DIY communities and mosaic artists often use similar techniques to make glass-on-glass tabletops and accent tables, especially when repurposing old patio furniture or birdbaths. Clear silicone or mosaic adhesives are usually recommended because they grip glass well and hold up outdoors when cured correctly.
Materials and Tools You’ll Need
You can adapt this project to whatever small table you have, but here’s a simple, versatile supply list that works for most people:
Core Materials
- Small table – A metal or wood side table, plant stand, or even an old patio table. A top with a shallow lip is ideal because it helps keep beads in place.
- Dollar store glass beads / glass gems – Flat-back “vase filler” or “decorative glass gems” in your preferred colors. Plan on buying several bags; it’s better to have extra than to come up short with a half-finished pattern.
- Adhesive for glass and outdoor use – A clear silicone adhesive or clear construction adhesive rated for glass and exterior projects. Look for terms like “waterproof,” “outdoor,” or “for glass & tile.”
- Optional: Spray paint – For painting the table base or tabletop before adding beads (white, black, or a bold color all work nicely).
- Optional: Grout – If you want a more traditional mosaic look and a smoother top, you can grout between the beads after gluing.
- Optional: Clear sealer or resin – For extra durability or a glass-smooth top. Use an outdoor-safe clear sealer or a pour-on resin if you want a thick, glossy finish.
Basic Tools
- Fine-grit sandpaper (for scuffing slippery surfaces)
- Rags and mild cleaner (for removing dust and grease)
- Disposable gloves
- Plastic putty knife or old gift card (for spreading grout if you use it)
- Plastic drop cloth or old cardboard (to protect your work area)
Step 1: Prep and Paint Your Table
Like all good DIY projects, success starts with prep. Even the fanciest adhesive can’t save you from a grimy, flaky table.
-
Clean the tabletop thoroughly.
Wipe it down with a mild cleaner to remove dirt, pollen, grease, or sticky mystery residue. Let it dry completely. -
Lightly sand slippery surfaces.
If your table has a glossy finish, give it a quick scuff with fine-grit sandpaper so the paint and/or adhesive have something to grab onto. -
Paint if desired.
Spray paint works great for metal tables; a small foam roller works well for wood. Choose a color that complements your glass beadswhite to make colors pop, black for drama, or a matching color for a monochrome look. Allow the paint to fully dry according to the can instructions.
If you’re using a table with a removable glass insert, you can decide whether to attach beads directly to the glass or to a painted surface underneath. Both options are common in glass-on-glass mosaic projects; attaching directly to glass gives the most light-catching effect, while attaching to a painted base often looks more solid and bold.
Step 2: Plan Your Glass Bead Design
This is the fun, “play with shiny things” part.
- Lay the beads out dry first. Arrange your glass gems on the table before committing with glue. This lets you test color blends and patterns.
- Decide on a style. You can do:
- Random mix – Scatter colors for a confetti effect.
- Concentric circles – Start at the center and work outward for a mandala vibe.
- Ombré – Fade from light to dark or one color to another.
- Stripes or wedges – Divide the tabletop mentally into slices or bands of color.
- Check the height. If your beads are domed, expect a bumpy surface. If you want to set drinks on this table, try to use flatter gems and keep them closer in height.
Once you’re happy with the layout, snap a quick reference photo with your phone so you can recreate the pattern as you glue.
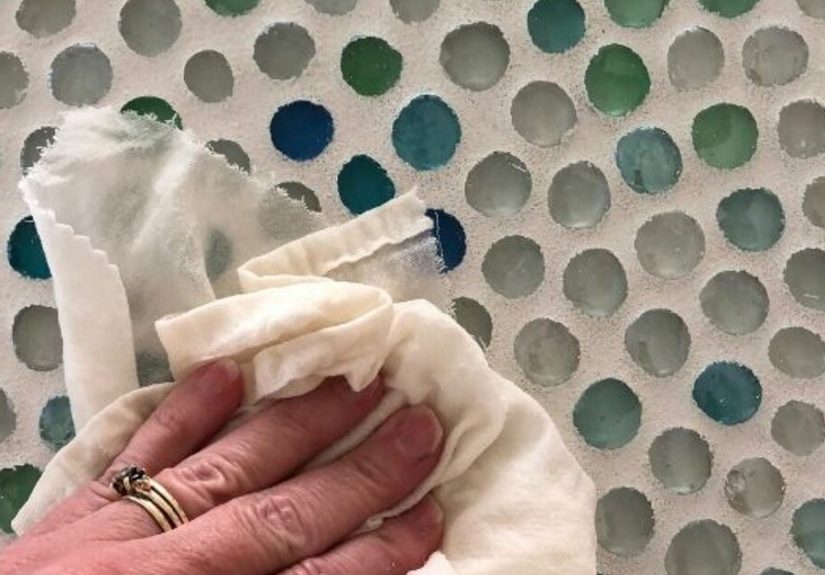
Step 3: Glue the Glass Beads in Place
Now we’re committing. Deep breath. Glue time.
-
Work in small sections.
Apply a thin layer or small dabs of clear adhesive to part of the tabletopabout a 3–4 inch area at a time. Adhesives designed for glass-on-glass or outdoor mosaics often grip quickly but still need time to cure, so working slowly helps you keep control. -
Press each bead firmly.
Place a bead into the adhesive, flat side down, and press gently. You want enough glue for good adhesion but not so much that it oozes up around the sides of the bead. -
Maintain your pattern.
Follow the design you laid out earlier. If beads start to drift, nudge them back into place before the adhesive sets. -
Check for gaps.
Decide whether you’re going to grout. If yes, leaving small, even gaps is fine and even helpful. If no grout, try to fit beads as tightly together as possible so the tabletop still feels cohesive.
When you’ve covered the entire table, inspect it from eye level and from the side. Look for any beads that are much higher than the rest (they can throw off drink glasses later) and press them down if the adhesive is still soft.
Step 4: Let the Adhesive Cure Completely
This is the part where impatient DIYers get into trouble. The glue is usually dry long before it’s fully cured, especially with silicone or construction adhesive.
- Follow the cure time on the label. Many clear adhesives recommend 24 hours before light handling and up to 72 hours for full cure, especially for outdoor exposure.
- Keep the table flat. Don’t stand it on end or move it onto uneven ground while the adhesive is curingbeads can slide slightly if the glue is still soft.
- Protect from rain. If you’re working outdoors, bring the table into a covered area while curing so moisture doesn’t interfere with the bond.
Once fully cured, the beads should feel rock-solid. You can gently tug on one or two in a discreet area to double-check. If they budge, either the glue isn’t fully cured or you need a stronger adhesive for that surface.
Step 5: Optional – Grout and Seal Your Glass Bead Table
You can absolutely stop at the “beads glued down” stage, especially if you like the look of the individual gems and don’t mind a textured top. But if you want a smoother surface and a more polished mosaic look, grouting is a nice upgrade.
How to Grout the Beads
-
Choose your grout color.
Dark grout (like charcoal or black) makes colors pop and hides outdoor dirt. Light grout gives a softer, beachy look but shows stains more easily. -
Mix grout according to instructions.
Aim for a peanut-butter-like consistency. Wear gloves and a mask if recommended on the packaging. -
Spread grout over the beads.
Use a rubber grout float, plastic putty knife, or even an old gift card to push grout into all the gaps between beads. Don’t worry if the beads look dull or muddy at firstthat’s normal. -
Wipe away excess.
After the grout sets up slightly (usually 10–20 minutes), wipe the surface with a barely damp sponge, revealing the tops of the beads while leaving the grout in the gaps. -
Polish when dry.
Once fully dry, buff the beads with a soft cloth to remove grout haze and restore their shine.
Sealing for Outdoor Durability
If your glass bead table will live outdoors year-round, sealing is a smart move:
- Use a grout sealer designed for exterior use to protect against moisture and staining.
- For a glass-smooth finish, some DIYers pour a thin layer of clear outdoor resin over the beads, creating a unified surface. This adds cost and requires careful leveling, but it looks amazing and keeps dirt out of crevices.
Step 6: Style and Use Your Glass Bead Table
Once everything is cured and sealed, it’s time for the reward: putting your new DIY table to work.
- On the patio: Use it as a side table next to lounge chairs, with a small planter or lantern on top.
- In the garden: Turn it into a little “jewel” tucked between plants, reflecting light and color among the greenery.
- By the front door: Style it with a small pot of flowers and a candle to create a welcoming, colorful entryway.
Because the table top is made of glass beads, it’s a good idea to use coasters under drinks, especially if your climate is hot or you get a lot of direct sun. Condensation and sudden temperature changes can be rough on glass and adhesives over time.
Common Mistakes (and How to Avoid Them)
Using the Wrong Glue
Hot glue alone usually doesn’t cut it outdoorsit can soften in heat and release beads. Craft glue that isn’t rated for glass or outdoor use can also fail. Look for a clear adhesive designed specifically for glass, tile, or mosaics, and make sure it’s weather-resistant.
Not Cleaning the Surface First
Dust, grease, or old flaking paint can keep the adhesive from bonding well. A five-minute cleaning step can save you from a table that sheds beads like a glitter explosion.
Rushing the Cure Time
It’s tempting to drag the table out to the patio the same day you finish gluing, but rushing this step is how beads slide or pop off later. Let the adhesive cure fullyeven if it means waiting an extra day.
Leaving Huge Gaps Between Beads
A few gaps are fine, especially if you plan to grout, but large random openings can trap dirt, leaves, and bugs. Aim for even spacing, or keep beads snug so the surface looks intentionally designed.
Real-Life Tips and Experiences with DIY Glass Bead Tables
Once you’ve made one DIY dollar store glass bead table, you start noticing all the ways you can tweak and improve the next one. Here are some practical, hard-earned lessons that crafters and DIYers often share once they’ve lived with their tables for a while.
1. Think About Weight and Portability
Those glass beads may look dainty, but they add up. If you start with a heavy metal or cast-iron table and then cover the top with several pounds of glass and grout, the finished piece can be surprisingly hefty. That’s great for wind resistance, but not as fun if you plan to haul it in and out of storage every season.
If you know you’ll be moving the table often, start with a lighter basesomething like a small plant stand, wire-frame side table, or plastic outdoor table that you can easily lift. The glass beads will still give it a substantial feel without turning it into gym equipment.
2. Match the Colors to Your Outdoor Space
Picking glass bead colors at the store is dangerously fun. People often grab every color that looks pretty in the bag, then get home and realize the mix doesn’t vibe with their actual patio cushions, planters, or siding.
Before you shop, snap a few photos of your outdoor space in daylight. Do you have navy cushions, terracotta pots, lots of greenery, or a black metal railing? Use that as your color palette inspiration. Blues and greens look amazing in garden settings, while clear and aqua beads work well with coastal or modern décor. Jewel tones pop against dark furniture and make the table feel like a piece of outdoor jewelry.
3. Start Small, Then Go Big
If you’re nervous about committing to a full tabletop on your first try, practice the technique on a smaller projectlike a glass bead stepping stone, a tray, or a plant stand top. Once you’re comfortable with how the adhesive behaves and how long it takes to set, scaling up to a full side table feels much less intimidating.
Many DIYers find that their first glass gem project teaches them how thick to apply glue, how tightly to fit beads, and how much time to budget. By the second or third table, the process goes a lot faster and the finish looks more intentional and polished.
4. Plan for Weather and Sun Exposure
Glass bead tables can handle the outdoors, but they’re still happier in semi-protected spots. If your climate has harsh sun, snow, or big temperature swings, try placing the table on a covered porch or under an umbrella rather than in the most exposed part of your yard.
Over time, UV light, moisture, and ice can take a toll on adhesives and grout. Giving your table a little shelter, wiping off standing water after rain, and resealing grout every year or two will help it last longer and stay bright instead of cloudy or grimy.
5. Don’t Stress About “Perfect” Patterns
When you see photos of glass gem tables online, it’s easy to assume those layouts were mathematically planned with a protractor and a spreadsheet. In reality, most people start with a loose ideaa spiral, some rings of color, maybe a starburstand then adjust as they go.
Part of the charm is that every table is one-of-a-kind. Slightly uneven lines, tiny gaps, or a random unexpected color bead here and there just make it look handmade and personal. If you make a “mistake,” turn it into a deliberate design moment: add a ring of that color, or repeat it in a few more spots so it looks intentional.
6. Budget and Time Expectations
On the cost side, many people are pleasantly surprised. Using dollar store glass beads and a thrifted or clearance table, you can often keep the total under what you’d spend on one mid-range decorative side table from a big-box store. Your largest investments will be the adhesive (don’t skimp on quality here) and any sealers or resin you choose.
Time-wise, expect this project to stretch over at least two or three days: one session to prep and paint the base, one to glue beads, and one to cure and possibly grout or seal. None of the steps are difficult, but there are dry times in between. Think of it as a slow, relaxing project instead of a one-hour “instant gratification” craft.
7. Let It Reflect Your Style
Finally, remember that a DIY dollar store glass bead table is supposed to be fun. It’s a low-risk way to experiment with color, pattern, and texture. You can make a table that looks like sea glass, mermaid scales, galaxy swirls, or frosted raindropsall from materials that cost a few dollars a bag.
Once your table is done and you see how it glows in the sunlight, don’t be surprised if you start eyeing other surfaces around your home and thinking, “What else can I cover in glass beads?” Coasters, trays, birdbaths, plant standsconsider yourself warned.


