Table of Contents >> Show >> Hide
- What Does “Wire from a Plastic Bottle” Really Mean?
- Why Plastic Bottles Work for This DIY Trick
- Tools and Materials You Will Need
- Safety First, Because Fingers Are Not Replaceable
- How to Make a Wire from a Plastic Bottle: 4 Steps
- Best Uses for Plastic Bottle Wire
- Common Mistakes and How to Avoid Them
- Is It Better to Reuse the Bottle or Recycle It?
- Practical Example: One Bottle, Several Small Wins
- Experience Notes: What It’s Really Like to Make Plastic Bottle Wire
- Final Thoughts
Note: Body-only HTML, English content, ready to copy and publish.
If you have ever looked at an empty water bottle and thought, “This feels too annoyingly useful to throw away,” congratulations: your inner DIY goblin is awake. One of the simplest ways to upcycle a plastic bottle is to turn it into a long, narrow strip that works like a lightweight plastic wire, tie, or cord. It is not electrical wire, and it is not magic, but it is surprisingly handy for bundling, gardening, labeling, crafting, and a dozen little fixes around the house.
This method works best with common drink bottles made from PET plastic, the clear, sturdy material used for many water and soda bottles. When cut into a continuous spiral, the bottle turns into a long strip that behaves like a flexible plastic strap. With a little patience and a steady hand, one bottle can produce a shocking amount of “wire.” Shocking in the emotional sense, not the outlet sense. Please do not wire your lamp with it.
In this guide, you will learn how to make a wire from a plastic bottle in four simple steps, what tools work best, where this DIY trick actually helps, and where it absolutely does not. You will also get practical tips, examples, mistakes to avoid, and a longer hands-on section at the end with real-world experience notes to make the article more useful than the usual “cut bottle, feel powerful, end of tutorial” kind of internet advice.
What Does “Wire from a Plastic Bottle” Really Mean?
Before we start, let’s clear up the wording. When people search for how to make a wire from a plastic bottle, they usually mean making a thin plastic strip that behaves like wire or cord for tying and fastening. What you are creating is closer to a PET bottle strip, plastic cord, or DIY bottle wire than true metal wire.
That distinction matters because this material is useful, but it has limits. It is great for light-duty jobs like tying plants to stakes, organizing cables, making temporary handles, securing lightweight bundles, weaving projects, and labeling storage containers. It is not suitable for electrical work, climbing, heavy lifting, child safety equipment, pet restraint, or anything where failure could cause injury or damage.
Why Plastic Bottles Work for This DIY Trick
Many beverage bottles are made from PET, a plastic that is lightweight, strong, and flexible enough to be cut into long, continuous strips. That combination is the secret. Once the bottle wall is turned into a narrow band, the strip becomes surprisingly useful because the original bottle shape has already stretched and oriented the plastic during manufacturing. In plain English: the bottle started life as a tough little overachiever, and you are now putting that energy to work.
There is another reason this trick is appealing: it turns trash into a practical household material. Reuse is often smarter than tossing something out immediately, especially when the reuse is simple, safe, and genuinely helpful. If you only need a few ties for a garden project or a quick bundle in the garage, making plastic bottle wire can be faster than buying another pack of single-purpose fasteners.
Tools and Materials You Will Need
- 1 clean plastic drink bottle, preferably a smooth-sided PET bottle
- Scissors or a sharp utility knife
- Cut-resistant gloves if available
- Marker and ruler for consistent strip width
- A stable work surface
- Optional: pliers, a cloth, and a hair dryer for smoothing the strip
Choose a bottle that is clean and dry. Clear water and soda bottles are usually the easiest to work with. Avoid bottles that are cracked, brittle, heavily dented, or made from a different plastic type if you are not sure what they are. Smooth bottle walls usually produce cleaner, more even strips than bottles with lots of ridges or decorative curves.
Safety First, Because Fingers Are Not Replaceable
Use a stable table with good lighting. Wear gloves if you have them, especially when starting the first cut. If you use a utility knife, keep the bottle steady and cut away from your body. If you get interrupted, stop cutting instead of trying to power through like you are in a dramatic montage scene. The goal is a useful plastic strip, not a heroic bandage story.
Also, skip open flames. Some tutorials online show heat near the plastic, but for a basic home version, a hair dryer on low or warm water is safer than waving the strip over a flame. If you want straightened material, gentle warming is enough for most simple uses.
How to Make a Wire from a Plastic Bottle: 4 Steps
Step 1: Pick the Right Bottle and Prep It
Start with a clean, empty bottle. Remove the cap, label, and any sticky residue. Rinse the inside and let it dry. If the bottle still smells like sports drink regret or last Tuesday’s soda, wash it again. A clean bottle is easier to grip, easier to mark, and less annoying to work with.
Next, inspect the bottle wall. You want the smoothest section possible because that is where your strip will come from. Bottles with straight sides give more uniform results. If the bottle has many deep grooves, you can still use it, but your “wire” may vary in width and curl more.
Step 2: Remove the Bottom and Make a Starter Cut
Use scissors or a knife to cut off the bottom of the bottle. Once the base is removed, you will have a plastic cylinder open at both ends. Then make a small starter notch at the lower edge of the bottle wall. From that notch, begin cutting around the bottle in a spiral.
If you want a narrower plastic wire, aim for a strip about 3 to 5 millimeters wide. For stronger, broader ties, go for 6 to 10 millimeters. Consistency matters more than perfection. A slightly wobbly strip still works. A strip that suddenly becomes as wide as a linguine noodle and then as thin as dental floss will be harder to use.
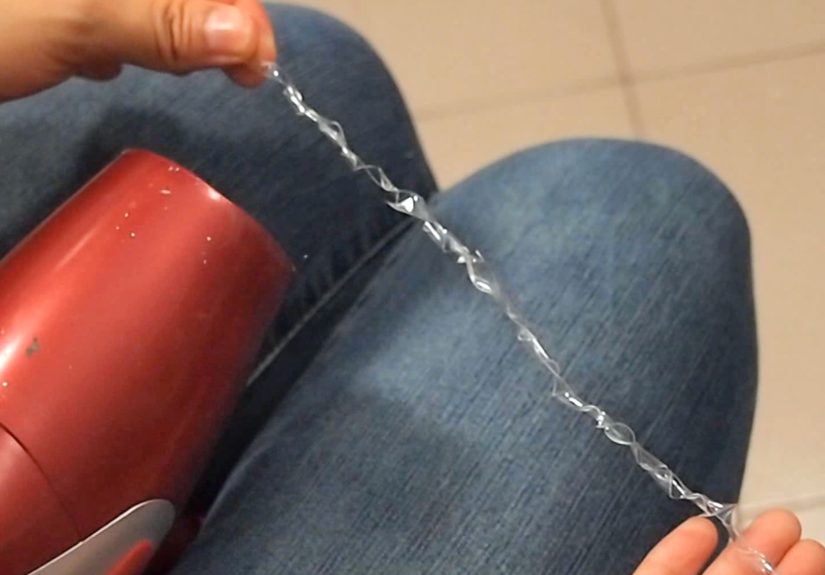
Step 3: Cut a Continuous Spiral Strip
This is the main event. Hold the bottle in one hand and slowly rotate it while cutting with the other. Try to keep the strip width even as you move upward around the bottle wall. You are basically unwrapping the bottle into one long ribbon.
Go slow. Many beginners make the mistake of trying to cut too fast, which leads to jagged edges, broken strips, or a sudden diagonal leap that ruins the length. Think “steady pizza crust peel” rather than “chainsaw ballet.”
As the strip grows longer, let it fall loosely onto the table or coil it gently beside you. Do not yank on it while cutting. Pulling too hard can make the strip twist and narrow unexpectedly. If the strip snaps, simply start again from a new notch and continue. You will get shorter pieces, but they are still useful.
Step 4: Straighten, Coil, and Put It to Work
Once you have a long strip, stretch it lightly by hand to reduce some of the curl. For a neater finish, warm it gently with a hair dryer on low while keeping it under slight tension. You can also wind it around a cardboard tube or small spool for storage.
At this point, your plastic bottle wire is ready to use. Cut sections as needed for ties, loops, labels, or craft work. If you need extra grip, twist two narrow strips together. If you need a flatter tie, leave it as a single band. One bottle can give you a surprisingly generous supply, which is excellent news for your junk drawer and mildly threatening news for every empty bottle in your kitchen.
Best Uses for Plastic Bottle Wire
Once you make your first batch, the question becomes: what can you actually do with it? Quite a lot, as long as you stay realistic.
Good Everyday Uses
- Tying tomato plants, bean vines, and lightweight garden supports
- Bundling extension cords, charger cables, and workshop scraps
- Making temporary bag closures
- Attaching labels to bins, baskets, or storage containers
- Weaving simple craft projects and decorative shapes
- Making lightweight loops, hangers, and organizational ties
- Holding rolled posters, cardboard tubes, or spare dowels together
Bad Uses You Should Skip
- Electrical wiring of any kind
- Anything near open flame or high heat
- Climbing, towing, or load-bearing tasks
- Childproofing or safety restraints
- Anything involving pets where failure would matter
- Food-contact repairs or hot cookware situations
Common Mistakes and How to Avoid Them
Choosing the Wrong Bottle
Thin, crinkly, or oddly shaped bottles make uneven strips. Start with a simple water or soda bottle that has a smooth sidewall.
Making the Strip Too Wide
A very wide strip is harder to guide and often curls aggressively. If you are new to this, start with a medium width and adjust after your first bottle.
Rushing the Spiral Cut
Speed is the enemy of consistency. Slow, even rotation creates better results and wastes less material.
Using Too Much Heat
Do not try to “fix” everything with heat. Too much heat can warp the strip or make it unpleasant to handle. Gentle warming is enough.
Expecting Industrial Strength
This material is clever and useful, but it is still a homemade plastic strip. Treat it like a handy household tie, not a miracle product with superhero insurance.
Is It Better to Reuse the Bottle or Recycle It?
For small practical jobs, reusing a bottle as DIY plastic wire can be a smart move. If one bottle solves a real problem in your home or workshop, that is a meaningful form of reuse. On the other hand, if your local recycling system accepts PET bottles easily and you do not actually need the material, recycling is still a good option.
The sweet spot is simple: reuse what you can use well, and recycle the rest properly. Turning a bottle into a messy tangle of sharp plastic confetti that nobody uses is not eco-genius. Making a tidy spool of useful ties that replaces store-bought fasteners for months? That is a much better story.
Practical Example: One Bottle, Several Small Wins
Imagine you have a one-liter water bottle and a cluttered desk. In ten minutes, that bottle can become several cable ties, two labels for storage baskets, a loop for hanging a pair of scissors in the garage, and a few narrow strips for bundling pens or craft sticks. In a garden, the same bottle can produce enough ties for several plant stakes. In a classroom or makerspace, it becomes a low-cost example of upcycling and material design.
That is the real appeal of this project. It is not just about making something from nothing. It is about noticing that ordinary materials already have structure, strength, and potential built into them. You are not inventing matter. You are being annoyingly resourceful with it.
Experience Notes: What It’s Really Like to Make Plastic Bottle Wire
The first time most people try this project, they expect one of two outcomes: either the strip will come out perfectly like factory ribbon, or the whole thing will collapse into chaos after six seconds. The truth is more interesting. The first bottle usually teaches you how the plastic wants to move. You learn quickly that the bottle has a “grain” of sorts, even if it does not look like wood. Some bottles cut smoothly and behave beautifully. Others fight back with curves, ridges, and dramatic curling that says, “You thought this would be easy? Adorable.”
One of the biggest lessons from experience is that bottle choice matters more than tool choice. A basic pair of scissors and a smooth bottle can give better results than a fancy blade and a weirdly sculpted bottle designed by someone who clearly believed water containers should resemble abstract architecture. Straight walls produce calmer strips. Thin bargain bottles often create floppy ties. Slightly sturdier bottles tend to give a more satisfying, durable strip.
Another thing people notice after a few tries is that width changes everything. A narrow strip feels more like synthetic string. A wider strip acts more like a zip tie without the lock. Very narrow strips are flexible and easy to twist, but they can bite into soft materials if pulled tight. Wider strips are gentler on plants and cardboard but harder to store neatly. After making a few batches, many DIYers end up creating two sizes: one narrow spool for cords and craft work, and one wider spool for garden or storage jobs.
Storage becomes part of the experience, too. If you leave long strips in a pile, they quickly form a nest that looks like a plastic octopus lost an argument. Coiling the strip immediately is worth the effort. Wrapping it around a cardboard tube, old thread spool, or even your hand before securing it with one short tie makes the material much easier to reuse later. This tiny habit turns a clever experiment into something you will actually keep using.
Many people also discover that plastic bottle wire shines in small household moments. It is great when you need “just one tie” and do not want to open a new pack of supplies. It works well for labeling containers in a garage, hanging light decorations, bundling leftover trim, or organizing art materials. In a garden, it is especially useful because it resists moisture better than paper ties and does not mind getting a little dirty.
Of course, experience also teaches humility. The material can snap if cut unevenly. It can curl more than expected. It can look scrappy instead of polished. But that is part of the charm. This is not a luxury craft with imported tools and background violin music. It is a practical little upcycling trick that gets better with repetition. By the third or fourth bottle, most people cut faster, waste less material, and start noticing how many minor household jobs this homemade plastic wire can handle.
That is why the project sticks with people. It is cheap, useful, a little nerdy, and oddly satisfying. You take a bottle that was heading for the bin and turn it into something functional with your own hands. Not bad for an object whose previous career highlight was holding lemon-flavored water for twenty minutes in the car.
Final Thoughts
If you want a simple, low-cost, and surprisingly practical DIY project, learning how to make a wire from a plastic bottle is worth trying. In just four steps, you can turn an ordinary PET bottle into a supply of lightweight plastic ties that help with home organization, crafts, gardening, and quick fixes. The method is easy to learn, inexpensive, and a smart example of everyday upcycling.
The trick is not to overcomplicate it. Pick a good bottle, cut slowly, keep the strip even, and use the finished material for jobs that match its strengths. Do that, and you will stop seeing empty bottles as trash and start seeing them as future cord, future ties, and future proof that being resourceful is sometimes just another word for “mildly obsessed with useful leftovers.”


