Table of Contents >> Show >> Hide
- Why a Driftwood Sunburst Mirror Works So Well
- What You’ll Need
- Before You Start: Pick the Right Mirror
- Step 1: Gather and Prep the Driftwood
- Step 2: Make a Backing Base
- Step 3: Plan the Sunburst Layout First
- Step 4: Glue in Sections
- Step 5: Attach the Mirror
- Step 6: Add Hanging Hardware
- How to Make It Look More Expensive
- Common Mistakes to Avoid
- Where to Use a Driftwood Sunburst Mirror
- Can You Really Make It for Under Ten Dollars?
- Final Thoughts
- Experience: What It’s Really Like to Make This Mirror
- SEO Tags
Some home decor projects whisper, “I cost a fortune.” This one strolls in wearing flip-flops and says, “Actually, I was made from beach sticks, a thrift-store mirror, and a wildly unnecessary amount of confidence.” A driftwood sunburst mirror is one of those rare DIYs that looks designer, feels coastal, and can still be made on a tiny budget if you source your materials like a crafty little raccoon. If you’ve ever admired sunburst mirrors in boutiques or magazine spreads and then nearly fell off your chair after seeing the price tag, welcome. You are among friends.
This project is all about using what you can find for free or dirt cheap. Driftwood, fallen twigs with that weathered look, scrap wood, or even trimmed branches can create the same sunburst effect. Pair that with a small round mirror from a thrift store, dollar store, or clearance bin, and suddenly your wall art budget is not giving “luxury showroom.” It is giving “I made this myself, thanks for noticing.”
In this guide, you’ll learn how to make a driftwood sunburst mirror for less than ten dollars, how to keep it looking polished instead of messy, and how to avoid the classic DIY mistake of gluing first and regretting everything later. We’ll cover materials, design tips, step-by-step instructions, styling ideas, common pitfalls, and what real people usually discover halfway through the project: driftwood has a mind of its own, and that is exactly why it looks so good.
Why a Driftwood Sunburst Mirror Works So Well
A sunburst mirror already has built-in drama. It radiates outward, catches the eye, and bounces light around a room. Add driftwood, and you get texture, warmth, and that relaxed coastal-meets-rustic vibe that makes a wall feel finished without looking too precious. In a living room, it can soften modern furniture. In a bathroom, it adds spa energy without forcing you to buy candles you will never light. In an entryway, it says, “Yes, I do have taste, and no, you may not ask how little I spent.”
The beauty of driftwood is that no two pieces match perfectly. That natural variation gives your mirror movement and character. A polished factory-made frame can be lovely, but driftwood has texture you can’t fake well. It feels collected, not mass-produced. And because the wood is irregular, it helps disguise minor DIY imperfections. That slightly crooked piece? Charming. That weird little bend? Intentional. This project is surprisingly forgiving.
What You’ll Need
- 1 small round mirror, ideally 8 to 12 inches wide
- Free driftwood, weathered twigs, or scrap wood pieces
- Hot glue gun and glue sticks, or strong craft glue for decorative attachment
- Cardboard, thin plywood, or a sturdy backing circle
- Scissors or utility knife for the backing
- Sandpaper, medium and fine grit
- Optional: matte sealer, clear wax, or a light whitewash finish
- Picture hanger, D-ring, or strong hanging wire
- Optional: ruler, pencil, and painter’s tape for layout
A Realistic Under-$10 Budget
Here is the trick: the “less than ten dollars” part depends on using free and secondhand materials whenever possible. A typical budget might look like this:
- Thrifted mirror: $2 to $4
- Glue sticks or leftover craft adhesive: $1 to $2
- Backing from an old shipping box or scrap wood: free
- Found driftwood or branches: free
- Hanging hardware from your stash or discount bin: $1 to $2
Total: usually around $4 to $9. If you have to buy every single item brand new, your “budget miracle” may turn into a “cute but not technically under ten bucks” situation. The good news is that the project still stays affordable, and it is an excellent stash-buster for leftover supplies.
Before You Start: Pick the Right Mirror
The easiest version of this DIY uses a lightweight round mirror that already has a frame, rim, or sturdy edge. That gives you something stable to build around. A tiny frameless craft mirror can work too, but you’ll want a solid backing so the decorative wood is not bearing stress directly on the glass.
If your mirror is heavy, do not expect decorative hot glue alone to solve your life. Let the mirror’s own hanging hardware do the real work, and think of the driftwood frame as decoration rather than structural support. In other words, the wood should make the mirror prettier, not responsible for surviving gravity.
Step 1: Gather and Prep the Driftwood
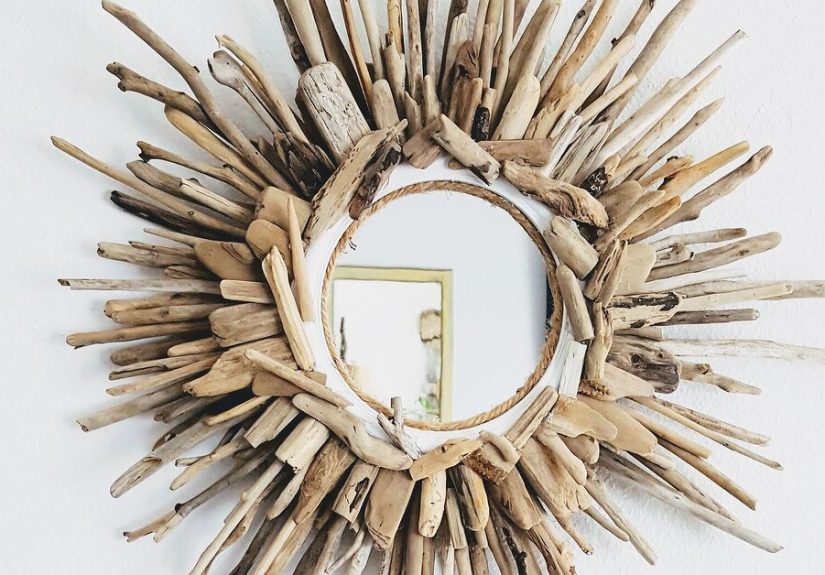
Look for pieces with variety. Some should be long and thin for dramatic rays, while others can be shorter for filler. Aim for a mix of straight, slightly curved, and textured pieces. That mix is what makes a driftwood sunburst mirror feel collected and organic rather than flat and fussy.
Once you bring the wood home, brush off dirt and let it dry completely. If the pieces feel rough enough to snag a sweater or declare war on your fingertips, sand them lightly. You do not want to erase all the weathered character, just tame the splinters and sharp edges. Medium grit works for rough spots, then fine grit for a smoother finish. If you want a more finished look, add a thin coat of matte sealer or wax. If you love the raw beach look, skip it.
Pro tip: sort the wood by length before you start gluing. This simple step saves you from the deeply humbling experience of laying out a gorgeous design and then realizing all your longest pieces are on one side like your mirror just got a side part.
Step 2: Make a Backing Base
Cut a circle from thick cardboard, foam board, or thin plywood so it is slightly larger than your mirror. This backing gives you a surface for arranging the wood evenly. If your mirror already has a sturdy backing or frame, you may be able to attach directly to it. But a separate base makes the project easier, especially for beginners.
Place the mirror in the center and lightly trace around it. This gives you a “safe zone” so you know where not to crowd the reflective surface. You want the driftwood rays to frame the mirror, not invade it like nosy neighbors.
Step 3: Plan the Sunburst Layout First
This is the step that separates “wow, you made that?” from “wow, that sure is… expressive.” Lay your longest driftwood pieces around the circle first, spacing them evenly like the points of a clock. These become the main rays. Then fill in between them with medium and short pieces until the overall shape feels balanced.
Stand back every few minutes and check the shape from a distance. Up close, almost anything looks reasonable. From across the room, you’ll notice whether one side feels heavy or sparse. Rotate the base as you work so you don’t unconsciously decorate only from your dominant-hand angle.
If you want a more polished look, create two layers: a first layer of longer rays and a second layer of shorter pieces tucked in between. That layered effect makes the mirror look fuller and more expensive. Fancy on a budget is our love language here.
Step 4: Glue in Sections
Once you like the layout, start gluing in small sections instead of trying to secure everything in one dramatic burst of ambition. Begin with the longest pieces. Attach them evenly around the base. Then add the medium pieces between them, followed by the shortest filler pieces.
Use enough glue to secure the wood, but not so much that it squeezes out in shiny little blobs. Hot glue works well for lightweight decorative pieces because it grabs quickly. If you’re using heavier wood, a stronger craft adhesive may be better, but it will need longer drying time. Either way, patience now prevents the sad little clatter of driftwood raining onto your table later.
If any piece looks too bulky, trim it before gluing or save it for a different spot. The goal is movement and texture, not a frame that looks like it lost a fight with a beaver lodge.
Step 5: Attach the Mirror
If the mirror is separate from the base, attach it once the driftwood border is secure. Center it carefully and press it down according to the adhesive instructions for your chosen product. For very lightweight mirrors, strong mounting tape or mirror-safe adhesive can help. For mirrors with their own frame or hanger, you may simply build the driftwood design around the mirror rather than bonding glass directly to the base.
Wipe off smudges before everything cures. Nothing ruins a beachy masterpiece faster than realizing your fingerprints are now part of the design story.
Step 6: Add Hanging Hardware
Turn the mirror over and add a hanger that suits the final weight. A sawtooth hanger may be enough for a small, lightweight piece. A D-ring and wire setup is better for something heavier. Hang it from wall hardware that matches both the weight and your wall type. Drywall is not the place for optimism. Use proper anchors when needed.
If you’re hanging the mirror above furniture, keep the placement intentional. You want it high enough to shine but low enough to feel connected to the piece below it. The mirror should look styled, not like it is attempting escape.
How to Make It Look More Expensive
Use variation on purpose
The most beautiful driftwood mirrors usually mix thin, spiky pieces with flatter, smoother ones. That contrast adds depth. Too much sameness can make the frame look stiff.
Keep the center clean
Even in rustic decor, a crisp center makes the whole project feel more refined. Make sure the mirror sits neatly in the middle and that glue strings are removed.
Limit the finish
A little clear wax or matte sealer can help, but do not overdo the gloss. Driftwood looks best when it still feels like driftwood, not like it was dipped in syrup.
Choose a good size ratio
A small mirror with dramatic rays often looks more high-end than a large mirror with timid little sticks. Think statement piece, not apologetic coaster.
Common Mistakes to Avoid
- Skipping the layout: eyeballing everything sounds adventurous until your mirror starts looking oval for emotional reasons.
- Using wood that is too heavy: a giant chunk of driftwood is sculpture, not trim.
- Ignoring splinters: rustic is charming, but bloodshed is not a design feature.
- Over-gluing: visible glue blobs make a budget project look cheap instead of creative.
- Using weak wall hardware: your mirror deserves better than a dramatic midnight crash.
Where to Use a Driftwood Sunburst Mirror
This mirror works beautifully in entryways, guest bathrooms, bedrooms, beach houses, and reading nooks. It pairs especially well with white walls, woven baskets, linen curtains, jute rugs, and soft neutral palettes. If your style leans coastal, boho, farmhouse, rustic, or relaxed contemporary, this DIY fits right in.
You can also customize the look. Want something brighter? Dry-brush the wood with white paint for a bleached finish. Want more contrast? Mix in a few darker twigs. Want subtle glam? Add a very light touch of gold on the tips. Just a touch, though. We are going for “found treasure,” not “pirate chandelier.”
Can You Really Make It for Under Ten Dollars?
Yes, but you have to be a little strategic. The cheapest version comes from using found wood, a thrifted mirror, and whatever adhesive or hanging hardware you already own. If you shop exclusively from craft aisles while making intense eye contact with full-price supplies, the budget gets wobbly fast.
The good news is that even when this project drifts slightly above ten dollars, it still costs far less than buying a ready-made driftwood sunburst mirror. And unlike a store-bought version, yours will have quirks, texture, and a story. It will also have the priceless charm of making guests say, “Wait, you made that?” which is basically the DIY version of winning an Oscar.
Final Thoughts
Learning how to make a driftwood sunburst mirror for less then ten dollars is less about perfection and more about smart materials, patient layout, and letting natural texture do the heavy lifting. This is one of those projects where imperfections actually help. Uneven grain, slightly bent twigs, and weathered edges all create the collected look that makes driftwood decor so appealing.
So go ahead: raid the thrift store, walk the shoreline, dig through your scrap pile, and make something that looks like it belongs in a breezy little design shop by the coast. Your walls will thank you. Your wallet will relax. And your mirror? Your mirror will finally stop being just a mirror and start being the main character.
Experience: What It’s Really Like to Make This Mirror
The first time I made a driftwood sunburst mirror, I was wildly confident for no reason. I had a tiny thrift-store mirror, a grocery bag full of driftwood, and the kind of optimism usually reserved for people who have never tangled holiday lights before. In my head, the project would take maybe an hour. I would glue a few sticks around the mirror, lean back, and somehow become the sort of person who casually says things like, “Oh that old thing? I made it in one afternoon.”
Reality, naturally, had other plans. The driftwood pieces were all different lengths, which was beautiful in theory and mildly chaotic in practice. Some were straight, some curved, some looked elegant, and some looked like they had been through emotional hardship. I spent more time arranging and rearranging them on the floor than I did actually gluing. But that turned out to be the secret. The project got dramatically better the moment I stopped rushing and started treating the layout like a puzzle instead of a race.
What surprised me most was how forgiving the materials were. A store-bought frame can feel intimidating because every flaw shows. Driftwood is the opposite. A slightly uneven gap still looks natural. A quirky bend in one piece often makes the whole design more interesting. That gave me a lot of confidence, especially once I realized this was not a project that needed factory precision to look polished.
I also learned that budget DIY gets easier when you stop expecting every supply to come from one perfect shopping trip. The mirror came from a thrift store. The backing came from an old shipping box. The glue sticks were leftovers from another project. The wood came from a beach walk that was technically supposed to be “relaxing,” but became a full scavenger mission the minute I spotted the first good stick. That scavenged mix is part of the charm. The finished mirror felt personal because it was literally built from found pieces.
Once it was done and hanging on the wall, the effect was bigger than I expected. The mirror reflected light, the driftwood added texture, and the whole thing looked far more expensive than it had any right to. It had that layered, collected look you usually see in homes where everything appears effortless, even though absolutely nothing was effortless. Friends noticed it immediately. Not one person guessed it cost less than lunch.
There is also something deeply satisfying about making decor from imperfect materials. You stop chasing flawless symmetry and start appreciating balance, rhythm, and texture. That mindset shift is half the fun. Instead of worrying whether every ray matches perfectly, you begin asking whether the overall shape feels good. That is a much more enjoyable way to create.
If I made another one tomorrow, I would still lay everything out first, still sand the sharp bits, and still choose a lightweight mirror unless I was prepared for serious hardware. But I would worry less. The best version of this project is not the one that looks machine-made. It is the one that looks collected, handmade, and a little bit beachy in the best possible way. In other words, it looks like it has a story. And for under ten dollars, that is a pretty fantastic deal.


