Table of Contents >> Show >> Hide
- Why Freeze Grape Leaves Instead of “Just Dealing With It Later”?
- Step 0: Pick the Right Leaves (Because Not All Leaves Want to Be Dolmas)
- What You’ll Need
- The Best Method: Blanch, Cool, Bundle, Freeze
- How to Thaw Frozen Grape Leaves Without Turning Them Into Leaf Confetti
- Troubleshooting: Common Problems (and the Fixes That Actually Work)
- FAQ (Because Someone Always Asks These)
- Kitchen Notes: of Real-World “Wish I Knew This Earlier” Experiences
- Conclusion
Fresh grape leaves are one of those “blink-and-you-miss-it” ingredients. One week they’re tender, bright, and ready for dolmas. The next week they’re tougher than your aunt’s opinion about how much lemon is “too much lemon.” Freezing grape leaves is how you capture that perfect spring momentand give Future You the kind of gift that deserves a thank-you note.
This guide walks you through picking (or buying), blanching, bundling, freezing, and thawing grape leaves so they stay pliable and roll-ready for stuffed grape leaves, wraps, and other Mediterranean favorites.
Why Freeze Grape Leaves Instead of “Just Dealing With It Later”?
Grape leaves don’t have much patience. Once picked, they start losing that tender, flexible texture you need for rolling. Freezing locks in quality and saves you from panic-buying jars at the last second.
- Texture insurance: Blanching + freezing keeps leaves flexible and easier to roll. (No leaf-shattering drama.)
- Flavor stays fresher: Proper blanching slows enzymes that can dull flavor and color over time.
- More control: You choose the size, tenderness, and cleanlinessunlike mystery leaves from a jar.
Food-safety note: Michigan State University Extension points out there are currently no research-tested methods for safely canning grape leaves at home, which makes freezing the straightforward, research-friendly option for most home kitchens.
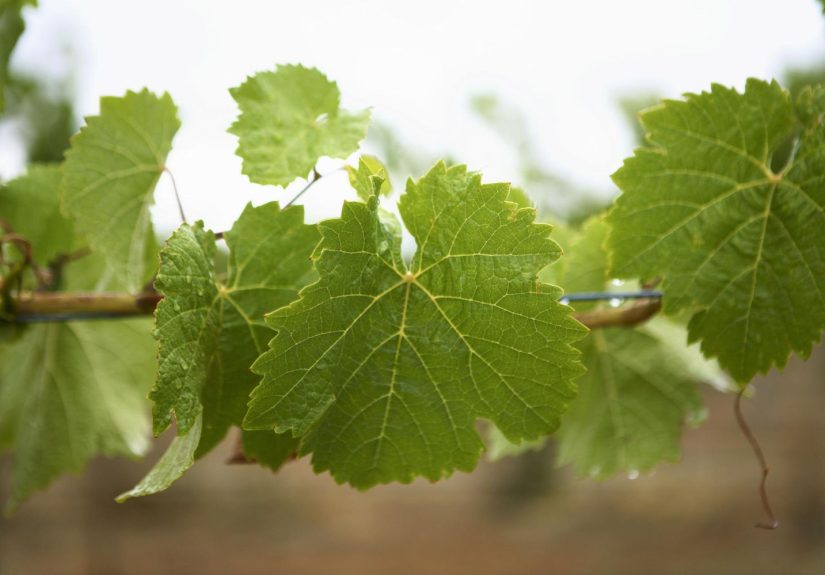
Step 0: Pick the Right Leaves (Because Not All Leaves Want to Be Dolmas)
When to harvest (or shop)
In many climates, the sweet spot is late spring to early summeroften May and early Junewhen leaves are tender and smooth. If you’re buying, look for fresh bundles around that season at farmers markets or specialty grocers.
What to look for
- Color & feel: Light green, shiny, smooth leaves tend to be more tender.
- Damage-free: Skip leaves with holes or tears. Stuffing has zero loyalty and will fall right out.
- Size matters: Medium leaves roll wellbig enough to hold filling, small enough to stay tender.
Safety and common sense (still cool, still important)
Avoid leaves from vines that may have been sprayed with pesticides, fungicides, or herbicides. If you’re harvesting, pick from trusted sources only. And yes, wash your hands first20 seconds with warm, soapy water is the boring hero move.
What You’ll Need
- Large pot (stockpot works great)
- Tongs or a spider strainer
- Big bowl for an ice bath
- Clean towels or paper towels
- Freezer bags or airtight containers (vacuum sealer optional, but fantastic)
- Labels + marker (because “green leaf thing” is not a plan)
Optional but helpful: kitchen twine (for bundles), parchment/wax paper (to prevent sticking), and a baking sheet (for quick chilling or tray-freezing).
The Best Method: Blanch, Cool, Bundle, Freeze
If freezing grape leaves had a motto, it would be: “Blanching is the glow-up.” Research-based freezing guidance for vegetables consistently recommends blanching to slow enzymes that can harm flavor, color, and texture. It also cleans the surface and helps the leaves pack better.
1) Rinse, sort, and trim
- Rinse each leaf under cool running water and shake off excess water.
- Trim stems close to the leaf. If the thick vein right near the stem feels especially tough, snip it slightly to help rolling.
- Sort by size so your bundles are consistent (your future rolling session will be smoother and less chaotic).
Example portioning: UC Cooperative Extension notes that about 1 to 1½ pounds of small fresh leaves can yield roughly 100–120 leaves. That’s enough to justify a “leaf day” on your calendar.
2) Set up an ice bath (don’t skip this)
Fill a large bowl with cold water and plenty of ice. The goal is to stop cooking fast. Cooling should take about the same amount of time as blanching, and extra moisture should be drained well so you don’t freeze a leaf-shaped ice sculpture.
3) Bring water (or brine) to a rolling boil
You have two solid options:
- Plain boiling water: Simple, classic, easy to control. Great if you want neutral leaves that won’t need rinsing later.
- Brine blanch (a traditional approach): Some extension guidance uses a brine (for example, 4 cups water + 1 cup salt). It can help soften leaves quickly and “set” colorbut it’s salty, so plan to rinse before stuffing.
Pro tip for speed and consistency: use a big enough pot. Leafy items cool the boil quickly if you crowd the pot. For leafy greens, some extension guidance recommends more water per pound than you’d use for chunkier vegetablesso the water returns to a boil fast.
4) Blanch in small batches until pliable
- Working in batches (roughly 12–15 leaves), slide leaves into boiling water.
- Blanch for about 1 minute (up to 2 minutes for larger/tougher leaves), just until the leaves soften and turn a brighter green.
- Bring the water back to a boil between batches for consistent results.
You’re not cooking themyou’re giving them a quick spa treatment so they behave nicely later. Over-blanching can make leaves fragile; under-blanching can leave enzymes more active and the texture less reliable.
5) Shock in ice water, then drain well
- Immediately transfer blanched leaves to the ice bath.
- Cool thoroughly (about as long as you blanched).
- Drain in a colander, then pat dry with towels or paper towels.
Drying matters. Excess water becomes ice crystals, and ice crystals are basically tiny quality assassins.
6) Bundle like a sane person (future you will thank you)
Pick a bundle size based on how you cook:
- For dolmas nights: Make bundles of 20 leaves (or 10–15 if you do smaller batches).
- For “I improvise” cooks: Stack leaves and separate layers with a small square of parchment.
A popular method is to stack a set number of leaves, roll into a loose “cigar,” and tie with kitchen twine so boiling water reaches the inner leaves. After cooling and drying, those bundles slip neatly into freezer bags.
7) Pack airtight, label, and freeze fast
- Place bundles into freezer bags or airtight containers.
- Press out as much air as possible (vacuum sealing is even better).
- Label with date + bundle count (example: “Grape Leaves, 20-count, June 2”).
- Freeze flat at first if possible (it saves space and helps them freeze quickly).
Quality guidance for grape leaves commonly lands around 6 months for best results. Longer storage can be safe at freezer temps, but quality gradually declinesthink dryness, frostiness, and torn leaves.
How to Thaw Frozen Grape Leaves Without Turning Them Into Leaf Confetti
The gentle thaw (recommended)
- Move a bundle to the refrigerator overnight.
- Once thawed, use soongrape leaves don’t love hanging out after thawing.
The quick thaw (when dinner is happening whether you’re ready or not)
- Keep the bundle sealed and place it in cool water for 20–30 minutes, changing water once or twice.
- If leaves feel stiff, dip briefly in hot (not violently boiling) water for a few seconds to relax them, then drain.
Food-safety reality check: Freezing slows microbial growth, but it doesn’t magically “sanitize” everything. Handle thawed leaves with clean hands and keep them out of the temperature danger zone as you prep your filling.
Troubleshooting: Common Problems (and the Fixes That Actually Work)
“My leaves are tearing when I roll.”
- Likely cause: Leaves were too old/tough, over-blanched, or dried out in storage.
- Fix: Choose younger leaves next time; blanch closer to 1 minute; pack more airtight; use within 6 months for best quality.
“They froze into one mega-leaf brick.”
- Likely cause: Leaves went into the bag too wet, or stacked without bundling/separators.
- Fix: Pat drier; bundle into manageable stacks; add parchment between layers; freeze flat.
“They taste salty.”
- Likely cause: Brine blanching (totally normal).
- Fix: Rinse leaves in cool water before stuffing, or soak briefly to pull out excess salt.
“They look dull or brownish.”
- Likely cause: Under-blanching or slow cooling can affect color; excess air can lead to freezer burn.
- Fix: Keep batches small, cool immediately in ice water, and remove as much air as possible from packaging.
FAQ (Because Someone Always Asks These)
Can I freeze grape leaves without blanching?
Some cooks do, and you’ll even see methods that freeze leaves dry (often unwashed) to avoid bruising and excess moisture. But blanching is widely recommended for vegetables going into long-term freezer storage because it slows enzymes that can hurt quality. If you skip blanching, plan to use them sooner and expect more variation in texture.
How long do frozen grape leaves last?
For best quality, aim to use them within about 6 months. You may get longer storage life, but texture and pliability can slowly decline.
What if I can only find jarred grape leaves?
Jarred leaves in brine are totally usablejust rinse well and drain. Freezing is most useful when you have fresh leaves and want to preserve that tender, just-picked vibe for later.
Is it okay to blanch in brine?
Yes, it’s a recognized approach in some grape-leaf guidance and can soften leaves quickly and help maintain color. Just remember it’s saltyrinse before stuffing, and don’t salt your filling like you forgot what brine means.
Kitchen Notes: of Real-World “Wish I Knew This Earlier” Experiences
Home cooks tend to learn grape-leaf freezing the same way they learn to roll dolmas: the first batch is a little chaotic, the second batch is better, and by the third batch they’re giving unsolicited advice to strangers. Here are the patterns that show up again and again the kind that don’t always make it into neat recipe cards, but absolutely affect how happy you’ll be in six months.
First, leaf selection is half the battle. People who love their frozen stash almost always picked (or bought) leaves that were medium-sized, shiny, and flexible. The “I’ll just grab the big ones” strategy sounds efficientuntil you try to roll them and discover they’re basically edible parchment. Many cooks report the best success when they harvest early in the season, before the leaves thicken and toughen.
Second, blanching is where confidence is won or lost. If you blanch too long, leaves can get fragile and rip when you fold them. If you blanch too short, they may stay stiff and fight you at every roll. The most consistent “sweet spot” is quick: just long enough to make them pliable and brighten the color. And the ice bath isn’t optionalpeople who skip it often end up with leaves that feel overcooked because they kept steaming after they left the pot. A fast cool-down helps preserve that fresh, spring-green look and keeps texture more predictable.
Third, drying is the stealth MVP. A lot of freezer disappointment isn’t about blanching at allit’s about packing wet leaves. Excess moisture turns into ice crystals, and ice crystals lead to freezer burn, sticking, and that “why is this leaf crunchy?” moment. The cooks who get beautiful results tend to drain thoroughly, pat dry, and then bundle. Some even let the leaves air-dry for a few minutes on towels before packing.
Fourth, portioning saves your sanity. Bundling by a consistent number (10, 20, whatever matches your usual recipe) means you thaw exactly what you need. It also prevents the dreaded “frozen leaf boulder” where you have to pry apart a whole season’s harvest with the desperation of an archaeologist. Many people swear by rolling stacks into loose cigars, while others prefer flat stacks with parchment between layers. Either way, the goal is the same: quick access and minimal damage.
Fifth, packaging is protection. Squeezing out air, sealing tightly, and labeling clearly turns a freezer stash into a true pantry tool. Some cooks add a surprisingly smart trick: put the bagged leaves into a small box (yes, like a clean shoe box) in the freezer to prevent crushing and cold damage. It sounds quirkyuntil you’ve watched a bag of delicate leaves get bulldozed by a frozen lasagna.
Finally, the most universal experience is this: you’ll be thrilled you did it. The first time you pull out a neat little bundle in the middle of winter, thaw it, and roll dolmas that taste like spring, you’ll understand why people get sentimental about grape leaves. It’s not just food storage. It’s future comfortwrapped, labeled, and ready to go.
Conclusion
Freezing grape leaves at home is simple once you know the rhythm: pick tender leaves, blanch briefly, cool fast, dry well, bundle smart, and pack airtight. Do it right and you’ll have flexible, rollable leaves ready for dolmas whenever the craving hitsno emergency jar run required.


