Table of Contents >> Show >> Hide
- What Is Succulent Wall Art (and Why It Works So Well)?
- Materials and Tools
- Step 1: Pick the Right Frame (So Your Wall Art Doesn’t Become Wall Regret)
- Step 2: Build a Shadow Box for Depth
- Step 3: Attach the Wire Mesh “Front”
- Step 4: Add a Solid Backing
- Step 5: Paint or Seal (Because Water Happens)
- Step 6: Choose the Right Soil Mix (Vertical Projects Need Drainage, Not Drama)
- Step 7: Prep Your Succulent Cuttings (Patience = Better Roots)
- Step 8: Fill the Frame with Soil
- Step 9: Design Like an Artist (Start Big, Then Get Cute)
- Step 10: Plant the Cuttings Through the Grid
- Step 11: Let It Root (Flat First, Hanging Later)
- How to Water a Succulent Picture Frame (Without Dripping Doom)
- Light and Placement Tips (Keep It Pretty, Not Stretchy)
- Maintenance: Keep It Looking Like Art (Not a Science Project)
- Troubleshooting Common Problems
- Creative Variations (Same Idea, Different Vibes)
- Cost, Time, and Expectations
- Conclusion: Your Wall Just Got a Hobby
- Experience Notes: What It’s Really Like to Make (and Live With) a Succulent Frame
Blank wall? Boring. Old picture frame collecting dust? Guilty. Succulents that thrive on neglect?
Perfect. Put them together and you’ve got succulent wall art: living décor that looks like a
tiny desert landscape decided to become a gallery piece (and honestly, good for it).
This guide walks you through a sturdy, real-plant “living frame” buildplus design tips, watering strategies,
troubleshooting, and smart shortcuts so you don’t accidentally invent a very expensive dirt confetti machine.
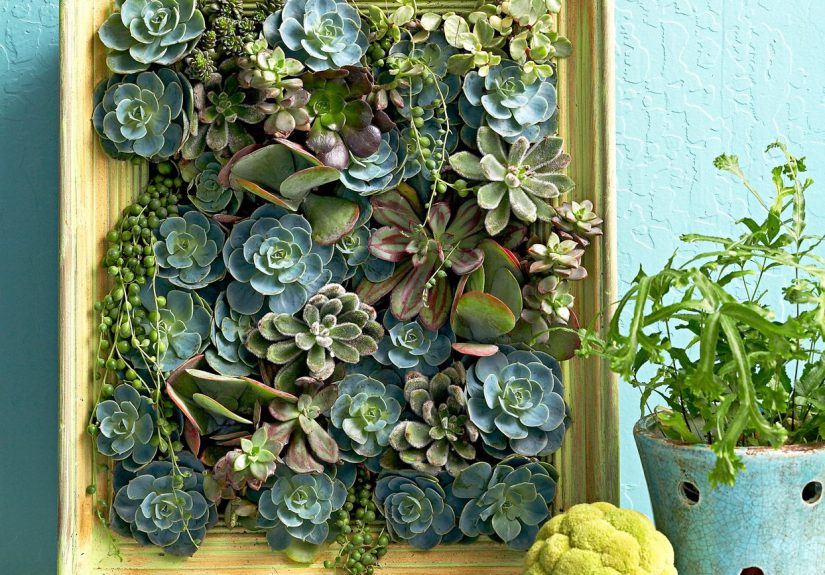
What Is Succulent Wall Art (and Why It Works So Well)?
Succulent wall art is a vertical succulent garden built inside a frameusually with a wire grid
that holds the soil in place while succulent cuttings root and spread into a living mosaic.
Succulents are ideal because they grow slowly, store water in their leaves, and don’t demand daily attention.
Translation: they’re the houseplants most likely to forgive you.
The big secret: gravity is your frenemy
A living frame succeeds when you build a “sandwich” that keeps soil contained, gives roots room,
and lets excess water drain (without dripping on your floors like a plant-themed horror movie).
You’ll also let the cuttings root while the frame stays flat before you hang it up.
Materials and Tools
You can go basic or build the “forever frame.” The list below aims for sturdy and beginner-friendly.
Materials
- Old picture frame (glass removed; deeper frames or large frames are easier)
- Wood strips (1×3 is common) to build a shadow-box depth behind the frame
- 1/2-inch hardware cloth (wire mesh) or strong galvanized wire grid
- Plywood backing (thin sheet to close the back)
- Exterior-grade screws/nails + wood glue (optional but helpful)
- Paint or sealant (especially if the frame will be outdoors or near humidity)
- Well-draining potting mix (cactus/succulent mix or DIY blend)
- Succulent cuttings (a mix of rosettes and trailing varieties looks amazing)
- Optional: floral pins, sphagnum moss topper, decorative gravel, landscape fabric
Tools
- Staple gun (or heavy-duty staples) for attaching the mesh
- Small saw (hand saw or miter saw) for cutting wood strips
- Hammer or drill/driver
- Pruning snips (for clean succulent cuttings)
- Chopstick/pencil (for poking planting holes)
- Safety gear: gloves + eye protection (wire mesh is rude)
Step 1: Pick the Right Frame (So Your Wall Art Doesn’t Become Wall Regret)
Any frame can work, but life gets easier with these traits:
- Bigger than 8×10: more room for a design that looks intentional, not accidental.
- Deep profile: you want space for soil and roots (shadow-box depth helps).
- Sturdy corners: a wobbly frame + soil + gravity = modern art you didn’t mean to make.
- Outdoor-friendly wood (or seal it): moisture is part of the deal.
Quick reality check
Soil is heavy. If you’re going large (say, poster-size), plan to anchor into studs and use strong hanging hardware.
“Command strips” are greatjust not for suspended garden ecosystems.
Step 2: Build a Shadow Box for Depth
A shadow box is simply a wood frame attached to the back of your picture frame to create a cavity for soil and roots.
Cut wood strips to match the inside dimensions and attach them securely.
- Measure the inside of your frame opening.
- Cut wood strips (mitered corners are nice but not required).
- Attach strips to the back of the frame with screws/nails (wood glue adds strength).
- Check squareness: if the box is crooked, the mesh won’t sit right.
If the frame will live outdoors, consider rot-resistant wood (like cedar/redwood) and outdoor paint or sealant.
Step 3: Attach the Wire Mesh “Front”
The wire grid is what holds your soil in place and supports your cuttings while they root.
A 1/2-inch hardware cloth is a popular sweet spot: small enough to hold soil,
large enough to tuck stems through.
- Cut mesh to fit the inside opening.
- Lay the frame face down on a protected surface.
- Staple the mesh tightly around the inside edges so it’s drum-tight (sagging = soil drift).
- Trim sharp ends or fold them under to avoid surprise finger attacks later.
Optional upgrade: add a thin liner
If your soil is very fine, you can place a layer of landscape fabric behind the mesh to reduce spill-out.
Don’t overdo itsucculents still need airflow and drainage.
Step 4: Add a Solid Backing
A thin plywood sheet closes the back and keeps everything contained.
Secure it to the shadow box with nails or screws.
Before you close it completely, you can also attach your hanging hardware (D-rings, wire, or a French cleat).
For heavier frames, a French cleat is the grown-up answer.
Step 5: Paint or Seal (Because Water Happens)
Let paint or sealant fully dry before soil goes in. If you want a rustic vibe,
lightly wipe partially dried paint with a soft cloth so the frame looks “thrifted on purpose.”
Step 6: Choose the Right Soil Mix (Vertical Projects Need Drainage, Not Drama)
Succulents hate sitting wet. A well-draining mix helps prevent root rot and keeps the frame lighter over time.
You have two good options:
Option A: Use a cactus/succulent potting mix
This is simplest and works well for most beginner builds.
Option B: Improve drainage with a gritty blend
A common approach is blending cactus mix with drainage boosters like perlite or pumice.
The goal is a mix that drains fast and doesn’t stay soggy.
Practical tip: If the mix clumps into a wet ball in your hand, it’s holding too much water.
Add more grit (perlite/pumice) until it crumbles.
Step 7: Prep Your Succulent Cuttings (Patience = Better Roots)
Cuttings work best for living frames because they’re lighter than fully rooted nursery pots
and adapt quickly. Aim for 1–2 inch stem sections for many varieties.
- Snip healthy stems with clean scissors or pruning snips.
- Remove lower leaves so you have bare stem to insert.
- Let the cut ends dry for a couple of days so they callus (this helps reduce rot risk).
If you’re using rosette types (like echeveria), keep enough stem to anchor them.
Trailing types (like sedum) are great “fillers” that soften edges and cover gaps.
Step 8: Fill the Frame with Soil
Now for the satisfying part: turning a picture frame into a tiny landscape.
- Lay the frame face down (mesh side down).
- Add soil gradually, pressing it down so it settles through the grid.
- Shake and tap gently to distribute soil evenly.
- Stop just below the grid so cuttings can sit neatly at the surface.
Step 9: Design Like an Artist (Start Big, Then Get Cute)
Succulent wall art looks best when it has structurelike a collage, not a salad.
Here are three easy design formulas:
1) Ombre fade
Blend greens into silvers into purples by grouping similar tones together.
2) “Rosette stars” + trailing border
Place larger rosettes as focal points, then use trailing sedums around edges for a soft frame-within-a-frame feel.
3) Checkerboard texture
Alternate spiky, round, and trailing varieties to create contrasttexture reads from across the room.
Lay your cuttings on top first like a dry run. Rearrange until it looks intentional.
(This is the fun part where you pretend you’re curating a gallery show called Leaves, But Make It Fashion.)
Step 10: Plant the Cuttings Through the Grid
- Poke holes in the soil with a pencil/chopstick where each cutting will go.
- Insert the stem through the mesh into the hole, keeping the rosette/leafy part on the surface.
- Press soil snug around the stem so it has contact and stability.
- Use floral pins if any cuttings wobble or try to escape.
Don’t worry if the mesh shows at first. As plants grow, they’ll cover it.
Step 11: Let It Root (Flat First, Hanging Later)
This is where most first-timers go wrong: they hang it immediately, then wonder why gravity stole their plants.
Keep the frame flat in bright, indirect light for a short rooting period.
- Placement: bright spot, but out of harsh direct sun at first.
- Time: give it at least 1–2 weeks to begin establishing roots.
- Watering: hold off initially so cut ends aren’t sitting in wet soil.
Once cuttings resist a gentle tug, they’re starting to anchor. That’s your green light to hang.
How to Water a Succulent Picture Frame (Without Dripping Doom)
Watering a vertical frame is different from watering a pot. The safest method:
take it down, lay it flat, water, let it drain fully, then rehang.
A simple routine
- Lay the frame flat in a tub, sink, or outside.
- Water the soil (not the leaves) until it’s evenly moist.
- Let it drain completely and dry down before hanging again.
- Repeat only when the mix is dry below the surface.
How often should you water?
There’s no single perfect schedule because light, temperature, humidity, soil, and frame size all matter.
A good starting point for many indoor setups is checking every couple of weeks and watering only when dry.
In brighter, warmer spots, it may dry faster; in winter, much slower.
Important: Don’t mist succulents as a substitute for watering. Misting can keep moisture on leaves
and increase rot riskespecially indoors where air doesn’t dry things quickly.
Light and Placement Tips (Keep It Pretty, Not Stretchy)
Succulents generally want bright light. Indoors, a bright window (often south-facing in the U.S.) is a common winner.
Outdoors, many do well with morning sun and some afternoon protection in hotter areas.
- Start gentle: after planting, avoid harsh direct sun until roots establish.
- Watch for stretching: “leggy” growth means it wants more light.
- Avoid scorched leaves: sudden intense sun can cause pale/bleached patches.
Maintenance: Keep It Looking Like Art (Not a Science Project)
Trim and replant
If a section gets too long or uneven, snip a piece, let it callus, and tuck it back in. Congratulations:
your art piece is now self-renewing.
Check for pests
Indoors, watch for mealybugs. If you spot cottony clusters, isolate the frame and dab pests with rubbing alcohol.
(Tiny drama, big results.)
Rotate if needed
If the light is stronger on one side, rotate the frame occasionally while it’s resting flat to keep growth balanced.
Troubleshooting Common Problems
Problem: Plants fall out after you hang it
- Cause: cuttings didn’t root long enough.
- Fix: lay it flat longer, use floral pins, and avoid watering too soon.
Problem: Leaves look mushy or translucent
- Cause: overwatering or staying wet too long.
- Fix: let it dry fully, increase airflow, and use a faster-draining mix next time.
Problem: Wrinkly leaves
- Cause: underwatering or roots not established yet.
- Fix: water thoroughly (flat), then let it dry; be patient during early rooting.
Problem: Long, stretched stems (leggy growth)
- Cause: not enough light.
- Fix: move it brighter, add a grow light, or “chop and prop” the best-looking tops.
Creative Variations (Same Idea, Different Vibes)
1) Monochrome minimalist
Use mostly one family (like echeveria-style rosettes) in different sizes for a clean, modern look.
2) “Living mosaic” with texture zones
Create patches: rosettes in one corner, spiky shapes in another, trailing sedum as a border.
3) Indoor-friendly micro frame
Use a smaller frame and slower-growing succulents, and keep it near a bright window.
It’s like a houseplant you can hangtiny, tidy, and very smug.
Cost, Time, and Expectations
A sturdy DIY succulent frame is typically a weekend project when you include drying time for paint and cuttings.
Cost depends on what you already haveold frame, scrap wood, and clippings can make this surprisingly budget-friendly.
Conclusion: Your Wall Just Got a Hobby
Building succulent wall art with an old picture frame is the perfect mix of upcycling and gardening:
part craft project, part living sculpture, and part “look what I made” bragging rights.
Build it sturdy, use a fast-draining mix, let cuttings root flat, and water by laying it down and letting it drain.
Do that, and your wall art won’t just surviveit’ll slowly evolve into a lush, living mosaic.
Experience Notes: What It’s Really Like to Make (and Live With) a Succulent Frame
The first experience most people have is a sudden, humbling respect for gravity. On paper, “stick plants in a frame”
sounds like a breezy afternoon craft. In practice, the build phase feels more like creating a tiny retaining wall
that just happens to be photogenic. The wire mesh will poke you at least once. The soil will try to escape.
And you will learn, immediately, that “tight staples” is not a personality traitit’s a requirement.
The next big “aha” moment is how much the rooting phase changes everything. When the frame is flat, planting feels
calm and controlledlike arranging a charcuterie board, except the olives are alive. The minute you imagine it
vertical, you start thinking differently: Are the rosettes anchored? Is there enough stem in the soil? Did you pack
the mix firmly enough to hold, but loosely enough to drain? Many DIYers say the project becomes easier the moment
they stop rushing to hang it. Letting it rest flat for a couple of weeks turns the whole thing from “wobbly collage”
into an actual living structure.
The watering experience is the most surprising adjustment. People expect succulents to be “no water ever” plants,
then they see wrinkled leaves and panic. The better lesson is: succulents like thorough water, but they also
like to dry out completely afterward. For a frame, that means getting comfortable with the routine of taking it down,
laying it flat, watering carefully, and waiting until it’s no longer heavy or damp before rehanging. The first time,
it feels fussy. By the third time, it feels oddly satisfyinglike resetting a small ecosystem.
Design-wise, expectations evolve too. Early on, the frame can look sparse because you’re leaving breathing room for
growth. Then, a month or two later, the plants begin to “knit” together. Trailing sedum starts to blur lines and cover
mesh. Rosettes settle and flatten into their spots. Gaps close. Many makers describe it as watching a mosaic
slowly self-edit. It’s also when you notice which varieties are happiest in your specific light. One side might grow
faster, or a color might fade if the light isn’t strong enough. Instead of feeling like a failure, it becomes a fun,
low-stakes experiment: move it brighter, rotate it during a flat rest, or swap in a cutting that likes your conditions.
Finally, living with a succulent frame teaches a small but powerful home décor truth: the best “statement pieces”
are the ones you can interact with. This isn’t a print you hang and forget; it’s art you maintain, tweak, and renew.
When a stem gets long, you trim it and replant it. When a rosette outgrows its space, you propagate it and fill a bare
spot. Over time, your frame becomes more personalnot because it stays perfect, but because it changes in response to
your home and your habits. It’s décor with a pulse, which is honestly a lot more interesting than another mass-produced
canvas that says “Gather.”


