Table of Contents >> Show >> Hide
- What Is a Fruit Crisp, Exactly?
- Why This Fruit Crisp Recipe Works
- Ingredients for a Classic Fruit Crisp Recipe
- Best Fruits to Use
- How to Make Fruit Crisp Step by Step
- Flavor Variations That Make You Look Extra Clever
- Common Mistakes That Ruin a Fruit Crisp
- What to Serve with Fruit Crisp
- Storage and Make-Ahead Tips
- Final Thoughts
- Kitchen Experiences with a Fruit Crisp Recipe
- SEO Tags
If pie feels like a commitment and cake feels like a math problem, a fruit crisp is the dessert that shows up in sneakers and still steals the whole party. It is cozy, flexible, forgiving, and wildly delicious. A good fruit crisp recipe gives you bubbling fruit underneath, a golden oat topping on top, and a kitchen that smells like you suddenly became the kind of person who owns a linen apron and says things like “I had some ripe peaches that needed using.”
The beauty of a fruit crisp is that it works with almost any fruit, does not demand perfection, and rewards common sense more than fancy technique. Apples, peaches, pears, berries, cherries, plums, or a mix of whatever is hanging around your counter can all become dessert with a little sugar, a little lemon, and a buttery crumb topping that does most of the heavy lifting. This article breaks down what makes a great fruit crisp, how to avoid the soggy-sad versions, and how to make one that tastes like the comforting cousin of pie but with far less drama.
What Is a Fruit Crisp, Exactly?
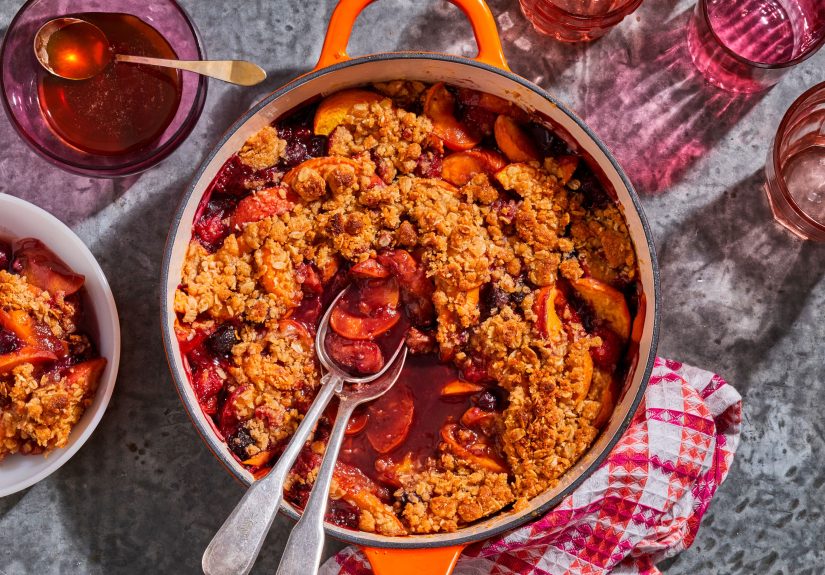
A fruit crisp is a baked dessert made with fruit filling and a crumbly topping, usually featuring oats, flour, butter, sugar, and warm spices. The topping bakes into a crunchy, golden layer while the fruit underneath softens and turns juicy. That crisp texture is what gives the dessert its name. Unlike a cobbler, which usually has a biscuit or dough topping, and unlike some crumbles that skip the oats, a classic crisp leans into that rustic, nubbly, buttery crunch.
In plain English, it is the dessert version of “work smarter, not harder.” No rolling pin. No pie crust anxiety. No staring at butter cubes like they personally offended you. Just fruit, topping, oven, happiness.
Why This Fruit Crisp Recipe Works
The best fruit crisp recipe balances three things: sweetness, texture, and moisture. Too much sugar and the filling tastes flat. Too little thickener and you get fruit soup wearing a hat of oats. Too little butter and the topping turns dry and dusty, like it got lost on the way to being granola. The sweet spot is a fruit layer that is lightly sweetened and just thick enough to become glossy and spoonable, plus a topping that forms clumps when mixed and bakes until golden brown.
That is why a reliable fruit crisp recipe usually includes these core moves:
- Fresh or frozen fruit tossed with sugar, lemon juice, and a small amount of flour or cornstarch
- A topping made from oats, flour, brown sugar, butter, salt, and often cinnamon
- Baking at a moderate temperature until the fruit bubbles and the top browns
- A short cooling period so the filling sets instead of running all over the plate like it is making a break for freedom
Ingredients for a Classic Fruit Crisp Recipe
For the Fruit Filling
- 6 cups fruit, sliced if needed
- 1/4 to 1/2 cup granulated sugar, depending on how sweet the fruit is
- 1 to 2 tablespoons lemon juice
- 2 tablespoons cornstarch or 3 tablespoons flour
- 1/2 teaspoon cinnamon
- Pinch of salt
- Optional: vanilla extract, citrus zest, or a little ginger
For the Crisp Topping
- 1 cup old-fashioned oats
- 3/4 cup all-purpose flour
- 2/3 cup packed brown sugar
- 1/2 teaspoon cinnamon
- 1/4 teaspoon salt
- 1/2 cup cold unsalted butter, cut into small cubes
- Optional: 1/2 cup chopped pecans or walnuts
This formula works beautifully in an 8-inch square or 9-inch square baking dish. It is enough for about six servings, though that depends heavily on whether anyone in your house believes “serving size” is a suggestion.
Best Fruits to Use
One reason people love a fruit crisp recipe is that it is flexible. You do not need one perfect fruit. You need good fruit and a little common sense.
Great Choices for Crisp
- Apples: classic, cozy, sturdy, and ideal for fall
- Peaches and nectarines: juicy, floral, and excellent with cinnamon
- Pears: mellow and elegant, especially with ginger
- Berries: quick-cooking, tart-sweet, and perfect for summer
- Cherries: rich and jammy with great color
- Plums: tangy, soft, and deeply flavorful
- Mixed fruit: the clean-out-the-fridge champion
Frozen fruit also works well. You may want a little extra thickener because frozen fruit often releases more liquid. Canned fruit can work too, but drain it well or your crisp may go from dessert to puddle faster than expected.
How to Make Fruit Crisp Step by Step
1. Prep the Fruit
Wash, peel if needed, and slice the fruit into fairly even pieces. Uniform pieces help everything cook at the same rate. Toss the fruit with sugar, lemon juice, thickener, cinnamon, and a pinch of salt. The lemon brightens the flavor, the sugar helps draw out the juices, and the thickener keeps the filling luscious instead of watery.
2. Make the Topping
In a bowl, mix oats, flour, brown sugar, cinnamon, and salt. Add the cold butter and work it in with your fingers, a fork, or a pastry cutter until the mixture looks crumbly and forms clumps when squeezed. That clumping matters. Tiny dust-like crumbs tend to bake up flat and dry, while larger clumps give you that irresistible crunchy texture.
3. Assemble
Spread the fruit into a greased baking dish. Scatter the topping evenly over the top. Do not pack it down like you are paving a driveway. Keep it loose so air can circulate and the topping can crisp properly.
4. Bake
Bake at 375°F for 40 to 50 minutes, depending on the fruit, until the filling is bubbling around the edges and the topping is golden brown. If the top browns too fast, loosely tent it with foil. If the fruit is done but you want a little extra color, a brief finish under the broiler can help, but stay close. Broilers turn from helpful to villainous in about eight seconds.
5. Cool Slightly Before Serving
Let the crisp rest for at least 10 to 15 minutes. This is not punishment. This is strategy. The filling thickens as it cools, so your spoonful looks glorious instead of sprinting across the plate.
Flavor Variations That Make You Look Extra Clever
A classic fruit crisp recipe is great, but a few small tweaks can make it feel custom and memorable.
- Apple-Pear Crisp: use equal parts apples and pears with extra cinnamon and a pinch of nutmeg
- Peach-Berry Crisp: combine peaches with blueberries or raspberries for color and tartness
- Cherry-Almond Crisp: add almond extract and sliced almonds
- Plum-Ginger Crisp: fresh ginger adds brightness and warmth
- Mixed Berry Crisp: strawberries, blackberries, blueberries, and raspberries create a jammy filling
You can also add chopped nuts, citrus zest, vanilla, cardamom, or even a handful of granola to the topping. The goal is not to turn the dessert into a science fair. The goal is to make it taste a little more like your own.
Common Mistakes That Ruin a Fruit Crisp
Using Too Much Sugar
Fruit should still taste like fruit. If the filling becomes one-note sweet, you lose the bright, juicy character that makes a crisp special. Taste your fruit first. Sweeter fruit needs less sugar.
Skipping the Thickener
Juicy fruit releases liquid as it bakes. Berries, peaches, and cherries especially like to show off. A little flour or cornstarch helps turn those juices into a glossy sauce rather than a swamp.
Overmixing the Topping
You want crumbs and clumps, not a smooth paste. If the butter fully disappears into the dry ingredients, the topping can lose texture.
Underbaking
A pale topping and lukewarm fruit are not charmingly rustic. They are simply unfinished. Wait for bubbling edges and a properly golden top.
Serving It Immediately
Yes, it smells incredible. Yes, your patience has left the building. Still, give it a little rest. Even ten minutes improves the final texture.
What to Serve with Fruit Crisp
A warm fruit crisp recipe practically begs for something cold and creamy. Vanilla ice cream is the classic move, and for good reason. The contrast between hot fruit and melting ice cream is one of humanity’s better ideas. Whipped cream also works, especially if you want a lighter finish. For brunch or breakfast-that-is-totally-not-dessert, a spoonful of Greek yogurt can be surprisingly good.
Coffee loves apple crisp. Black tea gets along beautifully with pear or plum crisp. Peach crisp with vanilla ice cream feels like summer took a victory lap.
Storage and Make-Ahead Tips
You can assemble the fruit filling and topping separately ahead of time, then combine and bake later. Some bakers even chill or freeze the topping first for extra clumps and better texture. Leftover crisp should be cooled, covered, and refrigerated. Reheat it in the oven if possible so the topping wakes back up and remembers its purpose in life.
Microwaving works in a pinch, but it softens the topping. That does not make the dessert bad. It just changes the vibe from “crunchy triumph” to “cozy spoon dessert.” Which, honestly, still sounds excellent.
Final Thoughts
The best fruit crisp recipe is the one you can make without stress and still be proud to serve. It is easy enough for a weeknight, pretty enough for company, and flexible enough to rescue fruit that is one day away from becoming an urgent situation. With juicy filling, buttery oat topping, and endless seasonal variations, fruit crisp earns its place as one of the most reliable homemade desserts around.
In other words, pie may get the glory, but crisp gets made more often. And in the kitchen, that usually means crisp wins.
Kitchen Experiences with a Fruit Crisp Recipe
The first time I made a fruit crisp, I treated it like a backup dessert. Pie was the star, cake was the overachiever, and crisp was the reliable friend I invited because I thought it would be easy. Then the fruit started bubbling, the cinnamon-butter smell filled the kitchen, and suddenly nobody cared about the pie anymore. That was the moment I understood the sneaky power of a good fruit crisp recipe. It does not need to be flashy. It just needs to be warm, crunchy, juicy, and ready at exactly the moment people start wandering into the kitchen asking, “What smells so good?”
Over time, fruit crisp became the dessert I made when I wanted something homemade without turning the kitchen into a crime scene. Apples in the fall were an obvious choice, but the real fun started when I stopped treating crisp like a single recipe and started using it as a format. Peaches that were slightly too soft for slicing neatly? Crisp. A random mix of berries that looked a little tired after two days in the fridge? Crisp. Pears nobody remembered to eat? Absolutely crisp. It became my favorite low-pressure dessert because it welcomed imperfect fruit and rewarded instinct.
One of the biggest lessons I learned was that texture matters more than people think. Early on, I made the mistake of mixing the topping too much. It looked neat and even in the bowl, which should have been my first clue that I was headed in the wrong direction. When baked, it came out flat and a little sandy. Still edible, of course, because butter and sugar are generous creatures, but not memorable. Once I started leaving the topping in rough clumps, everything changed. Those little clusters turned golden and crunchy while the fruit underneath softened into a glossy filling. That contrast is what makes a crisp worth making.
I also learned that fruit crisp is one of the best desserts for sharing because it feels casual in the best way. You do not need to slice it perfectly or present it like it is auditioning for a magazine cover. You just scoop it into bowls and let the juices run a little. Add vanilla ice cream and suddenly everyone gets quiet for a minute, which is one of the highest compliments a dessert can receive. There is something comforting about the fact that fruit crisp is supposed to look rustic. It frees you up to focus on flavor instead of perfection.
My favorite batches have usually happened when I was not trying too hard. A summer peach crisp with a little lemon zest tasted brighter than expected. A mixed berry version turned almost jammy and stained the spoon a dramatic purple. An apple-pear crisp made during a cool weekend disappeared so fast that the leftovers never even made it to breakfast, which frankly felt rude. Every version taught me the same thing: the recipe matters, but the rhythm matters too. Taste the fruit. Adjust the sugar. Do not rush the bake. Let it cool just enough. Then serve it while it still feels like the oven and the season are in the room with you.


