Table of Contents >> Show >> Hide
- Step 1: Define Your Dining Room Makeover Goals
- Step 2: Brighten the Room With the Right Paint
- Step 3: Add Architectural Interest With Board and Batten
- Step 4: Upgrade Lighting for a True “After” Moment
- Step 5: Choose Furniture That Fits (Literally and Stylistically)
- Step 6: Style the Space Like a Pro
- Step 7: Smart Storage for a Clutter-Free Look
- Real-Life Lessons From a Fabulous Dining Room Makeover
- 500-Word Experience: What It’s Really Like to Do a Dining Room Makeover
- Conclusion
If your dining room currently doubles as a mailroom, homework station, and occasional cat playground, you’re not alone. The good news? With a smart plan and a few weekend projects, you can pull off a fabulous dining room makeover that looks straight out of Remodelaholic – without blowing your budget or your sanity.
In this guide, we’ll walk through how to transform a dated dining room into a bright, welcoming space using high-impact ideas like board and batten wainscoting, fresh paint, updated lighting, and thoughtful styling. We’ll also share real-world tips inspired by DIY pros and designers from Remodelaholic and other U.S. home sites, so you can avoid common mistakes and get that “after” photo you’ll be proud to show off.
Step 1: Define Your Dining Room Makeover Goals
Before you grab a paint roller, take a minute to figure out what your dining room is missing. Is it too dark? Too formal? Too cluttered? The most successful makeovers start with a clear vision, which is exactly what Remodelaholic’s projects do: they combine function, comfort, and character instead of just swapping out chairs.
Think About How You Really Use the Space
- Daily dinners: You might want durable finishes, wipeable fabrics, and plenty of seating.
- Holiday hosting: You’ll need good lighting, a table that expands, and enough room to actually pull out all the chairs.
- Work-from-home or homework zone: Consider storage for paperwork and a more relaxed vibe.
Write down two or three priorities (“brighter,” “more seating,” “less clutter”) and keep them handy as you make design decisions. They’ll keep you from impulse-buying a stunning but wildly impractical white velvet chair set.
Choose a Style Direction (Without Overthinking It)
You don’t have to label your style perfectly, but a general direction helps: modern farmhouse, classic traditional, transitional, or cozy cottage. Board and batten wainscoting, for example, works beautifully with farmhouse and traditional styles and is a hallmark in many Remodelaholic dining room projects.
Collect a handful of inspiration photos and look for repeating themes: warm wood tables, black spindle chairs, brass lighting, plate walls, or bold paint colors. That’s your style roadmap.
Step 2: Brighten the Room With the Right Paint
Paint is the quickest way to make a dining room feel fresh and intentional – and it’s almost always the first step in a Remodelaholic-style makeover. Color also affects how large, cozy, or formal the room feels.
Pick a Wall Color That Fits the Mood
Designers often recommend these approaches for dining spaces:
- Light neutrals (soft white, warm beige, greige) to make small or dark dining rooms feel bigger and brighter.
- Moody hues (ink blue, forest green, charcoal) above white wainscoting for a dramatic, dinner-party vibe.
- Earthy colors (sage, terracotta, taupe) to create a relaxed, inviting space that works year-round.
Remember: very dark colors on all four walls can visually shrink a space, especially if you have limited natural light. If you love a deep color, consider pairing it with white wainscoting or limiting it to one accent wall.
Test Paint in Real Lighting
Paint can look completely different at 8 a.m. sunlight versus 8 p.m. candlelight. Following pro tips, always sample colors on more than one wall and look at them at different times of day before committing.
If your room gets cool north-facing light, warmer whites and creams will keep it from feeling chilly. In a bright south-facing room, you can lean into more saturated or deeper shades without making it gloomy.
Step 3: Add Architectural Interest With Board and Batten
One of the standout tricks in the original Fabulous Dining Room Makeover is the use of inexpensive board and batten wainscoting to give plain walls a custom, high-end look.
Why Board and Batten Works So Well
- It instantly upgrades builder-basic walls. Vertical battens add rhythm and structure that make the room feel finished.
- It protects high-traffic walls. The lower portion takes the brunt of chair bumps and kid scuffs, which is why you’ll see wainscoting featured in countless dining room makeovers.
- It pairs beautifully with color. White or off-white wainscoting with a deeper color above is a classic combo that keeps things bright and cozy at the same time.
Basic DIY Steps
If you’re comfortable with a saw and a level, you can DIY a board and batten wall over a weekend. Most Remodelaholic-style tutorials follow these general steps:
- Plan the layout. Decide on the height (often 1/3–2/3 of the wall) and spacing between battens. Sketch it or tape it out with painter’s tape.
- Prep the walls. Remove outlet covers, lightly sand, and patch major dings so the boards sit flush.
- Install the top rail and base. Use a level to nail a horizontal board at the top of the wainscoting and make sure your baseboard works with the design.
- Add vertical battens. Cut boards to size and attach with construction adhesive and finish nails, using a spacer to keep gaps consistent.
- Caulk and fill. Caulk inside corners and seams, fill nail holes with wood filler, and sand smooth.
- Prime and paint. Finish with a durable paint in satin or semi-gloss so it’s easy to wipe down after spaghetti night.
If full-room wainscoting feels like too much, consider a single board and batten accent wall behind the table or buffet. It still gives strong visual impact with less work and cost.
Step 4: Upgrade Lighting for a True “After” Moment
Nothing says “we just remodeled” like swapping an undersized builder-grade light for a statement chandelier or pendant. Designers consistently rank layered lighting as one of the most important parts of any room makeover – and dining rooms are no exception.
Choose the Right Chandelier Size
A common guideline is to add the room’s length and width in feet to get the ideal chandelier diameter in inches. For example, a 12 x 14 foot room (12 + 14 = 26) can usually handle a fixture around 26 inches wide. This keeps the light big enough to matter, but not so huge that guests feel like it might land in their mashed potatoes.
Hang the chandelier so the bottom sits about 30–36 inches above the tabletop. This height gives flattering light on faces and food while keeping the fixture out of the line of sight across the table.
Layer Your Lighting
- Overhead lighting: A chandelier, lantern, or linear pendant over the table.
- Accent lighting: Wall sconces on either side of a mirror or art, or picture lights above framed pieces.
- Ambient lighting: Table lamps on a buffet or console, plus candles or battery-operated tapers for extra warmth.
Use dimmers wherever possible so you can go from “kids doing homework” brightness to “romantic dinner and no one needs to see the crumbs” in seconds.
Step 5: Choose Furniture That Fits (Literally and Stylistically)
The furniture in a fabulous dining room makeover doesn’t have to be brand new. Many Remodelaholic-style spaces mix refinished vintage tables, thrifted chairs, and DIY benches with a few new pieces.
Start With the Table
Measure your room and leave at least 36 inches between the table edge and the walls or furniture to allow for pulling out chairs comfortably. If you entertain often, a rectangular extendable table is a smart choice. Round tables are great for square rooms and encourage conversation.
Don’t be afraid to refinish a solid wood table instead of replacing it. Sanding and staining (or painting) can give an old piece a totally new life for a fraction of the cost of buying new.
Mix and Match Chairs
Matching sets are convenient, but mixing chair styles looks more custom and curated. Try:
- Upholstered end chairs with simple wooden side chairs.
- All-wood chairs with a long bench on one side.
- Black spindle chairs for a modern farmhouse twist against white wainscoting and a wood table.
Just keep seat heights similar so everyone is at roughly the same level at the table.
Step 6: Style the Space Like a Pro
This is where your dining room makeover really earns the word “fabulous.” The right textiles, wall decor, and finishing touches make the room feel polished and intentional.
Anchor the Room With a Rug
A rug helps define the dining area and softens all the wood and hard surfaces. Designers typically suggest a rug large enough that chairs stay on it even when pulled out – usually 24 inches beyond the table on all sides. Choose a low-pile, easy-clean rug in a pattern that hides the occasional marinara mishap.
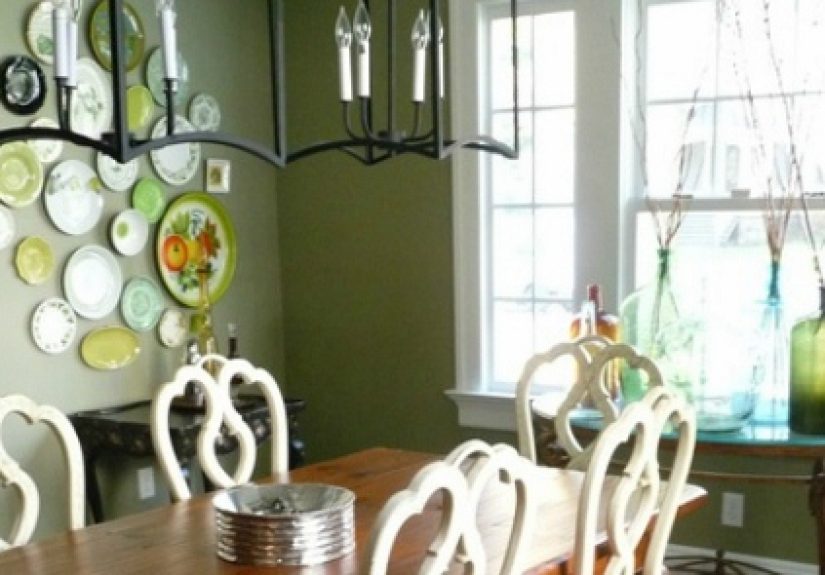
Create an Eye-Catching Focal Wall
In the original Fabulous Dining Room Makeover, decorative plates and art create a collected focal point that adds personality without clutter.
You can get a similar effect with:
- A plate wall using thrifted or heirloom dishes.
- A large mirror to bounce light around and make the room feel bigger.
- A symmetrical grid of framed prints or family photos.
Keep the arrangement centered over the table or buffet so the room feels balanced.
Add Texture and Greenery
Styles like modern farmhouse and classic cottage rely heavily on texture: woven baskets, linen runners, wood bowls, and ceramic vases. Houseplants or even realistic faux greenery bring life and color into the dining room, just as many designers recommend for finishing any makeover.
Step 7: Smart Storage for a Clutter-Free Look
A truly fabulous dining room doesn’t just look good for the “after” photo – it functions well week after week. Smart storage keeps dishes, linens, and seasonal decor close at hand but out of sight.
Buffets, Sideboards, and Built-Ins
If you have space, a buffet or sideboard is a workhorse piece. Use the top for lamps and serving dishes during parties, and the inside for table linens, special-occasion dishware, and extra candles. Built-ins, hutches, or glass-front cabinets can also double as display for pretty pieces while keeping visual clutter contained.
Hidden Helpers
- Use lidded baskets under a console for placemats, napkins, and kids’ craft supplies.
- Store leaf extensions for the table where you can actually find them before your next big dinner.
- Designate one drawer for candles, lighters, and napkin rings so you’re not hunting when guests arrive.
Real-Life Lessons From a Fabulous Dining Room Makeover
Looking across Remodelaholic and other before-and-after dining room projects, a few themes show up over and over:
- White + color is a winning combo. White wainscoting with a colored upper wall reads clean, bright, and timeless.
- Lighting can make or break it. A great light fixture and dimmers dramatically change how the room feels at night.
- Details matter. Caulked seams, neatly painted trim, and thought-through furniture layout separate a “nice DIY” from a “wow” makeover.
The result is a dining room that feels comfortable enough for pizza night yet special enough for Thanksgiving dinner – exactly the balance most homeowners want.
500-Word Experience: What It’s Really Like to Do a Dining Room Makeover
On paper, a fabulous dining room makeover looks like a tidy checklist: choose paint, install board and batten, hang a new light, style the room, done. In real life, it’s more like: choose paint, second-guess paint, repaint one wall, realize you miscalculated your batten spacing, run back to the home center… and eventually stand in the doorway grinning because you actually pulled it off.
The First Weekend: Chaos, But Worth It
Most homeowners who share their dining room transformations say the first weekend is the messiest. Furniture ends up shoved into the living room, there’s painter’s tape on every surface, and someone inevitably discovers a mystery scribble on the wall from years ago. The key is accepting that it will look worse before it looks better – that’s completely normal during any remodel.
Starting with paint is usually the smartest move. Once the old color is gone, you get a clearer sense of how the space will feel, which makes decisions about trim, lighting, and decor easier. Many DIYers discover that their “too small” dining room is actually just “too dark,” and a lighter color instantly makes it feel larger and more welcoming.
Learning Curve Moments
If you’re installing board and batten for the first time, expect a learning curve. The first few cuts may be off, and you’ll probably invent new vocabulary while trying to get everything level around uneven walls and not-quite-square corners. That’s okay. Even the pros rely on caulk and wood filler to hide tiny gaps and imperfections, and tutorials from Remodelaholic and other DIY blogs make it clear that small flaws disappear completely once everything is painted.
The good news is that once one wall is done, the rest go faster. Many homeowners say board and batten is one of the most satisfying projects they’ve taken on because the transformation is so dramatic for the cost of a few boards and a gallon of paint.
The “Why Didn’t We Do This Sooner?” Phase
After the dust settles, the fun part kicks in: hanging art, choosing a rug, styling the table, and testing out that new dimmer switch on an ordinary Tuesday night. Families often find they actually use their dining room more after a makeover – not just for holidays, but for weeknight dinners, puzzles, and long talks over coffee. The room stops being a pass-through space and starts feeling like the heart of the home.
It’s also common to discover how much little details matter. A comfortable chair that doesn’t squeak, a runner that doesn’t slide, a chandelier that doesn’t blind the person sitting directly under it – those upgrades don’t usually make the “before and after” headlines, but they change how the room feels to live in.
Confidence for Future Projects
Perhaps the biggest hidden benefit of a dining room makeover is confidence. Once you’ve successfully installed trim, chosen colors, and coordinated furniture in one room, the rest of the house feels less intimidating. That’s exactly the spirit behind Remodelaholic’s projects: learn by doing, embrace imperfection, and enjoy the process of turning your house into a home that reflects how you actually live.
So if your dining room currently looks more “before” than “after,” take heart. With a plan, some patience, and a willingness to wield a caulk gun, you’re closer than you think to your own fabulous dining room makeover.
Conclusion
A fabulous dining room makeover doesn’t require a full gut renovation or designer budget. By focusing on smart paint choices, architectural details like board and batten, updated lighting, functional furniture, and thoughtful styling, you can create a room that feels special every time you sit down. Start with one project, build on your success, and soon you’ll have a dining space worthy of its own before-and-after feature.


