Table of Contents >> Show >> Hide
- Why Upcycled Storage Box Organizers Are So Smart
- Supplies You’ll Need
- Plan Your Upcycled Storage Box Organizer
- Step-by-Step: How to Make a DIY Upcycled Storage Box Organizer
- Creative Variations for Your Upcycled Storage Box Organizer
- Tips for Long-Lasting Upcycled Organizers
- Common Problems (and Easy Fixes)
- Real-Life Experience with DIY Upcycled Storage Box Organizers
- Wrapping Up Your DIY Upcycled Storage Box Organizer
If your home has “that” drawer, “that” shelf, and “those” random piles of stuff,
this project is for you. Instead of buying pricey bins, you can turn plain
cardboard boxes into stylish DIY upcycled storage box organizers that look
like they came straight out of a Hometalk feature. You’ll tame the clutter,
save money, and keep a few boxes out of the landfill. That’s a triple win.
Using a few simple tools, some scrap cardboard, and leftover fabric or paper,
you can build custom organizers that fit your drawers, shelves, or closets
perfectly. Think of it as home organization meets arts-and-crafts night
(no glitter required, unless you’re into that).
Why Upcycled Storage Box Organizers Are So Smart
Before we jump into cutting and gluing, it helps to know why upcycled
storage box organizers are such a favorite in the DIY world and on
Hometalk-style projects.
- Budget-friendly: You already own the main “building material”—shipping boxes, shoe boxes, cereal boxes, and packaging.
- Custom sizing: Store-bought bins rarely fit your shelves and drawers just right. With DIY organizers, you can make them exactly as wide, tall, or shallow as you need.
- Eco-conscious: Upcycling cardboard and fabric scraps keeps usable materials out of the trash and gives them a second life.
- Endlessly customizable: Cover your organizers with fabric, contact paper, wallpaper samples, or even brown kraft paper for a minimalist look.
- Versatile: Use them in kitchen drawers, pantries, bathrooms, craft rooms, kids’ rooms, and home offices.
Supplies You’ll Need
One of the best parts of a DIY upcycled storage box organizer is that you
can mostly shop your own home. Here’s a flexible list you can adapt:
- Cardboard box (shoe box, shipping box, cereal box, or electronics box)
- Extra cardboard for dividers and reinforcement
- Craft knife or box cutter, plus scissors
- Ruler or measuring tape and a pencil
- Hot glue gun with glue sticks, or strong white glue
- Decorative paper, contact paper, wrapping paper, or fabric
- Clear tape or double-sided tape
- Optional: jute rope, ribbon, or bias tape for trim
- Optional: label holders, tags, or a permanent marker for labeling
Plan Your Upcycled Storage Box Organizer
Measure the Space First
Decide where this organizer will live. Is it in a dresser drawer, on a
pantry shelf, or inside a closet? Measure the width, depth, and height of
that space. This makes it easier to choose a box that fits snugly instead
of sliding around like a hockey puck.
Choose the Right Box
Different boxes work better for different jobs:
- Shoe boxes: Great for desk supplies, makeup, or kids’ art supplies.
- Cereal boxes: Perfect for drawer dividers, mail sorting, or small pantry items.
- Sturdier shipping boxes: Best for heavier items like canned goods, tools, or cleaning supplies.
Decide on Compartments
Think about what will go inside your DIY organizer. Long dividers work well
for utensils, makeup brushes, and pens. Grid-style dividers are better for
smaller items like tea bags, sewing notions, office supplies, or craft
embellishments. Sketch a quick layout so you’re not guessing once you start
cutting cardboard.
Step-by-Step: How to Make a DIY Upcycled Storage Box Organizer
1. Prep and Reinforce the Box
- Trim the flaps: If your box has top flaps, cut them off with a craft knife so you’re left with a neat open-top container.
- Square it up: Make sure the box is not warped. Gently push the corners back into shape if needed.
- Reinforce the bottom: Cut a piece of cardboard to the size of the inside base and glue it down. This helps the box handle heavier items without sagging.
- Reinforce the sides (optional): For flimsy boxes, glue extra cardboard panels inside each wall.
2. Create Custom Dividers
This is where your DIY upcycled storage box organizer starts to look truly
custom and high-end.
- Measure the inside dimensions of your box (length and width).
- Decide how many compartments you want across and front-to-back.
- Cut strips of cardboard to the height of your box and long enough to span the box.
-
Create slots so the dividers interlock:
- For the vertical dividers, cut slots halfway down from the top.
- For the horizontal dividers, cut matching slots halfway up from the bottom.
- Slide the pieces together to form a grid. Adjust if anything is too tall or too short.
- Secure with a dot of hot glue at the intersections and edges if you want extra stability.
3. Wrap and Decorate the Outside
Time to give this cardboard box organizer its glow-up.
- Place the box on your fabric or paper and roughly trace around it, leaving a few extra inches on each side.
- Cut out the shape and dry-fit it before gluing.
- Apply glue or double-sided tape to one side of the box at a time, smoothing the fabric or paper as you go.
- Fold the excess material neatly over the top edge and inside the box, securing it with glue or tape.
- For a rope-wrapped look, apply lines of hot glue and press jute rope around the box in tight, even rows.
4. Finish the Inside
You can leave the dividers plain, or cover them for a more polished look:
- Cover the bottom with a piece of coordinating paper or fabric.
- Wrap divider pieces individually before assembling, or cover the whole grid after it’s in place.
- Use clear tape along the edges to keep paper from peeling over time.
5. Add Handles and Labels
Small details make your DIY storage box look professional and user-friendly.
- Cut two small slits on each side and thread ribbon or rope for handles (better for lightweight items).
- Glue on metal label holders or simple cardstock tags.
- Label each organizer clearly: “Snacks,” “Cords,” “Markers,” “Mail,” etc.
6. Style Your Hometalk-Inspired Organizer
Set your upcycled storage box organizer in place and load it up. Line several
matching boxes on a shelf for a built-in look, or group different sizes in a
drawer for perfectly separated sections. The result is a custom system that
looks curated, not cobbled together.
Creative Variations for Your Upcycled Storage Box Organizer
Rope-Wrapped Basket Look
Wrap a sturdy cardboard box with jute or cotton rope, gluing it row by row.
The finished organizer looks like a woven basket but costs just a few dollars.
It’s ideal for living rooms, entryways, and linen closets where you want style
and storage at the same time.
Fabric-Covered Cube Bins
For cube shelves, use medium-sized boxes and cover them with coordinating fabric.
Choose patterns that match your décorneutrals for a calm, minimalist look or bold
prints for kids’ rooms and craft spaces. Add a simple pull tab made from folded
fabric or ribbon on the front.
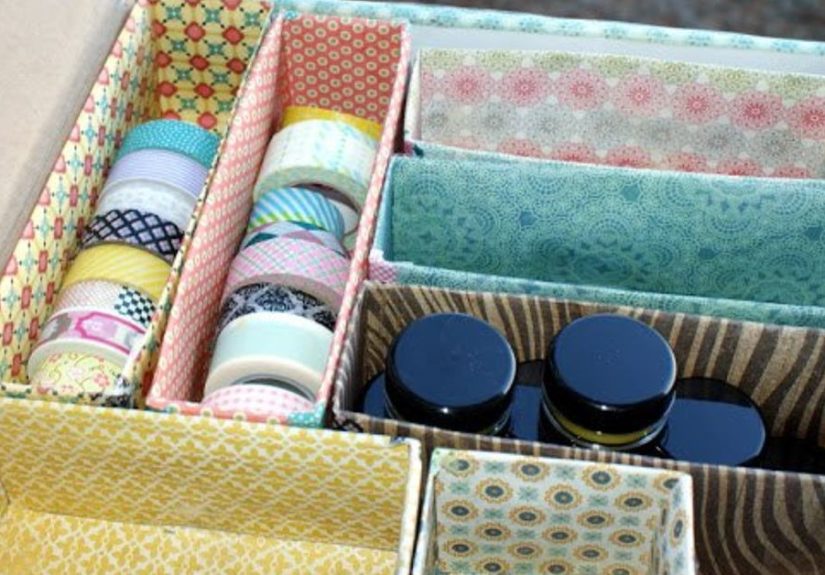
Cereal Box Drawer Dividers
Cereal boxes are naturally shallow and narrow, which makes them perfect for drawers.
Cut them down to the drawer height, wrap them in pretty paper, and arrange them side
by side. You’ll instantly have sections for utensils, office supplies, makeup, or
small accessories.
Kids’ Art & Homework Organizer
Transform a shoebox into a portable organizer for crayons, markers, scissors, glue,
and index cards. Add taller dividers for notebooks or worksheets. Let your kids help
decorate the outside with stickers or drawingsthey’ll be more likely to actually
put things away when they helped make the organizer.
Tips for Long-Lasting Upcycled Organizers
- Avoid heavy loads: Cardboard is strong for its weight, but it has limits. Reserve the heaviest items for reinforced boxes.
- Protect from moisture: Keep these organizers away from damp areas, or seal the outside with a clear spray sealer if needed.
- Reinforce stress points: Add extra cardboard to the bottom, corners, and handle areas.
- Test before filling: Place a few items inside, lift the organizer, and make sure nothing bends or buckles.
- Refresh the coverings: If paper gets dinged or torn, you can re-wrap the box instead of throwing it away.
Common Problems (and Easy Fixes)
The Box Feels Flimsy
Add a second layer of cardboard to the bottom and sides. Use hot glue and press
firmly while it sets. You can also nest a smaller box inside a larger one for
double strength.
The Dividers Don’t Stay Put
Trim any pieces that are slightly too tall or short, then secure them with small
dabs of hot glue where they meet the box walls. A snug fit plus glue is the
secret to dividers that don’t wobble.
The Covering Looks Wrinkled
Work slowly, smoothing as you go, and use thinner paper or fabric that can bend
easily around corners. For fabric, a spray adhesive can help you get a smooth,
wrinkle-free finish.
Real-Life Experience with DIY Upcycled Storage Box Organizers
Once you start making these organizers, it’s a little bit addictive. One box
leads to another, and before you know it, your home starts to feel calmer and
more intentional—all from things you were about to toss in the recycling bin.
Imagine this: your entryway console table used to be a landing zone for mail,
keys, coupons, and mystery papers. Now, a row of matching, fabric-covered
storage boxes sits neatly on the lower shelf. One is labeled “Mail,” another
“Coupons & Receipts,” another “Keys & Sunglasses.” You walk in the
door, drop each item straight into its designated organizer, and suddenly that
chaos is under control.
In the kitchen, small upcycled organizers made from cereal boxes transform a
junk drawer into a command center. One narrow divider holds pens and pencils,
another contains rubber bands and twist ties, and another corrals batteries and
tape. You’re no longer digging under wooden spoons and takeout menus just to
find a single paper clip. Everything has a home, and the home cost you exactly
zero dollars.
Craft rooms may be where DIY upcycled storage box organizers really shine.
Cardboard boxes are surprisingly easy to customize for spools of thread, paint
tubes, markers, stickers, and small tools. With grid-style dividers, you can
store different items in their own little “apartments.” When you sit down to
work on a project, you’re not wasting half your time looking for the right
brush or that one roll of washi tape you swear you bought last month.
Parents often find that these organizers are game-changers in kids’ rooms.
Shoeboxes wrapped in fun, colorful paper or fabric become dedicated homes for
doll accessories, action figures, building blocks, or small cars. You can even
create a simple color-coding system: blue boxes for building toys, green boxes
for art supplies, yellow boxes for puzzles. Cleaning up becomes more of a
matching game than a chore.
Home offices benefit too. A single upcycled storage box organizer on your
desk can hold sticky notes, USB drives, chargers, earbuds, and pens. Larger
boxes on a shelf become paper sorters: “To File,” “To Pay,” “To Read,” “Shred
Later.” That kind of structure helps you stay on top of paperwork and prevents
those intimidating stacks from taking over your workspace.
Over time, you’ll notice which designs work best for you. Maybe you like low,
wide organizers for shelves and tall, narrow ones for drawers. Maybe you find
that rope-wrapped boxes hold up better in high-traffic areas, while paper-covered
ones are perfect for gentle use. The beauty of a DIY upcycled storage box
organizer is that you can tweak the design any time. If your storage needs
change, you can literally cut out a new divider layout, re-wrap the box, or
repurpose it for something else.
And that reflects the real heart of a Hometalk-inspired project: it’s not
about perfection, it’s about creativity, problem-solving, and using what you
have to make your space work better for you. Your first organizer might not be
flawless, but it will still be useful. By the third or fourth box, you’ll be
designing like a pro, eyeballing measurements, and coming up with clever ideas
tailored to your home. In the end, you’re not just making storage—you’re
building a more organized, intentional, and personal space.
Wrapping Up Your DIY Upcycled Storage Box Organizer
A DIY upcycled storage box organizer is simple, inexpensive, and surprisingly
satisfying to make. With a bit of measuring, cutting, and decorating, you can
turn basic cardboard into stylish, functional organizers that look right at
home in any room.
Start with one box, learn what you like, and then repeat the process wherever
clutter tends to pile up. You’ll gain more storage, less stress, and the happy
feeling that comes from creating something useful with your own hands.


