Table of Contents >> Show >> Hide
- What Makes It “Pottery Barn Inspired” (Without Copying Anything)?
- Pick Your Build Style: Recessed vs. Surface-Mount
- Planning Dimensions That Actually Fit Real Walls
- Materials & Tools
- Design Blueprint: A Reliable Build That Looks Custom
- Step-by-Step: Build the Cabinet Box
- Add the Face Frame: The “Custom Built-In” Trick
- Shelves That Don’t Hate You
- The Door: Shaker-Inspired Mirror Door Without the Drama
- Hardware That Feels Fancy: Hinges & Door Action
- Finishing for Bathrooms: Steam Is a Menace
- Installation: Recessed Cabinet (Between Studs)
- Installation: Surface-Mount Cabinet (Easiest, Still Beautiful)
- Upgrades That Make It Feel Truly High-End
- Cost Reality Check (Why DIY Is Worth It)
- FAQ: Quick Answers Before You Grab a Saw
- Wrap-Up: Your Bathroom’s New “Custom” Moment
- Experience Notes: What It’s Actually Like Building One (The Fun Part)
Pottery Barn has a gift: making you fall in love with a bathroom cabinet you didn’t know you needed.
Pottery Barn also has a second gift: that cabinet’s price tag. So today we’re doing the healthy, adult thing
and building a DIY Pottery Barn inspired medicine cabinet that looks upscale, feels sturdy,
and doesn’t require you to eat ramen until summer.
This guide walks you through the decisions that make a cabinet look “store-bought” (in a good way),
the build itself (box, shelves, door, mirror, finish), and the install (recessed or surface-mount).
I’ll also sprinkle in the little details that separate “I made this” from “I made this… and now I want to remake it.”
What Makes It “Pottery Barn Inspired” (Without Copying Anything)?
“Inspired” is all about vibe: classic lines, clean symmetry, and hardware that whispers “I have my life together.”
When you look at high-end medicine cabinets, a few design cues show up again and again:
- A framed mirror door (often with a subtle bevel or thick-looking frame)
- Simple Shaker-ish geometry (straight rails and stiles, no fussy carving)
- Quality hinges (bonus points for soft-close, because slamming a mirror door is a jump scare)
- A furniture-like face frame around the box opening (this is the “custom built-in” illusion)
- A durable bathroom finish that can handle humidity and daily wipe-downs
The goal: a cabinet that looks intentional and tailoredlike it was designed for the space,
not like it was adopted from an aisle labeled “miscellaneous rectangles.”
Pick Your Build Style: Recessed vs. Surface-Mount
Option A: Recessed (Built Into the Wall)
A recessed cabinet sits between studs, so it looks sleek and saves precious inches in smaller bathrooms.
This is the cleanest, most “custom” lookif your wall cavity cooperates.
- Pros: flush look, space-saving, very “designer bathroom” energy
- Cons: you must avoid plumbing/electrical, and stud spacing can limit width
Option B: Surface-Mount (Hangs on the Wall)
If your wall contains pipes, wiring, or your studs are feeling uncooperative, surface-mount is the low-drama choice.
You can build it wider, deeper, and more “statement piece.” Done well, it still looks high-end.
- Pros: easiest install, can be larger, no wall surgery required
- Cons: sticks out from the wall (but we’ll make that look intentional)
Reality check: Before you commit to recessed, use a stud finder, then do a small exploratory hole
(inside the outline area) to check for plumbing or wiring. If you find surprises, pivot to surface-mount and pretend
it was the plan all along.
Planning Dimensions That Actually Fit Real Walls
The “Stud Bay” Recessed Size (Most Common)
Most bathrooms have studs at 16 inches on center. The open space between studs is usually about 14 1/2 inches.
That means a recessed cabinet box around 14 inches wide is the sweet spot for an easy fit.
Typical depth for recessed cabinets is limited by your wall framing (often 2×4), so plan a box depth around
3 1/2 to 4 inches and keep shelves practical (think skincare bottles, toothbrush chargers,
and that one mysterious ointment with a label from 2019).
The “Pottery Barn Vibe” Statement Size (Often Wider)
If you love the look of a wider cabinetsay 20 to 24 inchessurface-mount is usually easiest.
You can still give it a semi-recessed feel by adding trim around it, or building a thicker face frame that disguises depth.
Materials & Tools
Materials
- 3/4-inch plywood for the cabinet box (birch/maple plywood is a paint-friendly favorite)
- 1/4-inch plywood for the back panel (or leave the back open for recessed, depending on your design)
- Solid wood (poplar or maple) for the face frame and door frame
- Mirror (plain or beveled; typically 1/8-inch to 1/4-inch thick depending on your door design)
- Backing panel for the mirror (thin plywood or hardboard)
- Wood glue, brad nails, and/or pocket hole screws
- Shelf pins and a shelf pin drilling jig (optional, but it makes you feel like a cabinet wizard)
- Concealed hinges (inset or overlay depending on your door style) + screws
- Magnetic catch or soft-close catch (optional)
- Primer + cabinet-grade topcoat (more on finishing below)
- Knob or pull that matches your bathroom hardware vibe
Tools
- Miter saw or circular saw + guide (or table saw if you’re living the dream)
- Drill/driver, level, tape measure
- Brad nailer (optional but extremely satisfying)
- Pocket hole jig (optional, but great for clean joinery)
- Router (helpful for rabbets and door details)
- Stud finder, drywall saw (for recessed install)
- Clamps (you can never have too many; they multiply when you’re not looking)
Design Blueprint: A Reliable Build That Looks Custom
Below is a classic, repeatable approach that creates that “high-end” look:
- Build a sturdy plywood box (square, true, and not held together by hope).
- Add a face frame that slightly overlaps the drywall opening (for recessed) or adds furniture detail (surface-mount).
- Install adjustable shelves so the cabinet adapts to real life (and tall bottles).
- Build a framed mirror door (Shaker-inspired) with quality concealed hinges.
- Finish like a pro so it survives steam, splashes, and daily use.
Step-by-Step: Build the Cabinet Box
Step 1: Cut the Box Parts
For a recessed stud-bay cabinet, a practical finished outside size is often around:
14″ W x 24″–30″ H x 3 1/2″–4″ D. Adjust height based on your mirror preference and what’s above the sink.
Cut:
- Two sides (height x depth)
- Top and bottom (width x depth)
- Optional fixed shelf (width x depth) for added rigidity
- Back panel (width x height) if you want a closed-back box (especially for surface-mount)
Step 2: Assemble the Box (Square Matters)
Dry-fit your pieces. Then assemble using wood glue plus one of these methods:
- Rabbet/dado joinery (strong, clean, and very “I own chisels”)
- Pocket holes (fast, strong, and great for hidden joinery)
- Butt joints + brad nails (okay for light loads if done carefully, but reinforce with a back panel)
Check for square by measuring diagonals. If the diagonals match, you’re winning.
If not, clamp diagonally until they do.
Step 3: Add the Back (Optional but Recommended)
A back panel increases rigidity and makes the cabinet feel “finished.” For recessed installs, some builders keep it open
to maximize depth and access, but a thin back is still commonespecially if you’re not hiding anything inside the wall.
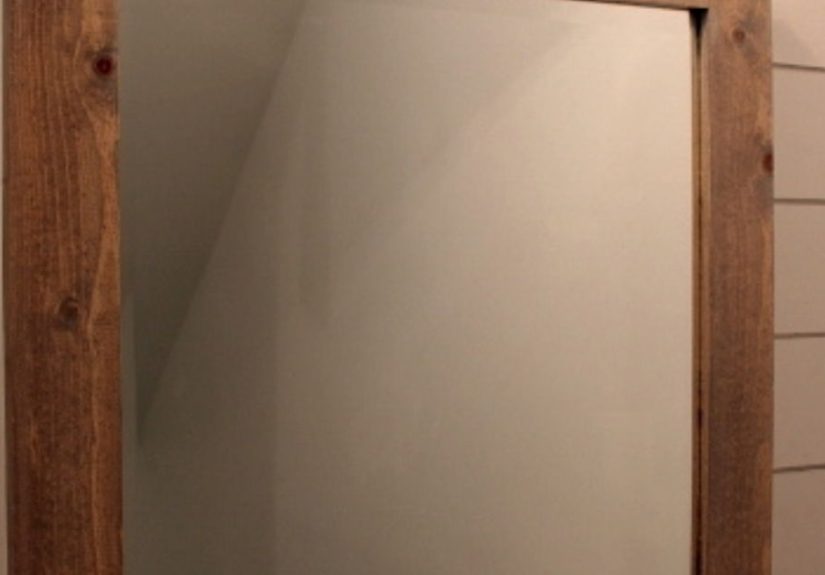
Add the Face Frame: The “Custom Built-In” Trick
The face frame is where your cabinet starts looking expensive. Use poplar (paint-grade) or maple (tougher)
and make a simple frame that sits on the front edge of the box.
Face Frame Tips That Make It Look High-End
- Make it slightly proud of the box (even 1/8-inch) for a furniture feel.
- Hide plywood edges completelyno raw layers visible from the front.
- Use consistent reveals (equal margins around the opening) so it looks intentional.
Attach the face frame with glue and brad nails (or clamps until dry).
Fill nail holes, sand smooth, and enjoy the moment where it suddenly looks “real.”
Shelves That Don’t Hate You
Adjustable shelves are your friend because bathroom items come in two sizes:
“tiny” and “why is this bottle taller than my dreams?”
Two Shelf Options
- Shelf pins: Drill a neat row of 1/4-inch holes using a jig for consistent spacing.
- Fixed shelves: Strong and simplegreat if you know exactly what you’ll store.
Pro tip: Don’t set shelf spacing too tight. Leave room for pump tops and electric toothbrush chargers.
The Door: Shaker-Inspired Mirror Door Without the Drama
Door Style Choices
You’ve got two classy options:
- Inset door: Sits flush inside the face frame opening. Super custom look, requires careful alignment.
- Overlay door: Covers the opening. Easier to build/install, still looks polished.
If you want the “Pottery Barn inspired” feel, inset is gorgeousjust know it demands patience, like a sourdough starter.
Build a Frame That Holds a Mirror
Build the door frame from rails and stiles (1×2 or 1×3 depending on proportions). You can join them with:
- Mortise-and-tenon (classic and strongest)
- Cope-and-stick router bit set (common for cabinet doors)
- Dowels or loose tenons (strong and approachable)
Then route a rabbet on the back side of the frame to create a “seat” for the mirror and backing panel.
The mirror should be held securely but not glued rigidly (glass expands and contracts slightly; it also enjoys revenge).
Mirror + Backing: A Solid, Serviceable Sandwich
- Place the mirror into the rabbet with tiny silicone dots (not a full glue bed).
- Add a thin backing panel (hardboard or thin plywood) behind the mirror.
- Secure with small mirror clips, glazing points, or thin stop molding so the mirror can be replaced later.
If you’re using a beveled mirror, measure carefully and order it with a little breathing room so it’s not forced into place.
Hardware That Feels Fancy: Hinges & Door Action
Concealed Hinges (Soft-Close if Possible)
Concealed hinges are the easiest path to a clean exterior. For inset doors, choose hinges designed for inset applications.
Use a hinge jig to drill the cup holes consistently. Your future self will thank you while adjusting the door by a millimeter
and pretending it’s relaxing.
Knobs, Pulls, and Finishing Touches
Hardware is the jewelry. Match your faucet finish if you canpolished nickel, matte black, brasswhatever your bathroom is doing.
A simple knob can look classic; a small pull can feel modern-traditional. Either way, skip anything flimsy.
Finishing for Bathrooms: Steam Is a Menace
Bathrooms are basically tiny weather systems. You want a finish that resists moisture and cleans easily.
That usually means a durable primer and a cabinet-grade topcoat with a practical sheen.
Primer: Don’t Skip the Boring Step That Prevents Future Regret
Use a bonding primer or stain-blocking primer suited for wood and previously finished surfaces.
A quality primer helps adhesion, blocks tannins (especially with wood like oak), and gives your topcoat an even base.
Topcoat Options That Perform
- Cabinet/door/trim enamel: Formulated for harder wear and smoother leveling.
- Waterborne alkyd paints: Popular for cabinets because they level nicely and cure harder than typical wall paint.
Sheen: The “Looks Nice” vs. “Cleans Easily” Balance
In bathrooms, satin and semi-gloss finishes are popular because they wipe clean and hold up better to moisture than flatter finishes.
Go too glossy and you’ll see every brush stroke; go too flat and it’ll scuff if you look at it funny.
Pro Finish Moves
- Sand between coats lightly for a smoother feel.
- Use a high-quality brush or small foam roller for cabinet paint.
- Let it cure fully before heavy use“dry to touch” is not the same as “ready for your skincare stampede.”
Installation: Recessed Cabinet (Between Studs)
Step 1: Mark and Open the Wall
Mark the cabinet location. Confirm stud positions. Then cut a small inspection hole first to check for plumbing or wiring
before you commit to a full opening.
Step 2: Frame the Opening
Add blocking (like a mini “window frame”) so the cabinet has solid wood to screw into. This also helps keep the opening square.
If you’re modifying studs or dealing with utilities, consider hiring a prostructural and electrical mistakes are expensive hobbies.
Step 3: Slide In, Level, and Secure
Dry-fit the cabinet. Shim as needed so it sits plumb and centered. Then screw through the cabinet sides into the framing/blocking.
Re-check door swing and alignment before you declare victory.
Step 4: Trim for a Built-In Look (Optional but Powerful)
If there’s a tiny drywall gap, cover it with thin trim or a slightly wider face frame. Caulk lightly and touch up paint.
This is where it starts looking like it was always there.
Installation: Surface-Mount Cabinet (Easiest, Still Beautiful)
- Locate studs and mark mounting points.
- Pre-drill the cabinet back or mounting cleats.
- Level the cabinet and screw into studs (not just drywall).
- Add trim or a thicker face frame if you want it to look more “furniture-like.”
Upgrades That Make It Feel Truly High-End
- Beveled mirror: Instantly elevates the look.
- Interior lighting: LED strip on a door switch (keep electrical work code-compliant).
- Hidden outlet: For toothbrush chargers and shavers (use GFCI where required, follow local codes).
- Soft-close hinges: Quiet, smooth, and surprisingly addictive.
- Built-in organizer: A slim removable tray for small items.
Cost Reality Check (Why DIY Is Worth It)
The cost of a DIY cabinet depends heavily on materialsplywood grade, hardwood species, and mirror type (beveled costs more).
Hardware also matters: high-quality concealed hinges and a good pull aren’t “cheap,” but they’re the difference between
“nice cabinet” and “why does this feel like a camping cooler lid?”
The win with DIY isn’t just savingsit’s getting the exact size, depth, finish, and storage layout you actually want.
That customization is the real luxury.
FAQ: Quick Answers Before You Grab a Saw
How deep can a recessed medicine cabinet be?
Most recessed cabinets are limited by wall framing depth. In many homes, a practical recessed depth is around 3 1/2 to 4 inches.
If you need deeper storage, consider a surface-mount cabinet with a thicker face frame so it looks intentional.
Can I recess a cabinet if there’s plumbing in the wall?
Sometimes, but it depends on exact pipe placement. If anything is in the way, surface-mount is usually the smarter move.
You can still get a high-end look with trim and proportions.
Is MDF okay in a bathroom?
Moisture and MDF are not best friends. If you use MDF for paint-smooth doors, seal it thoroughly on all sides and edges.
Plywood and solid wood generally hold up better long-term in humid spaces.
What paint finish is best for bathroom cabinetry?
Satin and semi-gloss are common choices for moisture resistance and cleanability. Pair that with proper priming and adequate cure time.
Wrap-Up: Your Bathroom’s New “Custom” Moment
A Pottery Barn inspired medicine cabinet is really a combination of simple geometry,
clean execution, and durable finishing. Nail the face frame proportions,
keep the door reveal consistent, choose quality hinges, and treat the paint job like it matters (because it does).
The result is a cabinet that looks like a built-in upgradenot a weekend compromise.
Experience Notes: What It’s Actually Like Building One (The Fun Part)
The first time I built a medicine cabinet, I thought the hard part would be the woodworking. Plot twist:
the hard part was the wall. Walls have secrets. Walls have opinions. Walls have plumbing placed exactly
where your “perfect centered cabinet” wants to live, like it’s guarding treasure.
My best decision was doing a tiny exploratory hole before cutting the full opening. It felt dramaticlike
I was performing surgery on drywallbut it saved me from a much bigger surprise. The stud bay looked clear
at first, then I shined a flashlight and saw a wire stapled right where my cabinet side would land.
That was my cue to pivot: surface-mount cabinet, thicker face frame, and a confident attitude.
Nobody has to know you changed the plan. Your bathroom will never tell.
The second biggest “aha” was how much the face frame changes the whole vibe. Before the face frame,
the box looked like… a box. After the face frame, it looked like something you’d brag about during
a house tour you didn’t even plan to give. That little border hides plywood edges, forgives drywall
gaps, and creates that furniture-like detail that reads “custom.”
Then came the mirror door, and yes, I was nervous. Glass feels like the one material that can sense fear.
Ordering the mirror was surprisingly simple, but installing it taught me an important life lesson:
don’t over-tighten anything near glass. I used small clips and a backing panel so the mirror was held
securely but not squeezed. I also left a tiny bit of clearance so the mirror could settle without stress.
Result: no weird creaks, no mysterious cracks, no “why is the mirror making me anxious?”
Hardware was the part that made it feel expensive. I’m not saying soft-close hinges changed my personality,
but I did start closing the door gently just to watch it glide. The adjustability also saved me when the door
was slightly off. With concealed hinges, you can fine-tune alignment in multiple directions, which is basically
therapy for perfectionists.
Finally: finishing. Bathroom humidity is real, and it will humble you. The first coat always looks a little
disappointinglike the cabinet is wearing pajamas. Then you sand lightly, apply the second coat, and suddenly
it looks like it has a job and pays taxes. The key was thin coats and patience. I let everything cure longer
than I wanted to, which felt annoying at the time and brilliant later when the finish didn’t stick to itself
or pick up fingerprints the moment someone looked at it.
The best part? Every morning, the cabinet still feels like a small luxury because it fits the space perfectly.
The shelves hold exactly what we use. The door swings the right way. The mirror is the right size. And the cabinet
looks intentionallike it belongs in the room. That’s the DIY win: not just “I saved money,” but “I made it better
for how we actually live.”


