Table of Contents >> Show >> Hide
- Why Chestnuts Need Special Treatment (AKA: Why They “Pop”)
- The Ultimate Fireside Tool Kit
- 1) A Scoring Tool You Trust (Because Slipping Is Not a Holiday Tradition)
- 2) The Classic Long-Handled, Perforated Chestnut Pan (The Star of the Show)
- 3) A Cast Iron Skillet (Your Backup Plan That’s Also a Flex)
- 4) Fireplace Tongs + Poker (For Ember Management, Not Chestnut Jenga)
- 5) Heat-Resistant Gloves (Because “Ouch” Is Not a Seasoning)
- 6) A Fireplace Screen (Your Spark & Ember Bouncer)
- 7) A Metal Tray + Trivet (The “Where Do I Put This Hot Thing?” Solution)
- 8) The Peeling Hack Tools: A Clean Kitchen Towel (and Maybe a Paper Bag)
- 9) A Small Paring Knife (For the Stubborn Inner Skin)
- Set Up a Safe Fireside Roasting Station
- How to Roast Chestnuts by the Fireplace (Step-by-Step, Without the Drama)
- Troubleshooting: When Chestnuts Misbehave
- Buying Guide: What Makes a Fireside Chestnut Tool Worth It?
- Storage and Leftovers (Yes, You Can Save Them)
- Fireside Field Notes: of Real-Life Roasting Vibes
- Conclusion: Your Coziest Upgrade Is a Smarter Tool Kit
There are two kinds of winter people: the “hot cocoa is a personality trait” crowd and the “I will absolutely risk my eyebrows for a perfect marshmallow” crowd. Roasting chestnuts sits right in the cozy overlapold-school, festive, and just dramatic enough to make your living room smell like a holiday movie montage.
But here’s the twist: chestnuts aren’t like other nuts. They’re more like tiny, starchy potatoes in hard little jackets. Which is why the right fireside tools don’t just make roasting easierthey make it safer, tastier, and way less likely to end with you muttering, “Why won’t you peel?!”
Why Chestnuts Need Special Treatment (AKA: Why They “Pop”)
Chestnuts have a higher moisture content than most nuts, and that moisture turns to steam when heated. If the shell doesn’t have an escape route, pressure builds… and chestnuts can crack or burst like tiny, nutty jump-scares.
That’s why scoring matters. A simple “X” cut does three big things: it vents steam, helps heat penetrate more evenly, and makes peeling less of a wrestling match. Skip it, and you’re basically hosting a miniature fireworks showexcept the confetti is hot shell bits and regret.
The Ultimate Fireside Tool Kit
You don’t need a medieval armory to roast chestnutsjust a smart set of tools that handle heat, embers, and the “peel-it-while-it’s-warm” reality. Here’s the fireside lineup that earns its keep.
1) A Scoring Tool You Trust (Because Slipping Is Not a Holiday Tradition)
The shell is tough and glossy, which can make it easy for a knife to skate. Many cooks prefer a serrated knife because it bites into the shell with less slipping. If you want extra peace of mind, a dedicated chestnut cutter/scorer (the kind that holds the nut steady) is a great upgradeespecially if you roast chestnuts often.
- Best for: safer prep, consistent scoring
- Look for: a comfortable grip, stable base, and a blade that doesn’t wobble
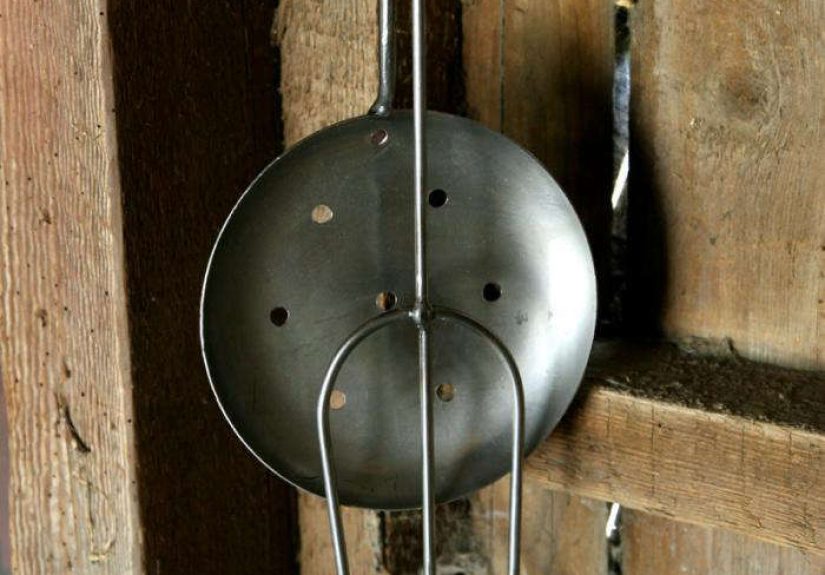
2) The Classic Long-Handled, Perforated Chestnut Pan (The Star of the Show)
A perforated chestnut roasting pan is the traditional fireside MVP. The holes let flame and heat contact the shells directly, building that smoky, woodsy flavor you can’t fake with an oven. The long handle keeps your hands a safer distance from heat and embersbecause “cozy” should not mean “singed.”
- Best for: authentic flavor, easy shaking/stirring, roasting over embers
- Look for: sturdy metal (carbon steel or similar), generous perforations, and a handle long enough to feel in control
3) A Cast Iron Skillet (Your Backup Plan That’s Also a Flex)
No chestnut pan? No problem. A cast iron skillet set near or over a bed of embers can roast chestnuts beautifully. Cast iron holds heat well, and it’s stablehelpful when you’re working around a fireplace. It’s also great for roasting small batches when you want “a snack” instead of “a full-blown holiday production.”
- Best for: sturdy roasting, small batches, multipurpose use
- Pro tip: keep chestnuts in a single layer and stir/turn so they roast evenly
4) Fireplace Tongs + Poker (For Ember Management, Not Chestnut Jenga)
Roasting chestnuts over an open hearth is really about embers, not roaring flames. You want a hot bed of coals that gives steady heat. Tongs and a poker let you nudge logs, pull coals forward, and create a safe roasting zone without putting your hands where they don’t belong.
- Best for: moving embers, adjusting heat zones, keeping things controlled
- Look for: comfortable handles and enough length for your fireplace depth
5) Heat-Resistant Gloves (Because “Ouch” Is Not a Seasoning)
If you’re handling anything near emberspans, skillets, trays, even the occasional runaway chestnutheat-resistant gloves are non-negotiable. Leather-style fireplace gloves are popular for a reason: they’re durable, give grip, and buy you precious seconds if something gets hotter than expected.
6) A Fireplace Screen (Your Spark & Ember Bouncer)
A screen or glass doors help keep sparks and embers where they belong: inside the fireplace. Chestnuts can “jump” as they heat and split, and a screen adds a layer of protection for people, pets, rugs, and that one friend who always sits too close to the fire.
7) A Metal Tray + Trivet (The “Where Do I Put This Hot Thing?” Solution)
Once chestnuts are roasted, you need a safe landing zone. A metal tray (or rimmed sheet pan) plus a heat-safe trivet keeps hot cookware off delicate surfaces. This is one of those tools you won’t appreciate until you absolutely, urgently need it.
8) The Peeling Hack Tools: A Clean Kitchen Towel (and Maybe a Paper Bag)
Roasted chestnuts peel best when they’re still warmand steaming them briefly helps loosen both the hard shell and the papery inner skin. Wrapping hot chestnuts in a towel for several minutes is a small step that saves major frustration later.
- Best for: easy peeling, less torn chestnut meat, fewer grumpy faces
- Bonus: it also keeps the batch warm while you peel a few at a time
9) A Small Paring Knife (For the Stubborn Inner Skin)
Even with perfect scoring and steaming, a few chestnuts will cling to their inner skin like it’s paying rent. A small paring knife lets you tidy them up without shredding the sweet, tender center.
Set Up a Safe Fireside Roasting Station
Fires are great. Unplanned fires are… less great. Before roasting, clear the area around the fireplace so nothing flammable is too close. Use your screen, keep tools within easy reach, and make sure you have a stable surface for hot pans.
The ideal roasting moment is when your fire has burned down into a steady bed of hot embers. That’s the sweet spot for consistent heat and fewer flare-ups.
If you’re a teen: roasting chestnuts near an open fire should be an adult-supervised activity. This is one of those traditions that’s best enjoyed with a grown-up managing the fire while you manage the snack glory.
How to Roast Chestnuts by the Fireplace (Step-by-Step, Without the Drama)
Step 1: Choose and Prep Your Chestnuts
Start with chestnuts that feel heavy for their size and look glossy and intact (avoid cracks, moldy spots, or anything that feels suspiciously light). Rinse, pat dry, and score an “X” on the flatter side of each nut.
Optional but helpful: soak scored chestnuts in water for about 30 minutes if you’re worried about them drying out too much while roasting.
Step 2: Get the Heat Right (Embers > Flames)
You want a hot bed of embers. If flames are licking aggressively, wait a bit. Chestnuts roast best with steady, radiant heat. Use tongs/poker to pull a small mound of coals forward into an easy-to-reach roasting zone.
Step 3: Roast in a Chestnut Pan (or Skillet)
With a perforated chestnut pan: add chestnuts in a single layer. Hold the pan over embers (not directly in roaring flames) and shake/stir often. Roast time commonly lands around 10–12 minutes, but it depends on chestnut size, freshness, and heat level.
With a cast iron skillet: place the skillet near or over hot coals, add chestnuts scored-side up, and roast about 10 minutes, stirring once or twice so they don’t scorch on one side.
You’ll know you’re close when the scored “X” starts to open and curl back, and the chestnut inside looks dry and golden rather than pale and firm.
Step 4: Steam for Easy Peeling
Transfer roasted chestnuts to a clean kitchen towel (or a paper bag), wrap them up, and let them steam for about 5–10 minutes. This step is weirdly magical: it loosens the shell and inner skin so peeling feels like a victory instead of a chore.
Step 5: Peel While Warm (Future You Will Thank Present You)
Peel chestnuts while they’re still warm. Pull back the shell at the “X,” remove the shell and the papery inner skin. If you find a chestnut that looks gooey or spoiled inside, toss itno hero points for eating questionable nuts.
Troubleshooting: When Chestnuts Misbehave
“They’re hard inside.”
That usually means undercooked. Chestnuts should be tender all the way through. Return them to the heat for a few more minutes, then steam again before peeling.
“They burned on one side.”
Your heat was too direct or you didn’t stir enough. Roast over embers, not active flames, and shake/stir more often. Think of it like popcorn: ignore it too long and it gets moody.
“The inner skin won’t come off.”
Try steaming longer (still wrapped in the towel), and peel a few at a time while keeping the rest warm. If needed, use a paring knife to lift stubborn patches without gouging the chestnut.
“Some exploded.”
That’s almost always scoring (or scoring depth) plus moisture/steam pressure. Make sure every chestnut is scored, and don’t be shy about making a clean “X” through the shell (not deeply into the nut).
Buying Guide: What Makes a Fireside Chestnut Tool Worth It?
Here’s what actually matters when you’re shoppingwhether you’re upgrading your own setup or gifting a future chestnut enthusiast.
Chestnut Pan Must-Haves
- Perforations that make sense: enough holes for heat/flame contact, but not so huge that small chestnuts try to escape.
- A long, sturdy handle: because distance is comfortand also safety.
- Durable metal: carbon steel and similar metals handle high heat well; treat them kindly and they’ll last.
Scoring Tool Must-Haves
- Grip and control: chestnuts roll, and nobody needs a surprise trip to the first-aid kit.
- Consistency: uniform scoring helps roasting and peeling go smoothly.
Safety Tools That Don’t Feel “Optional” Once You’ve Used Them
- Heat-resistant gloves for handling pans, trays, and anything near embers.
- A fireplace screen to keep sparks and jumpy shells contained.
- A metal tray + trivet so hot cookware doesn’t go sightseeing across your furniture.
Storage and Leftovers (Yes, You Can Save Them)
Unroasted chestnuts keep best in the refrigerator for about 1–2 weeks. Once roasted, peel them all while they’re still warm, even if you don’t plan to eat them immediatelypeeling later is harder and honestly feels like a personal insult.
Roasted, peeled chestnuts are great tossed into stuffing, chopped into salads, blended into soups, or folded into desserts. They’re sweet, earthy, and quietly fancylike the friend who owns matching towels.
Fireside Field Notes: of Real-Life Roasting Vibes
The first time you roast chestnuts by a fireplace, you expect it to be effortlesslike you’ll casually swirl a pan, smile wistfully, and suddenly your home will smell like a holiday candle called “Grandma’s Sweater Weather.” The reality is more charming: it’s a tiny event. There’s setup, anticipation, and a little bit of learning the fire’s personality.
You start with the scoring. At first, it feels oddly officiallike you’re stamping passports for each chestnut before it can enter the land of Delicious. Then you realize chestnuts are round and mischievous. They want to roll. A steady cutting board, a confident grip, and a tool you trust matter here. Once you get the hang of making a clean “X,” it becomes satisfyingalmost rhythmic. Score, rotate, score, repeat. The pile grows. The excitement does too.
When you move to the hearth, the whole mood changes. The fire has that warm, living energy, and you start paying attention in a way you don’t with an oven. Embers glow, shift, and breathe. You learn quickly that the best roasting heat isn’t a towering flameit’s the steady, radiant blanket of coals beneath. This is where fireplace tools feel less like accessories and more like extensions of your hands. A poker nudges coals forward. Tongs reposition a log. Gloves let you hold a pan with confidence instead of panic.
Roasting itself is interactive. If you’re using a long-handled perforated pan, you shake it gently and listen. There’s a soft rattle as shells tap metal. Then the first “pop” happensnot an explosion, more like a tiny crackfollowed by the shell curling back at the score. It’s the sign you’re waiting for. You stir, you shake, you hover (responsibly), and you start to smell it: that sweet, toasty aroma that’s half comfort food and half winter nostalgia.
The steaming step feels like a secret handshake among people who have peeled chestnuts before. You wrap the hot batch in a towel and wait. The towel puffs slightly as the heat works its magic. Those minutes are the difference between “easy peel” and “why is this inner skin glued on with spite?” When you finally unwrap them, they’re warm and fragrant, and peeling becomes a cozy group activitysomething you can do while chatting, sipping cider, or pretending you’re in charge of the holiday soundtrack.
There’s always that one stubborn chestnut, of coursethe one with an inner skin that refuses to cooperate. That’s when a small paring knife saves the day, and you learn the best mindset: don’t rush. Peel a few at a time while the rest stay warm. Accept that a couple will crumble. They’ll still taste great. And when you finally bite into a properly roasted chestnuttender, sweet, and just a little smokyyou understand why this tradition sticks around. It’s not just a snack. It’s a moment you can smell.


