Table of Contents >> Show >> Hide
- Why a DIY rock mat feels so spa-like
- Supplies you’ll need for your DIY rock mat
- Step-by-step DIY rock mat tutorial
- How to style your bathroom around your new rock mat
- Creative ways to use your DIY rock mat beyond the bathroom
- Real-life experiences and extra tips for using a DIY rock mat
- Wrapping it up: your DIY rock mat spa moment
Imagine stepping out of the shower and onto smooth, cool river stones that massage your feet and make your bathroom feel like a fancy spa instead of, well, the place where your kids leave wet towels on the floor.
A DIY rock mat is one of the easiest, most budget-friendly ways to bring that spa-like feel home – and you don’t need a renovation, a contractor, or a lottery win to do it.
In this guide, you’ll learn how to make a DIY rock mat from start to finish, plus how to style the rest of your bathroom so the whole space feels like a relaxing retreat.
We’ll talk supplies, step-by-step instructions, spa-inspired decorating ideas, and real-life tips to keep your mat looking good (and not shedding pebbles like a nervous squirrel).
Why a DIY rock mat feels so spa-like
Spas are masters of turning basic routines into little rituals. A rock mat hits a lot of those same notes:
- Natural materials: River rocks and stone instantly add a calming, nature-inspired element that contrasts beautifully with tile and porcelain.
- Gentle foot massage: Standing on rounded pebbles gives a light acupressure effect that can feel surprisingly relaxing after a long day on your feet.
- Visual texture: The mix of shapes and subtle color variations makes even a small bathroom look more designed and intentional.
- Better drainage: When used as a bath mat, the spaces around pebbles help water drain more quickly instead of soaking into a traditional fabric mat.
And the best part? A rock mat looks like something you bought at a boutique spa store, but you can DIY it in an afternoon with basic supplies.
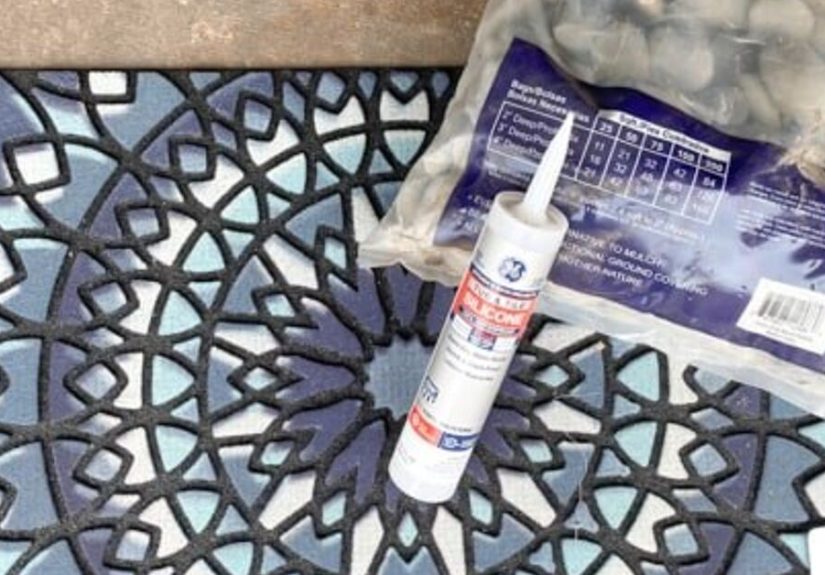
Supplies you’ll need for your DIY rock mat
Before you start, gather everything in one place. This keeps the project quick and fun instead of you running through the house with glue on your hands.
- Base mat: A rubber bath mat or rubber-backed doormat works best. Look for something with a nonslip backing and some flexibility.
- River rocks or decorative pebbles: Choose smooth, flat stones. You can use bags of river rock from the home center or decorative stones from the craft store.
- Waterproof adhesive: A strong silicone adhesive or waterproof construction adhesive is ideal. Look for one that’s mold- and mildew-resistant if it will live in a bathroom.
- Rubbing alcohol or mild cleaner: For cleaning the mat before gluing.
- Caulk gun: If your adhesive comes in a tube.
- Utility knife or scissors: To trim your base mat if needed.
- Optional: Clear sealant, felt pads for the underside (if it will sit on delicate flooring), and rubber gloves to keep your hands glue-free.
Step-by-step DIY rock mat tutorial
Step 1: Choose your location and size
First, decide where your rock mat will live: in front of the shower, beside the tub, at the bathroom vanity, or even by the back door as a stylish boot tray.
Measure that spot and use those dimensions as your guide. If your base mat is larger, you can easily trim it down with a sharp utility knife.
For a spa-like bathroom, a rectangular mat in front of the shower or tub is a classic choice. If your space is small, even a narrower runner-style mat can make a big impact.
Step 2: Prep the base mat
A little prep work goes a long way toward durability:
- Wash or wipe the mat with warm, soapy water to remove dust, oils, or manufacturing residue.
- Rinse thoroughly and let it dry completely.
- Wipe the surface with rubbing alcohol so the adhesive can grip better.
Make sure the mat is flat. If it was rolled up, lay it out overnight with something heavy on the corners to help it relax.
Step 3: Sort and “dry-fit” your rocks
Here’s where the fun (and oddly satisfying) part starts:
- Sort your rocks into general size groups: small, medium, and large.
- Pull out any that are too pointy, extremely tall, or uncomfortable to stand on.
- Spread the rocks out on the mat without glue first – this is your “dry fit.”
Try to keep the stones relatively even in height so the mat feels comfortable. Mix colors and sizes to get a natural, riverbed look.
You can create a subtle ombré pattern, a border of darker stones, or random placement – whatever feels most relaxing to you.
Step 4: Glue the rocks in place
Once you like your layout, start gluing:
- Work in small sections so the adhesive doesn’t skin over before you place the stones.
- Apply generous dots or lines of adhesive where each rock will sit.
- Press each stone firmly into the glue, giving it a slight wiggle to help it seat.
- Don’t forget the edges – secure them well so rocks don’t pop off when the mat is moved.
The mat will get heavy quickly, which is actually helpful for keeping it in place on the floor. Just remember to build it on a surface where you’re comfortable leaving it to cure overnight.
Step 5: Let the mat cure completely
Patience is your friend here. Even if the adhesive feels dry on the surface, it may still be curing underneath.
- Follow the curing time on your adhesive – often 24 hours or more for full strength.
- Avoid stepping on the mat until the adhesive is fully cured.
- If you used a sealant over the rocks, give that time to dry as well.
When the wait is over, test a few rocks by pressing or gently twisting them. If anything feels loose, add a bit more adhesive and let it dry again.
Step 6: Test for comfort and adjust if needed
Step onto the mat barefoot and see how it feels. If a particular rock feels too pointy, you can:
- Pry it off carefully and replace it with a flatter stone.
- Shift it slightly if the edge is what’s poking your foot.
The goal is a gentle foot massage, not a surprise Lego-level pain. A little tweaking now will make your spa-like experience much nicer later.
Step 7: Decide how you’ll use and care for your mat
A stone mat in a bathroom will occasionally get wet and soapy, so plan a simple care routine:
- Regular rinsing: Every week or so, rinse the mat in the tub or shower to remove soap residue and dust.
- Drying: Stand it on its side or prop it up so air can circulate and everything dries thoroughly.
- Deep cleaning: Use a soft brush and mild cleaner a few times a year to scrub between stones.
With basic care, a rock mat can stay beautiful and functional for a long time – and the natural materials only look better with a bit of age and patina.
How to style your bathroom around your new rock mat
A single DIY project can transform how a room feels, but pairing your rock mat with a few spa-inspired upgrades will amplify the effect.
Think of the mat as the star of the show – now you’re adding supporting actors.
1. Declutter like a spa
Spas never have random shampoo bottles on every surface, and your bathroom shouldn’t either if you’re trying for a spa-like feel. A few simple changes can help:
- Store backup products (extra bottles, refills, and rarely used items) in a cabinet or basket.
- Decant daily essentials (soap, shampoo, cotton pads) into matching bottles or jars.
- Keep counters mostly clear, with just a few well-chosen items on display.
2. Add soft, plush textiles
Your rock mat gives you that natural texture underfoot, so balance it with soft, cozy textiles everywhere else:
- Swap old towels for thicker, neutral-colored ones that feel luxurious.
- Add a robe hook and treat yourself to a fluffy bathrobe.
- Layer a small basket with rolled hand towels for a hotel-like touch.
The contrast between plush towels and smooth pebbles creates a sensory experience that feels expensive, even if you did it on a budget.
3. Use spa-worthy lighting
Harsh overhead lighting can make even a gorgeous bathroom feel like a medical exam room. To get that spa-like glow:
- Switch bright white bulbs for warm, soft-white ones.
- Add a dimmer switch if possible, so you can dial the brightness down at night.
- Bring in candles (real or battery-operated) near the tub or vanity for evenings.
Your rock mat will look even more beautiful when the stones catch soft, warm light instead of a blinding glare.
4. Bring in scent and greenery
Scent is one of the quickest ways to trigger that “ahh, I’m at the spa” feeling:
- Use a subtle diffuser with essential oils like eucalyptus, lavender, or sandalwood.
- Hang a small bundle of eucalyptus in the shower so the steam releases its scent.
- Add a small plant that loves humidity, such as a fern, orchid, or peace lily, if light conditions allow.
Place your rock mat where it’s visible as you walk in – the natural stone, greenery, and calming scent will instantly make the space feel more like a retreat than a purely functional room.
5. Keep the color palette calm and cohesive
Your rock mat will likely feature grays, browns, creams, or blacks, so echo those tones throughout the room:
- Choose towels in soft neutrals that pick up a color from the stones.
- Use wood or bamboo accessories (like trays or storage boxes) for warmth.
- Limit bold patterns to one or two pieces so the room doesn’t feel busy.
A cohesive palette lets your DIY rock mat look like it was always meant to be part of the bathroom design, not just a random craft project.
Creative ways to use your DIY rock mat beyond the bathroom
Once you’ve made one rock mat, it’s very hard to stop at just one. (You’ve been warned.) Here are a few other ideas:
- Boot tray by the door: Use a deeper tray-style base and fill it with rocks so wet shoes can drip without creating puddles.
- Plant stand: A smaller rock mat under a grouping of plants makes a pretty, water-resistant base.
- Spa station for feet: Place a rock mat near a chair, add a basin of warm water and a towel, and you have an at-home foot soak corner.
The same technique – base plus rocks plus adhesive – opens up all kinds of decorative possibilities around your home.
Real-life experiences and extra tips for using a DIY rock mat
Now let’s talk about what it’s really like to live with a rock mat, beyond the Pinterest-perfect photos.
Here are some experience-based tips and insights to help you enjoy yours long term.
Lesson 1: Test height and comfort before you commit
One of the biggest surprises for many people is how different the mat feels depending on the stones you choose.
If your rocks are too tall or irregular, the mat can feel more like a balance challenge than a relaxing foot massage.
That’s why it’s smart to do a “comfort test” during the dry-fit stage. Lay out a small section of stones on the mat, step on it with bare feet, and shift your weight around.
If your first instinct is to hop off, pick flatter stones. If it feels like a gentle, grounding pressure, you’re on the right track.
A few extra minutes here can make the difference between a mat you use every day and one that becomes a pretty but unused prop.
Lesson 2: Embrace the weight – and plan where it lives
Rock mats are heavy. That’s part of their charm: they stay put, they don’t slide around, and they feel substantial. But it also means you probably won’t want to drag yours from room to room.
Before you glue a single stone, decide exactly where the mat will live most of the time.
If you have a walk-in shower, placing the mat just outside the entrance gives you a pleasant transition from water to stone to towel.
If the mat will be used by kids or guests, make sure it’s in an obvious spot where people will naturally step – you don’t want anyone tripping because they didn’t expect a textured surface.
Lesson 3: Make cleaning part of the ritual, not a chore
A spa-like bathroom isn’t just about how it looks; it’s also about how it feels to use and maintain. A rock mat does require a bit more care than a machine-washable fabric rug, but it doesn’t have to be difficult.
Treat rinsing the mat as part of your weekly reset. Maybe Sunday night is “mini spa night”: you light a candle, put on a face mask, and quickly rinse the mat in the shower afterward.
Let it drip-dry while you finish your routine. A little consistency keeps soap scum and dust from building up between the stones.
If you notice the mat taking longer to dry, prop it on its side or lean it against the tub so air can get underneath.
This simple habit prevents mustiness and keeps the stones looking clean and naturally beautiful.
Lesson 4: Customize for your household
Every household is different, and your rock mat should fit your lifestyle:
- For kids: Choose extra-smooth, low-profile stones and consider placing the mat where they can step on and off easily while holding onto a wall or vanity.
- For older adults or anyone with balance issues: Use the mat as a decorative accent near the tub or as a boot tray rather than the primary stepping surface.
- For pet owners: Cats and dogs may be curious at first. Most will ignore it after a while, but if you have a chewer, keep an eye on things until you’re sure they’re not interested.
The beauty of DIY is flexibility. You can make a smaller mat, use it in a lower-traffic area, or create a version that’s purely decorative if that suits your space best.
Lesson 5: Let the mat inspire bigger spa-like changes
A small project like this has a way of kick-starting a bigger transformation. Once you see how different your bathroom feels with one spa-inspired detail,
you might find yourself decluttering more, adding plants, swapping out harsh lighting, or even planning a new paint color.
The rock mat becomes a daily reminder that you’re allowed to create small, calming moments for yourself at home.
You don’t need a weekend trip to a resort to feel cared for – sometimes it’s as simple as stepping onto cool river stones, taking a deep breath, and enjoying the quiet.
Wrapping it up: your DIY rock mat spa moment
Creating a spa-like feel at home doesn’t have to be complicated or expensive. With a simple DIY rock mat, a few thoughtful styling choices, and a bit of intention,
your bathroom can go from “purely functional” to “mini retreat” in an afternoon.
Gather your mat, stones, and adhesive, queue up a favorite playlist, and treat this project like a creative break rather than another chore.
When you’re done, you’ll have more than just a bath mat – you’ll have a little slice of spa energy waiting for you every time you step out of the shower.


