Table of Contents >> Show >> Hide
- Before You Start: Inspect the Damage
- Tools and Materials You May Need
- Step 1: Clean the Chewed Area
- Step 2: Remove Loose Wood and Rough Splinters
- Step 3: Sand the Damaged Area
- Step 4: Choose the Right Repair Material
- Step 5: Tape Around the Repair
- Step 6: Apply the Filler or Epoxy
- Step 7: Rebuild the Shape of the Table Leg
- Step 8: Sand Smooth in Stages
- Step 9: Match the Color
- Step 10: Seal and Protect the Repair
- How to Repair Painted Table Legs
- How to Repair Stained Wood Table Legs
- How to Repair Deep Dog Bite Marks
- When Should You Replace the Table Leg?
- How to Stop Your Dog From Chewing the Table Again
- Common Mistakes to Avoid
- Real-Life Experience: What Actually Works When Repairing Dog-Chewed Table Legs
- Conclusion
Dogs bring joy, loyalty, comedy, and occasionally the artistic destruction of your furniture. If you walked into the dining room and found that your table leg now looks like it was attacked by a tiny beaver with emotional issues, take a deep breath. A dog-chewed table leg is frustrating, but in many cases, it is absolutely repairable.
The key is to look at the damage clearly, choose the right repair method, rebuild the missing wood, refinish the area, and then prevent your dog from turning the same leg into a sequel. Whether the damage is a few tooth marks, a deep gouge, or an entire corner chewed into a sad wooden stump, this guide walks you through how to repair dog chewed table legs in a practical, beginner-friendly way.
You do not need to be a master carpenter. You do need patience, sandpaper, filler or epoxy, a bit of color-matching courage, and the understanding that your dog is probably not sorry. Curious? Yes. Bored? Maybe. Sorry? Let’s not get carried away.
Before You Start: Inspect the Damage
Before grabbing filler and declaring war on the chew marks, inspect the table leg carefully. The right repair depends on how much wood is missing and whether the leg is still structurally sound.
Light Damage
Light damage includes shallow scratches, small tooth dents, and surface scuffs. These repairs are usually cosmetic. You may only need light sanding, a stain marker, wax fill stick, or a thin layer of stainable wood filler.
Moderate Damage
Moderate damage means visible gouges, rough edges, missing finish, and shallow chunks taken out of the leg. This is common when a dog gnaws a corner or lower edge. A wood filler, epoxy putty, or two-part wood repair compound usually works well here.
Severe Damage
Severe damage includes deep missing sections, a badly rounded leg profile, exposed joinery, cracks, wobbling, or a table leg that no longer supports weight properly. If the table is antique, valuable, or structurally compromised, consider calling a furniture repair professional. There is DIY confidence, and then there is “I accidentally made the table shorter” confidence.
Tools and Materials You May Need
You will not need every item on this list for every repair, but these are the most useful supplies for fixing chewed wood furniture:
- Wood cleaner or mild dish soap and water
- Clean cloths
- Painter’s tape
- Utility knife or small chisel
- Putty knife or plastic scraper
- Sandpaper in 80-, 120-, 150-, 180-, and 220-grit
- Stainable wood filler for small to medium repairs
- Two-part epoxy wood filler or epoxy putty for deeper repairs
- Wood hardener if the chewed area is soft or crumbly
- Stain marker, gel stain, or matching wood stain
- Paint, if the table leg is painted
- Clear topcoat, polyurethane, lacquer, or furniture wax
- Disposable gloves
- Dust mask and eye protection
Work in a ventilated space, especially when using solvent-based products, stains, or two-part fillers. Read product labels and cure times carefully. Your table leg needs to dry before use, and your dog should be kept away from the repair area until everything is fully cured and odor-free.
Step 1: Clean the Chewed Area
Start by cleaning the damaged section. Dog saliva, dirt, oils, old furniture polish, and loose finish can prevent filler from bonding properly. Wipe the area with a damp cloth and mild soap, then dry it thoroughly.
If the table has wax or polish buildup, use a suitable wood-safe cleaner. Avoid soaking the wood. A table leg is not a sponge, and water can raise the grain or make the damage worse. Once clean, let the leg dry fully before sanding or filling.
Step 2: Remove Loose Wood and Rough Splinters
Dog chewing often leaves torn fibers and sharp splinters. Use a utility knife, small chisel, or scraper to remove loose bits. Do not carve aggressively. Your goal is to create a stable surface, not audition for a chainsaw sculpture contest.
If any wood feels soft, crumbly, or punky, apply wood hardener before filling. Wood hardener helps strengthen weak fibers so the repair material has a firmer base. This is especially helpful if the table leg is older or if the dog chewed through finish into vulnerable wood.
Step 3: Sand the Damaged Area
Sand the chewed area to smooth ragged edges and help the filler grip. For rough damage, begin with 80- or 100-grit sandpaper. Feather the edges outward so the repair blends into the surrounding wood rather than sitting on top like a pancake.
After the rough shaping, move to 120- or 150-grit sandpaper. Always sand with the grain when possible. If the table leg is round, turned, or carved, wrap sandpaper around a dowel, pencil, or small foam block to follow the shape.
Wipe away dust with a clean cloth. Dust left in the gouge can weaken the repair and create a gritty finish.
Step 4: Choose the Right Repair Material
Not all fillers are created equal. Choosing the right one is the difference between a repair that disappears and a repair that looks like beige chewing gum stuck to a chair leg.
Use Wax Fill Sticks for Tiny Marks
Wax fill sticks or furniture repair crayons work well for small scratches, light tooth marks, and minor finish damage. They are fast and easy, but they are not ideal for rebuilding missing chunks because they remain softer than hardened filler.
Use Stainable Wood Filler for Small to Medium Gouges
Stainable wood filler is a good choice for shallow holes, small gouges, and missing finish on unfinished or lightly sanded wood. It can be sanded smooth and finished with stain or paint. For deeper damage, apply it in thin layers rather than one giant blob.
Use Two-Part Epoxy or High-Performance Filler for Deep Damage
If your dog removed a noticeable chunk from the table leg, a two-part epoxy wood filler or high-performance repair filler is usually stronger. These products cure hard, can often be shaped, sanded, carved, drilled, and painted, and are better for rebuilding missing corners or rounded profiles.
Use Wood Putty for Finished Surfaces Only
Traditional wood putty is often used after finishing, especially for small nail holes or minor blemishes. It usually does not harden the same way filler does, so it is not the best choice for rebuilding a chewed table leg.
Step 5: Tape Around the Repair
Apply painter’s tape around the damaged area to protect the surrounding finish. This keeps filler from spreading too far and reduces sanding later. Leave a small margin around the chew marks so you can feather the repair naturally.
For round table legs, tape may wrinkle. That is fine. The tape is there to protect, not win a beauty pageant.
Step 6: Apply the Filler or Epoxy
Use a putty knife, craft stick, or gloved finger to press filler firmly into the damage. Do not just smear it over the surface. Push it into the gouges so it bonds well.
Slightly overfill the area because most fillers shrink a little or need sanding after curing. If the damage is deeper than about one-quarter inch, build the repair in layers. Let each layer dry or cure according to the product instructions before applying the next.
For table legs with a rounded or carved profile, shape the filler while it is still workable. You can use a plastic scraper, old credit card, small file, or even a piece of cardboard cut to match the curve. The closer you shape it now, the less sanding you will do later.
Step 7: Rebuild the Shape of the Table Leg
This is the part where the repair starts looking less like damage control and more like furniture restoration. Study the undamaged side of the leg. Is it square? Round? Tapered? Turned with decorative rings?
For a square leg, use a sanding block to restore crisp edges. For a round leg, rotate the sandpaper around the leg evenly. For a carved or turned leg, use small files, folded sandpaper, or a dowel wrapped in sandpaper to recreate grooves and curves.
If a corner is missing, build it slightly larger than needed with epoxy filler, then sand it back into shape. Trying to make it perfect during the first application often leads to frustration. Build generously, then refine.
Step 8: Sand Smooth in Stages
Once the filler has fully cured, sand the repair. Start with 120-grit sandpaper if the area is rough. Move to 150-grit, then 180-grit, and finish with 220-grit for a smooth surface. Avoid sanding only the filler spot. Feather the repair into the surrounding area so the transition is invisible to the eye and hand.
Run your fingers over the leg. Your fingertips can detect ridges your eyes miss. If you feel a bump, keep sanding lightly. If you sand too far and expose a low spot, add another thin layer of filler and repeat the process.
Step 9: Match the Color
Color matching is often the trickiest part of repairing dog-chewed table legs. Wood changes color with age, light, finish, and species. The repaired area may accept stain differently than the original wood.
Test stain on a hidden area or scrap if possible. If the table is stained, start lighter than you think you need. You can darken a repair with additional coats, stain markers, glaze, or toner, but making a dark blotch lighter is much harder.
For painted table legs, the job is easier. Prime the repaired area if needed, then apply matching paint. If the paint is old, take a small chip or drawer part to a paint store for color matching.
Tips for Better Stain Matching
- Use a stain marker for tiny touch-ups.
- Use gel stain when you need more control on vertical surfaces.
- Blend several light coats instead of one heavy coat.
- Add darker color only in grain lines or low spots for a natural look.
- View the repair in daylight and room lighting before sealing.
Step 10: Seal and Protect the Repair
After the color looks right, apply a clear protective finish that matches the rest of the table. Common options include satin polyurethane, semi-gloss polyurethane, lacquer, shellac, or furniture wax. Use thin coats and let each coat dry fully.
If the original table leg has a glossy finish, you may need a shinier topcoat. If it has a soft, low-sheen finish, satin or matte may blend better. The goal is not just matching color; it is matching sheen. A perfect stain match can still stand out if the repaired patch shines like a tiny disco ball.
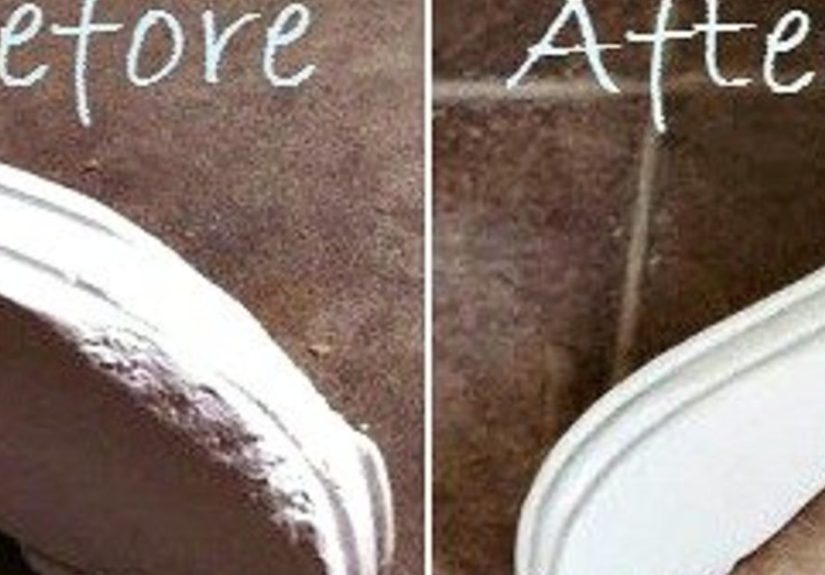
How to Repair Painted Table Legs
Painted furniture is often the easiest to repair because you do not have to match wood grain. Clean, sand, fill, shape, sand again, prime, and paint. For white, black, or solid-color furniture, a carefully repaired leg can look nearly new.
Use paintable wood filler or epoxy filler. After sanding smooth, apply primer to the repaired area. Primer helps prevent flashing, which is when one patch looks duller or shinier than the surrounding paint. Finish with two thin coats of paint for better durability.
How to Repair Stained Wood Table Legs
Stained wood requires more patience because filler does not always absorb stain exactly like natural wood. For small repairs, stainable wood filler may be enough. For larger repairs, consider layering color with stain markers, artist brushes, or glaze.
To imitate grain, use a fine brush or stain pen to draw subtle lines through the repair after the base color dries. Keep the lines irregular. Real wood grain does not look like it was drawn with a ruler by a nervous accountant.
How to Repair Deep Dog Bite Marks
Deep bite marks need a stronger approach. After cleaning and sanding, use a two-part epoxy wood filler or epoxy putty. Mix only what you can use within the working time. Press it into the missing area and shape it before it hardens.
Once cured, file and sand the patch until it matches the table leg. Deep repairs often need more than one round of filling and sanding. That is normal. Good furniture repair is more like sculpting than frosting a cupcake.
When Should You Replace the Table Leg?
Sometimes repair is not the best option. Replace the table leg if it is cracked through, badly weakened, wobbly at the joint, or missing a large structural section. Replacement may also be smarter if the table has simple removable legs that screw into mounting plates.
For antique, heirloom, or expensive furniture, consult a professional before replacing parts. Original components can affect value, and a repair expert may be able to conserve the leg better than a full replacement.
How to Stop Your Dog From Chewing the Table Again
Repairing the table is only half the mission. The other half is convincing your dog that furniture is not a snack category.
Understand Why Dogs Chew
Dogs chew because they explore the world with their mouths. Puppies chew during teething. Adult dogs may chew because of boredom, stress, anxiety, excess energy, or lack of appropriate chew options. Some dogs simply discover that table legs have an oddly satisfying texture, which is unfortunate for everyone except the dog.
Dog-Proof the Room
Block access to the repaired table while the finish cures. Use baby gates, closed doors, furniture barriers, or supervised access. If your dog has chewed the same leg more than once, assume it will happen again unless you change the environment.
Offer Better Chew Choices
Give your dog safe chew toys, puzzle toys, food-stuffed toys, or vet-approved chews. Rotate toys so they stay interesting. A bored dog will invent a hobby, and you may not enjoy its interior design opinions.
Use Bitter Spray Carefully
A pet-safe bitter deterrent spray may help make table legs less appealing. Test it first on a hidden area to make sure it does not damage the finish. Reapply as directed. Deterrents work best when paired with supervision and better chew alternatives.
Increase Exercise and Enrichment
Many chewing problems improve when dogs get more physical activity and mental stimulation. Walks, sniffing games, training sessions, puzzle feeders, and playtime can reduce destructive chewing. A tired dog is not automatically perfect, but it is usually less committed to carpentry.
Talk to a Veterinarian or Trainer
If chewing is sudden, extreme, anxious, or paired with swallowing wood, vomiting, drooling, appetite changes, or tooth pain, contact your veterinarian. If the behavior is persistent, a certified trainer or behavior professional can help create a safe, humane plan.
Common Mistakes to Avoid
Using the Wrong Filler
Soft putty is not ideal for rebuilding missing wood. Choose stainable filler for smaller repairs and epoxy or high-performance filler for deeper damage.
Skipping Surface Prep
Filler sticks better to clean, sanded, dust-free wood. If you apply filler over saliva, wax, dust, or loose fibers, the repair may fail.
Sanding Too Aggressively
Power sanders can flatten curves and erase details quickly. Use hand sanding for table legs, especially rounded or decorative ones.
Applying One Thick Glob of Filler
Deep gouges are best repaired in layers. Thick filler can shrink, crack, dry unevenly, or become harder to shape.
Forgetting the Sheen
A repair must match both color and shine. Always compare the final topcoat to the original finish.
Real-Life Experience: What Actually Works When Repairing Dog-Chewed Table Legs
The most useful lesson from repairing dog-chewed table legs is that the damage usually looks worse before it looks better. At first glance, a chewed leg can feel like a furniture emergency. There are tooth grooves, torn wood fibers, weird shadows, and maybe a guilty-looking dog avoiding eye contact from the hallway. But once you clean the area and remove loose splinters, the repair becomes less mysterious. You are not fixing “ruined furniture.” You are filling missing material, reshaping a profile, and blending a finish.
One practical experience that helps is taking a photo of the undamaged table legs before beginning. This gives you a visual guide for the shape, color, and sheen. When you are sanding filler on one damaged corner, it is surprisingly easy to forget what the leg is supposed to look like. A reference photo prevents over-sanding and helps you rebuild curves more naturally.
Another experience-based tip is to work slower than you want to. Many first-time repairs fail because the filler is rushed, the stain is applied too dark, or the finish is added before the repair is fully dry. Furniture repair rewards patience. Let the filler cure completely. Sand in stages. Test color in a hidden spot. Apply thin coats. The process feels slow, but it is much faster than redoing a blotchy repair that looks like a Band-Aid made of mud.
Color matching also teaches humility. Even “stainable” filler may not stain exactly like the surrounding wood. A good workaround is to get the base color close, then use a stain marker or fine artist brush to add subtle darker lines that mimic grain. On darker furniture, a slightly imperfect repair often disappears once the clear coat is applied. On lighter furniture, less color is usually better. Start pale and build slowly.
For painted table legs, the biggest improvement comes from primer. Without primer, the repaired section may flash through the paint as a dull or uneven patch. A small coat of primer over the sanded filler creates a more even surface and makes the final paint look intentional instead of suspicious.
Finally, the most important experience is this: do not repair the leg and immediately give the dog unsupervised access. Dogs often return to the same chew spot because it already smells familiar and has an interesting texture. Keep the repaired table blocked off, provide better chew options, and use a pet-safe deterrent if needed. The best repair is one you only have to do once.
Conclusion
Learning how to repair dog chewed table legs is part woodworking, part patience, and part accepting that dogs have questionable decorating instincts. For light damage, a touch-up marker, wax stick, or small amount of wood filler may be enough. For deeper gouges and missing corners, use a stronger filler or epoxy, rebuild the shape carefully, sand in stages, match the finish, and seal the repair.
Most importantly, prevent the next chewing episode. Give your dog better chew options, block access while the repair cures, add exercise and enrichment, and seek professional help if chewing seems anxiety-driven or medically concerning. With the right approach, your table can look respectable again, your dog can keep its adorable reputation, and your furniture can stop living in fear.
Note: If the table is antique, valuable, structurally unstable, or if your dog may have swallowed wood, finish, paint, or filler, contact a furniture repair professional or veterinarian before continuing.


