Table of Contents >> Show >> Hide
- Why Paper Picture Frames Are Still Worth Making
- Before You Start: Materials, Sizing, and Smart Choices
- Method 1: Make a Classic Layered Cardstock Window Frame
- Method 2: Make a Slotted-Corner Paper Picture Frame
- Method 3: Make an Upcycled Quilled Paper Picture Frame
- How to Make Your Paper Frame Look Better, Not Busier
- Photo-Safe Tips for Better Results
- Common Mistakes to Avoid
- Final Thoughts
- Extra Notes From Real Crafting Life: What Making Paper Picture Frames Actually Feels Like
- SEO Tags
If you have one photo, a pile of paper, and the stubborn belief that “I can totally make that myself,” congratulations: you are already emotionally prepared to make a paper picture frame. The beauty of this craft is that it’s cheap, customizable, and weirdly satisfying. One minute you’re trimming cardstock at the kitchen table, and the next minute you’re holding a handmade frame that looks charming enough to pass for a boutique gift-shop find. Or at least “boutique gift shop with excellent lighting.”
Paper picture frames are also wonderfully flexible. You can make one for a child’s drawing, a printed snapshot, a wedding table number, a dorm-room photo wall, a classroom display, or a last-minute handmade gift that looks far more thoughtful than the phrase “last-minute” deserves. Some styles are clean and modern. Others are playful and layered. And some are delightfully extra, which is where paper quilling strolls in wearing sequins.
In this guide, you’ll learn three ways to make a paper picture frame: a classic layered cardstock frame, a no-fuss slotted-corner frame, and a decorative upcycled quilled frame. Along the way, you’ll also get sizing tips, decorating ideas, and a few photo-safe pointers so your favorite print doesn’t end up glued into oblivion.
Why Paper Picture Frames Are Still Worth Making
There’s something refreshing about a craft that doesn’t require power tools, twelve specialty attachments, or a support group. A DIY paper picture frame is approachable for beginners, fun for kids, and polished enough for adults who want a handmade result that doesn’t scream “elementary school scissors incident.”
Paper frames are lightweight, inexpensive, and easy to coordinate with a room, event, or season. You can match them to party colors, holiday décor, nursery themes, or your favorite “I only decorate in calming neutral shades and emotional support beige” palette. They’re also excellent for upcycling. Cereal boxes, scrapbook paper, old calendars, magazine pages, and leftover cardstock can all become part of the final design.
Better yet, paper lets you experiment. Want a minimalist frame? Use white cardstock and a crisp border. Want something cheerful? Layer patterned paper. Want a dramatic, textured design? Add quilling, pleats, scalloped edges, or paper rosettes and let your inner maximalist stretch its legs.
Before You Start: Materials, Sizing, and Smart Choices
No matter which method you choose, start with the photo or artwork you want to frame. Measure it first. Then make your frame opening slightly smaller than the image area you want visible. This creates a neat border and helps hold everything in place. If your photo is 4-by-6 inches, for example, you might cut the window opening to about 3.5 by 5.5 inches.
For most projects, these supplies are enough:
- Cardstock, construction paper, scrapbook paper, or recycled boxboard
- Scissors or a craft knife
- Ruler and pencil
- Glue stick, craft glue, or double-sided tape
- Decorative extras like stickers, markers, washi tape, or paper scraps
If the photo is special or irreplaceable, upgrade your materials a bit. Choose acid-free paper or lignin-free cardstock when possible, and avoid putting glue directly on the front or back of the original print. Use photo corners or paper corner tabs instead. That tiny detail can make a surprisingly big difference when you want the image to stay in good condition.
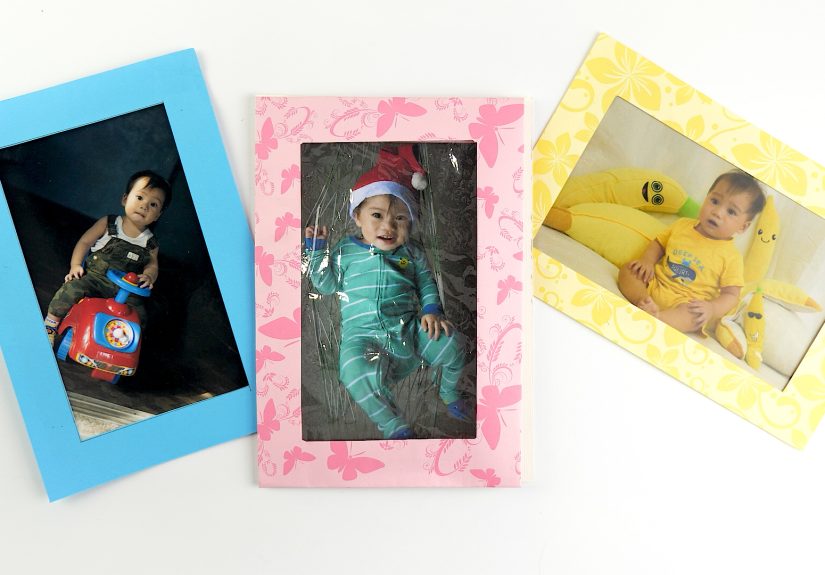
Method 1: Make a Classic Layered Cardstock Window Frame
Best for
Gifts, tabletop displays, gallery walls, holiday crafts, and anyone who likes a clean, polished look.
What You’ll Need
- 1 sheet of sturdy cardstock or lightweight chipboard for the back
- 1 sheet of decorative cardstock for the front
- Ruler, pencil, scissors, or craft knife
- Glue or double-sided tape
- Optional: ribbon, stickers, labels, paper flowers, or washi tape
How to Make It
First, cut the backing piece. Make it at least 1 inch larger than your photo on all sides. If your photo is 4 by 6 inches, a 6-by-8-inch backing is a comfortable size.
Next, cut a front panel the exact same size as the back. This front piece will become the visible frame. Draw a centered rectangle on it and cut out the middle to create a window. Keep the border even on all sides unless you want a more playful, asymmetrical look.
Now glue the front panel to the back panel along three sides only: left, right, and bottom. Leave the top open so you can slide the photo inside. This simple pocket-style construction works beautifully and keeps the frame easy to reuse.
Want it to stand up on a desk? Cut a narrow strip of cardstock, fold it into a triangle-like easel support, and glue one side to the back. For a hanging version, glue ribbon or twine to the back corners and call it wall-worthy.
Why This Method Works
This is the easiest cardstock photo frame for most people because it balances structure and style. The layered construction creates a true frame effect, and the pocket opening means you can switch out the picture later without performing surgery on your craft project.
Easy Ways to Customize It
- Use patterned scrapbook paper for the top layer
- Add a second, smaller frame layer for depth
- Round the corners for a softer look
- Use metallic pen lines around the opening for a faux-matted effect
- Add paper flowers, bows, stars, hearts, or seasonal cutouts
If you want a handmade frame that looks “put together” instead of “held together by hope,” this is your winner.
Method 2: Make a Slotted-Corner Paper Picture Frame
Best for
Quick crafts, greeting-card inserts, scrapbook pages, kids’ projects, and anyone who hates waiting for glue to dry.
What You’ll Need
- 1 sheet of cardstock or decorative paper
- Your photo or printed image
- Ruler and pencil
- Scissors or craft knife
- Optional backing sheet for extra strength
How to Make It
Cut a rectangle of paper larger than your photo. Then mark the area where the photo will sit. At each corner of that marked area, cut a small diagonal slit or pair of slits just big enough to hold the corners of the photo.
Slide the photo corners into the slits. That’s it. Really. The picture stays in place without glue on the image itself, which is part of the reason this method remains so practical.
If you want the frame to feel sturdier, glue the slotted sheet onto a thicker backing board after you cut the slits. Just avoid gluing over the slotted area. If you’re framing artwork instead of a photograph, you can also widen the border and decorate it with handwritten notes, a date, or a tiny caption.
Why This Method Works
This is the best method when you want a homemade photo frame that is fast, flexible, and photo-friendly. The slotted corners hold the print mechanically instead of permanently. That means fewer regrets and much less muttering.
Design Ideas
- Use map paper, sheet music, or old calendar pages
- Stamp or doodle around the border
- Layer the slotted panel on a contrasting background
- Add a fold-out card back to turn it into a handmade gift insert
- Create a series of matching frames for a mini photo set
This method is also excellent for classrooms and party crafts because it’s forgiving. Even if the slits aren’t perfect, the photo usually hides the evidence. A true hero.
Method 3: Make an Upcycled Quilled Paper Picture Frame
Best for
Decorative gifts, statement pieces, crafty weekends, and anyone ready to turn “paper frame” into “paper frame, but make it fabulous.”
What You’ll Need
- An empty cereal box or lightweight cardboard
- Construction paper or quilling strips
- Scissors
- Craft glue
- Straw, skewer, toothpick, or quilling tool
- Paint or markers for the base frame
How to Make It
Cut a frame shape from the cereal box. Paint or cover the base with paper first so the finished frame has a solid background color. Then cut strips of colored paper. Roll each strip around a straw, skewer, or quilling tool and secure the end with glue. Make enough coils, teardrops, scrolls, or spirals to decorate the border.
Once your paper shapes are dry, glue them onto the frame. You can cover the entire border for a rich textured look, or cluster the quilling in just the corners for something more subtle. When everything is dry, attach a paper backing or pocket so the photo can slide in from the side or top.
Why This Method Works
It turns a simple paper photo frame craft into a display piece. The recycled cardboard base adds strength, while the quilled paper adds dimension and color. It’s the sort of project that looks surprisingly expensive even though one of the main ingredients used to hold breakfast cereal last Tuesday.
Ways to Style It
- Use monochrome quilling for a modern look
- Choose floral colors for Mother’s Day or spring décor
- Use book-page strips for a literary theme
- Add tiny pearls, sequins, or gold accents for a dressier finish
- Mix newspaper and colored paper for an artsy upcycled look
How to Make Your Paper Frame Look Better, Not Busier
One of the biggest mistakes in paper crafting is confusing “decorated” with “attacked.” A beautiful frame usually has one focal idea. Maybe it’s layered pastel paper. Maybe it’s bold stripes. Maybe it’s quilled flowers in one corner. Once you pick the main style, let it breathe.
Use contrast wisely. If your photo is colorful, choose a simpler frame. If the photo is black-and-white, a brighter border can look stunning. If the frame includes pattern, keep the embellishments limited. Not every square inch needs a sticker. Your glue stick may disagree, but you are in charge.
Also pay attention to proportion. A thick border can make a tiny photo feel intentional and gallery-like. A very thin border feels modern and crisp. Neither is wrong; they just create different moods.
Photo-Safe Tips for Better Results
If the image matters, treat the frame like more than décor. Use acid-free or photo-safe materials whenever possible. Avoid “magnetic” sticky album pages and don’t glue the original print directly to the frame if you can help it. Photo corners, folded paper tabs, or a pocket-style frame are smarter choices.
For everyday craft projects, basic cardstock is usually fine. For heirloom photos, wedding prints, baby pictures, old family snapshots, or anything you’d cry about if it yellowed, it’s worth choosing better materials. Conservation-minded papers and boards are designed to be gentler on photographs and paper items over time.
Another smart move: keep the photo removable. That way you can replace it, clean the frame, or rescue the print later if needed. Crafting is fun. Regret is not a supply category.
Common Mistakes to Avoid
- Cutting the window too large: the photo may slip through or look awkwardly exposed.
- Using flimsy paper only: the frame bends unless it has a sturdier backing.
- Adding too much glue: warped paper is never the aesthetic goal.
- Skipping a ruler: “eyeballing it” is brave, but not always rewarding.
- Decorating before test-fitting the photo: measure first, embellish second, celebrate third.
Final Thoughts
Learning how to make a paper picture frame is one of those rare crafts that gives you a useful result without a giant learning curve. You can keep it simple with layered cardstock, go practical with slotted corners, or lean into texture and drama with an upcycled quilled design. Each method has its own charm, and all three prove that paper is a lot more versatile than it gets credit for.
So the next time you print a favorite photo, finish a child’s drawing, or need a handmade gift that feels personal, skip the generic store-bought frame and make one yourself. It’s inexpensive, creative, and just customizable enough to make you feel extremely capable. Which, frankly, is one of the best side effects of crafting.
Extra Notes From Real Crafting Life: What Making Paper Picture Frames Actually Feels Like
The funny thing about making a paper picture frame is that it sounds almost too simple at first. You think, “It’s paper. It’s a rectangle. I’ve met rectangles before. This will be easy.” Then you sit down with scissors, a ruler, and ambitious confidence, and suddenly you care very deeply about whether your border is 1 inch or 1.125 inches. That’s the moment the craft has you.
My favorite part of making paper frames is how quickly the project becomes personal. The frame stops being just a frame and starts becoming part of the memory. A bright patterned border changes the mood of a goofy family snapshot. A clean white cardstock frame makes a child’s drawing feel like gallery art. A layered floral design can turn an ordinary printed photo into something gift-worthy. It’s a small project, but it carries surprising emotional weight.
I’ve also learned that paper frames are excellent for people who want creativity without a massive commitment. You do not need a whole craft room. You do not need expensive equipment. You need paper, a flat surface, and enough patience to cut a straight line while resisting the urge to “just trim a little more” until the frame opening is mysteriously the size of a garage door.
There’s also a very satisfying rhythm to the process. Measure, cut, test-fit, adjust, decorate. It’s repetitive in the best way. If you’ve had a noisy week, making a paper frame can feel surprisingly calming. The hands stay busy, the brain gets focused, and for a little while the only major decision in life is whether this frame wants gold dots or striped washi tape.
And then there’s the reveal. Sliding the photo into place changes everything. A pile of paper scraps suddenly becomes an object with purpose. That transformation is probably why people keep returning to crafts like this. You start with flat materials and end with something that displays a memory, marks a season, or makes a gift feel genuinely thoughtful.
Paper picture frames are also one of the easiest ways to experiment without fear. If a design flops, you haven’t ruined a pricey material. You can cut another piece. Try another color. Start over with less drama and more snacks. That freedom makes the craft approachable, especially for beginners or anyone crafting with kids.
Most of all, I love that paper frames don’t pretend to be perfect. They look handmade, and that’s the point. The tiny quirks, the layered textures, the slightly uneven edge that only you notice at midnight under one specific lamp; all of that gives the frame character. It feels human. In a world full of mass-produced décor, that charm goes a long way.
So yes, a paper picture frame is a simple craft. But it’s also a clever little reminder that beautiful things do not always need fancy materials, huge budgets, or advanced skills. Sometimes they just need paper, patience, and a photo worth showing off.


