Table of Contents >> Show >> Hide
- Before You Start: The 60-Second Gear Check
- Way 1: Straight Into the Amp Input (The Classic “Just Play” Setup)
- Way 2: Connect Through Pedals (More Sounds, Same Amp Input)
- Way 3: Plug Into the FX Return / Power Amp In (Bypass the Amp’s Preamp)
- Fast Troubleshooting: Fix the 8 Most Common Problems
- Real-World Experiences: What Players Learn After the First “Why Is Everything Buzzing?” Moment
- Conclusion: Choose the Connection That Matches Your Playing
Plugging an electric guitar into a combo amp sounds like the kind of task that should come with two steps:
(1) Plug it in. (2) Become a rock legend. And honestly? You’re not far off. But there are a few
“small” detailslike using the right cable, choosing the right jack, and not accidentally routing your
pristine tone through the sonic equivalent of a microwavethat can make the difference between
“sweet sustain” and “why does it sound like angry bees?”
This guide covers three real-world ways to connect an electric guitar to a combo amp, from the classic
straight-in setup to more flexible rigs that use pedals and an amp’s effects return. Along the way you’ll
get practical settings, troubleshooting tips, and examples so you can spend less time staring at jacks and
more time actually playing.
Before You Start: The 60-Second Gear Check
What you need (minimum)
- Electric guitar (working output jack, volume knob not at zeroask me how I know)
- Combo amp (powered off or volume down before connecting)
- One 1/4" instrument cable (TS)a regular “guitar cable”
What you should not use
-
A speaker cable as your guitar-to-amp cable. Speaker cables are built differently and can
introduce noise when used for low-level instrument signals. -
A mystery cable you found in a drawer that may or may not have survived a decade of being
used as a lasso.
Quick safety + sanity rules
- Volume down first. Start with the amp’s volume low (and gain modest) before you strum.
-
Plug order that reduces pops: many players plug the cable into the amp first, then the guitar.
If your cable has a “silent” plug or mute switch, even better. -
Don’t yank the cable out by the wire. Grab the plug. Your future self will thank you when your
output jack isn’t held together by vibes and hope.
Way 1: Straight Into the Amp Input (The Classic “Just Play” Setup)
This is the most commonand still the most reliableway to connect an electric guitar to a combo amp:
guitar → instrument cable → amp input. It’s simple, quiet (when your cable is decent), and it works
with basically every combo amp ever made.
Step-by-step
- Turn the amp volume down (and gain down if your amp has it).
- Plug one end of your 1/4" instrument (TS) cable into your guitar’s output jack.
- Plug the other end into the amp’s Input (usually on the front panel; sometimes top-mounted).
- Power on the amp. If it’s a tube combo with standby: power on, wait a moment, then take it off standby.
- Bring up volume slowly. Then adjust gain (if available), and finally shape tone with EQ.
Which input jack do I use: High/Low, 1/2, or “Bright”?
Some combos have two inputs (often labeled High/Low or Input 1/Input 2).
The “high” input is typically the normal choice for most guitars. The “low” input can be useful if you have
very hot pickups or you’re slamming the front end and want a little more headroom.
Example starting settings (so you don’t start at “Chainsaw”)
- Clean-ish foundation: Gain 2–4, Volume to taste, Bass 4, Mid 5, Treble 5.
- Edge-of-breakup: Gain 4–6, Volume to taste, Bass 4, Mid 6, Treble 5.
- High-gain: Gain 6–8 (start lower!), Bass 4–6, Mid 3–6, Treble 4–6, plus noise gate if needed.
Why this works so well
Your guitar pickups output a relatively low-level signal. A proper instrument cable is shielded to keep hum
and interference down, and the amp’s input is built to “receive” that instrument signal and boost it through
the preamp and power amp stages.
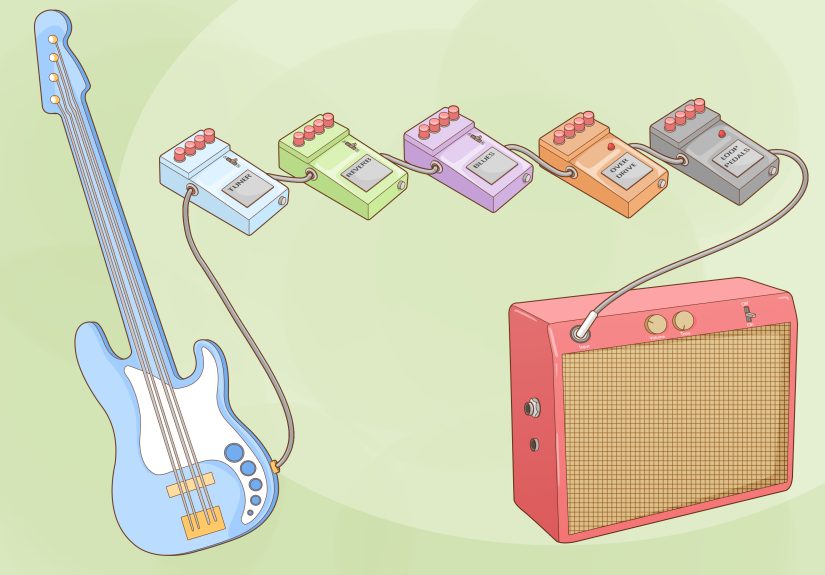
Way 2: Connect Through Pedals (More Sounds, Same Amp Input)
If Way 1 is “vanilla ice cream,” Way 2 is “vanilla ice cream… with hot fudge, cookie dough, and a legally
questionable amount of sprinkles.” You still plug into the amp’s main input, but you place pedals in
between to shape tone, add effects, and control dynamics.
The basic chain looks like this: guitar → pedals → amp input.
This setup is ideal for players who get their main drive sounds from pedals (overdrive, distortion, fuzz)
and use the amp as a clean or slightly breaking-up platform.
Step-by-step
- Turn the amp volume down.
- Plug your guitar into the first pedal’s Input.
- Connect pedals with short patch cables: Output → Input down the line.
- From the last pedal’s Output, run a normal instrument cable into the amp’s Input.
- Power your pedals (isolated supply is great; batteries work; daisy chains are… a mood).
- Bring volume up slowly and balance pedal levels so turning effects on doesn’t cause surprise volume blasts.
A practical pedal order (that won’t start a comment war)
- Tuner (first is convenient)
- Wah / filter (often early, before heavy gain)
- Compressor (early for leveling; later for sustainyour call)
- Overdrive / distortion / fuzz (gain stages)
- Modulation (chorus, phaser, flanger)
- Delay
- Reverb (often last)
Common “why does it sound bad?” fixes
-
Too much noise: Try shorter cables, better shielding, and keep power supplies away from audio
cables. Also, reduce gainyes, even if it hurts emotionally. -
Thin tone: Check if a pedal is flipping phase or using a “bright” setting, and make sure your amp’s
EQ isn’t scooped into oblivion. - Volume jumps: Match each pedal’s output so “on” equals “off” unless you want a boost for solos.
Pro tip: Use your amp’s effects loop (if you have one) for cleaner delays and reverbs
Many combo amps include an effects loop (usually on the back) with jacks labeled
Send and Return. This loop sits between the amp’s preamp and power amp, which means
time-based effects like delay and reverb can stay clearerespecially if your amp’s preamp is providing the
distortion.
A simple loop hookup looks like this: FX Send → effects input, then
effects output → FX Return. If your amp has loop level controls (or your effects have input/output
level settings), start conservative and bring levels up gradually.
Way 3: Plug Into the FX Return / Power Amp In (Bypass the Amp’s Preamp)
This is the “secret menu” method that becomes incredibly useful once you have a
multi-effects unit, amp modeler, or preamp pedal that you want to be the “brains” of your tone.
Instead of going into the amp’s normal input, you connect to the amp’s FX Return (sometimes labeled
Power Amp In).
In plain English: you’re using the combo as a powered speakeryour external device provides the tone shaping,
and the combo’s power amp and speaker do the loud part.
When this method is a win
- You have an amp modeler/preamp pedal you love and want it to be the main tone.
- You want consistent sound across different amps (rehearsal space, backline, friends’ garages).
- You want to avoid “double EQ” (modeler EQ + amp preamp EQ fighting each other).
Step-by-step
- Turn the amp’s master volume way down. Seriously. Treat this like opening a soda that’s been shaken.
- Connect your guitar to your modeler/preamp input (or run your pedal chain into it).
- Run a cable from the modeler/preamp Output to the amp’s FX Return / Power Amp In.
- Power on everything. Bring up the amp’s master volume slowly, then adjust your modeler/preamp output level.
-
If your modeler has cabinet simulation, try both ways:
- Cab sim ON can sound dark/muffled through a guitar speaker on some rigs.
- Cab sim OFF is often more natural into a guitar combo’s speaker.
Common gotchas (and how to avoid them)
-
It’s suddenly extremely loud: Your modeler/preamp output might be hot. Lower its output,
then raise the combo’s master carefully. -
It sounds “weird” or overly processed: Turn off extra amp/cab blocks in your modeler, or use
a “preamp” model instead of a full amp model if available. - Your amp EQ knobs do nothing: That’s normalthose knobs are usually in the preamp you just bypassed.
Where a wireless system fits in (without changing the method)
Wireless doesn’t replace these three methodsit replaces the first cable. In other words, the wireless receiver’s
output goes where your guitar cable would normally go: the amp input (Way 1/2) or your pedal/modeler input (Way 3).
Set the receiver output appropriately and keep your levels under control.
Fast Troubleshooting: Fix the 8 Most Common Problems
1) No sound at all
- Check the guitar volume knob (yes, really).
- Try a different cable. Instrument cables fail more often than people admit.
- Confirm you’re in the amp’s Input (or the FX Return if you’re doing Way 3).
- Bypass pedals: guitar straight to amp input. If that works, the issue is in the pedal chain.
2) Loud hum or buzz
- Move away from fluorescent lights, dimmers, and power bricks.
- Use a quality, shielded instrument cable and keep it away from power cords.
- Try a different outlet if you suspect grounding issues (safelyno DIY electrical heroics).
3) Crackling when you move the cable
- Clean the guitar output jack and amp input (contact cleaner made for electronics).
- Replace the cable if it crackles when wiggled near the plug.
4) Thin, weak sound
- Make sure you’re not accidentally using a stereo (TRS) output incorrectly on a device that expects TS.
- Check pickup selector position and tone knob settings.
- If using Way 3, try turning off cab simulation or switching output modes on your modeler.
5) Pops when plugging in
- Turn volume down before connecting/disconnecting.
- Consider a cable with a silent plug or mute your tuner/pedal before swapping.
6) Delay/reverb sounds messy with amp distortion
- Move delay/reverb into the effects loop (Way 2 tip) so repeats aren’t being distorted by the preamp.
7) FX loop sounds too loud/too quiet
- Some loops run at different signal levels. Adjust pedal/modeler input/output levels and any loop level controls.
8) Your cable keeps getting yanked out mid-song
- Route the cable through your strap (or use a cable retainer). Your output jack will live longer.
Real-World Experiences: What Players Learn After the First “Why Is Everything Buzzing?” Moment
The first time I “upgraded” my setup, I did what many players do: I added more gear without adding more patience.
I went from one cable to a pedalboard the size of a small runway, then wondered why my amp suddenly had the
background ambience of a neon-lit convenience store. The fix wasn’t mysticaljust practical: I separated power
supplies from audio cables, shortened a few runs, and swapped a bargain cable that behaved like an antenna.
Lesson one: noise problems are usually systems problems, not “your guitar hates you” problems.
Another recurring experience: setting levels. With Way 2 (pedals into the front input), it’s tempting to treat every
pedal like a “more” button. More gain, more output, more everything. But a combo amp’s input can only handle so much
before your tone turns into fizzy congestion. The best approach I’ve seenespecially for newer playersis to pick one
“always on” foundation sound and then add one effect at a time. Dial your amp clean-ish and loud enough to feel alive,
then bring in your overdrive. After that, add modulation, then delay, then reverb. If you add everything at once, you’ll
spend your evening troubleshooting and your cat will learn new words.
Way 3 (into the FX Return/Power Amp In) is the method that surprises people the most. The first time you hear your
modeler or preamp pedal through the return jack, you realize how much the amp’s preamp can “color” your soundsometimes
for the better, sometimes like it’s wearing a filter you didn’t ask for. I’ve watched players plug a modeler into the
normal amp input, get a harsh or boxy tone, and conclude “modelers aren’t for me.” Then they try the return jack and
suddenly the sound opens up. The flip side is volume: a hot output device into a return can jump in level fast. The
practical habit is simple: amp master down, device output down, then slowly bring them up together until it’s loud but
controlled.
Live gigs add their own flavor. Cables get stepped on. Plugs get bumped. Someone will trip over somethingit’s basically
a law of physics. The players who have the calmest nights are the ones who plan for that chaos: they use right-angle
plugs where it prevents strain, they route cables through straps or along the edge of pedalboards, and they keep one
spare instrument cable in the bag (not in the car, not at homein the bag). And if you go wireless, it’s still wise
to keep a cable as a backup. Wireless is freedom right up until a battery dies at the exact moment you start your solo.
The biggest mindset shift I’ve seen is this: “connecting” isn’t just about making soundit’s about making
repeatable sound. Once you find a setup that gives you the tone you want at a comfortable volume, take a photo of
your amp knobs, note your pedal levels, and keep that as your baseline. Then you can experiment without getting lost.
Great tone isn’t fragileit’s just organized.
Conclusion: Choose the Connection That Matches Your Playing
If you want the simplest, most dependable setup, go with Way 1: guitar straight into the amp input with a proper
instrument cable. If you want more tones and effects, Way 2 gives you flexibility while keeping the familiar amp input
workflow (and the effects loop can be a game-changer for delays and reverbs). And if you’re building a rig around a modeler
or preamp pedal, Way 3plugging into the FX Return/Power Amp Incan deliver cleaner, more consistent results by bypassing
the amp’s preamp.
Whichever method you pick, the golden rule stays the same: start quiet, build levels slowly, and use the right cables for the job.
Your ears (and your speakers) will appreciate the professionalismeven if your riffs are still in their “early draft” phase.


